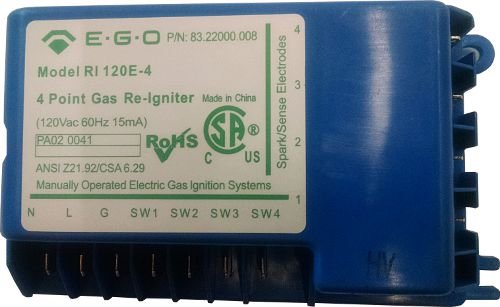
PA020041 Viking Appliance Tytronics 0+4 Spark Module
J**B
Wire connections may vary
Replacing this module involves working with an appliance that uses flammable gas and electricity. If you are comfortable doing this, you may well be OK - if not, you might want to call a trained service person. If all the comments below do not make sense to you - call the service person!I used this to replace a PA020013 module on my Viking range. The module installed fairly well. The mounting holes were slightly off for one screw but I was able to install using a screw with a slightly smaller head but having the same thread.The module has labels that indicate which wires go where. Take note of the connections on the old module. I moved wires one at time from the old to new module. Wire colors should make sense to you before you start moving them. On mine, there were the ground (green), line (black) and neutral (white) plus 4 red switch wire coming from the burner knobs and 4 white burner spark ignition wires going out to the burners. The spark supply terminals on this module were in a different order compared to my original module.When a burner is turned on all burners connected to the module get a spark. When the burner ignites, the path resistance changes so that the module senses ignition on that burner and turns off the sparking. If the burner ignition wire is on the wrong terminal this will not happen. Understanding this makes it easy to find the correct terminal. Here is a sketch of the procedure I used. See if this makes sense for you. Do not try to turn on any burner until all parts are in their original position. I did however leave the metal module cover off until I had the correct wire connections in place. Be careful to not scuff the wires where they enter the metal module cover.Finding the correct burner terminals:1. Best to unplug the stove before this step! Hook up an ignition wire to the module - doing this one at a time is easier.2. Plug in the stove. Use the burner knob to turn on the burner. Make sure you use the right knob for that burner or gas will be supplied to the wrong burner and it will not be properly ignited - smelly and potentially dangerous!3a. If the burner ignites and the igniter spark stops, great!, go on to step 1 for another burner.3b. If the burner ignites but the igniter keeps sparking, turn off the burner. Go back to step 1. You need to move the igniter wire to a different terminal on the module.On my stove, I found it easier to install the module if I released one of the mounting plates (by removing a screw) that holds two of the burners and moved the plate (and burners) out of the way. The plate MUST be reinstalled before testing the burners or else gas will be released into the room - smelly and dangerous!Hope this helps - BE SAFE. I felt comfortable doing this, but I have experience with this kind of stuff. I spent some time writing this up in order to help you be safe, but Darwin awards are always a possibility!
D**R
Instant fix for continuous sparking / failed flame sensor
Took about 30 minutes to install on my 2003 era Viking range. The 1234 order of the white wires to the burners was reversed from the unit previously installed in my range - so swap 4321 for 1234 when installing if this is also your case. Instantly fixed the non stop sparking for one of my burners where the flame sensor had stopped working in the old unit. Exact same part is $350 from viking and available new as cheaply as $140 on ebay. Note EGO and Defendi and Tytronics labels on these units are all the exact same company making this part.
J**J
Worked for Viking VGIC365 (2006). Had to reorder white wires & screw holes didn't line up with OEM
I used this part for Viking model VGIC365-6BSS (2004). The problem was the four burners on the right were not sparking. Taking out the old part meant 1) removing the screw that holds in the far-right burners and then lifting them up out of the way and then removing the screws on the metal casing around the spark module. I carefully swapped the wires, careful not to change the order. Putting it back together was simple, except you need to make sure the burner's gas feed lines are lined up (they are close to the front - you'll see them). My issue was that once complete the module kept sparking. I looked at other reviews and someone recommended reordering the white wires on the left (so instead of 1234 make them 4321). That solved the problem. The only other issue was that this replacement's screw holes did not line up with the old one, but I was able to make it fit.
C**O
Works great for Viking Vgrc 485 6
The original unit began to fail when the oven below it was hot, and it returned to normal function when the oven cooled.Then it stopped working altogether. The symptom is you get no spark across the multiple burners that it feeds.Photo here is the original unit that failed and was replaced by new unit from Amazon.The old/new units are physically laid out differently (their terminals are in different locations) but you just swap each wire to its terminal as marked (SW1 for SW1, Ground for Ground, etc. etc.) and it works great. Note this unit only provides spark for up to four burners. On my six burner range there are two units… This one handles six burners and a second unit handles two.
D**S
Had to have two of them for my Viking 6 burner.
Pretty expensive for what they are. Easy to install if you pay attention.
R**2
Works like a champ!
Works exactly fine! Was a bit skeptical about buying as it’s not the original that came with the stove 15years ago, but was delighted that it appears to be great build quality and works perfectly.
J**L
No more using a lighter.
Viking VGRC 485. Burners would not work This stove is over 20 years old and the part does look different but does work great. Yes, the wires hook to different spots on the side. I attached a picture that explains.
B**L
Works great- watch wiring order.
Viking VGCR 485 wasn’t sparking on two right burners. Installed this and sparks returned. However they wouldn’t stop sparking! Spent a lot of time troubleshooting only to figure out the original terminals 1-4 are reversed to 4-1 on the replacement. Inverted the wire order and problem solved.
Trustpilot
1 month ago
3 weeks ago