


🎛️ Mix Like a Pro, Anywhere You Go!
The Zoom LiveTrak L6 is a compact, battery-powered 10-track digital mixer and recorder delivering professional-grade 32-bit float audio quality at 48 kHz. Lightweight and portable, it offers up to 7 hours of lithium battery life and versatile connectivity with 12 input channels, making it perfect for musicians, podcasters, and live streamers seeking studio-quality sound on the move.


| Item Weight | 1.7 Pounds |
| Connectivity Technology | USB |
| Number of Channels | 10 |
| Audio Input | XLR/TRS Combo, TRS |
| Power Source | Battery Powered |
W**D
Awesome little mixer!
Awesomely engineered. Fun to mix with. Intuitive and sounds great.
G**R
High marks if you want a compact mixer with basic multitrack recording
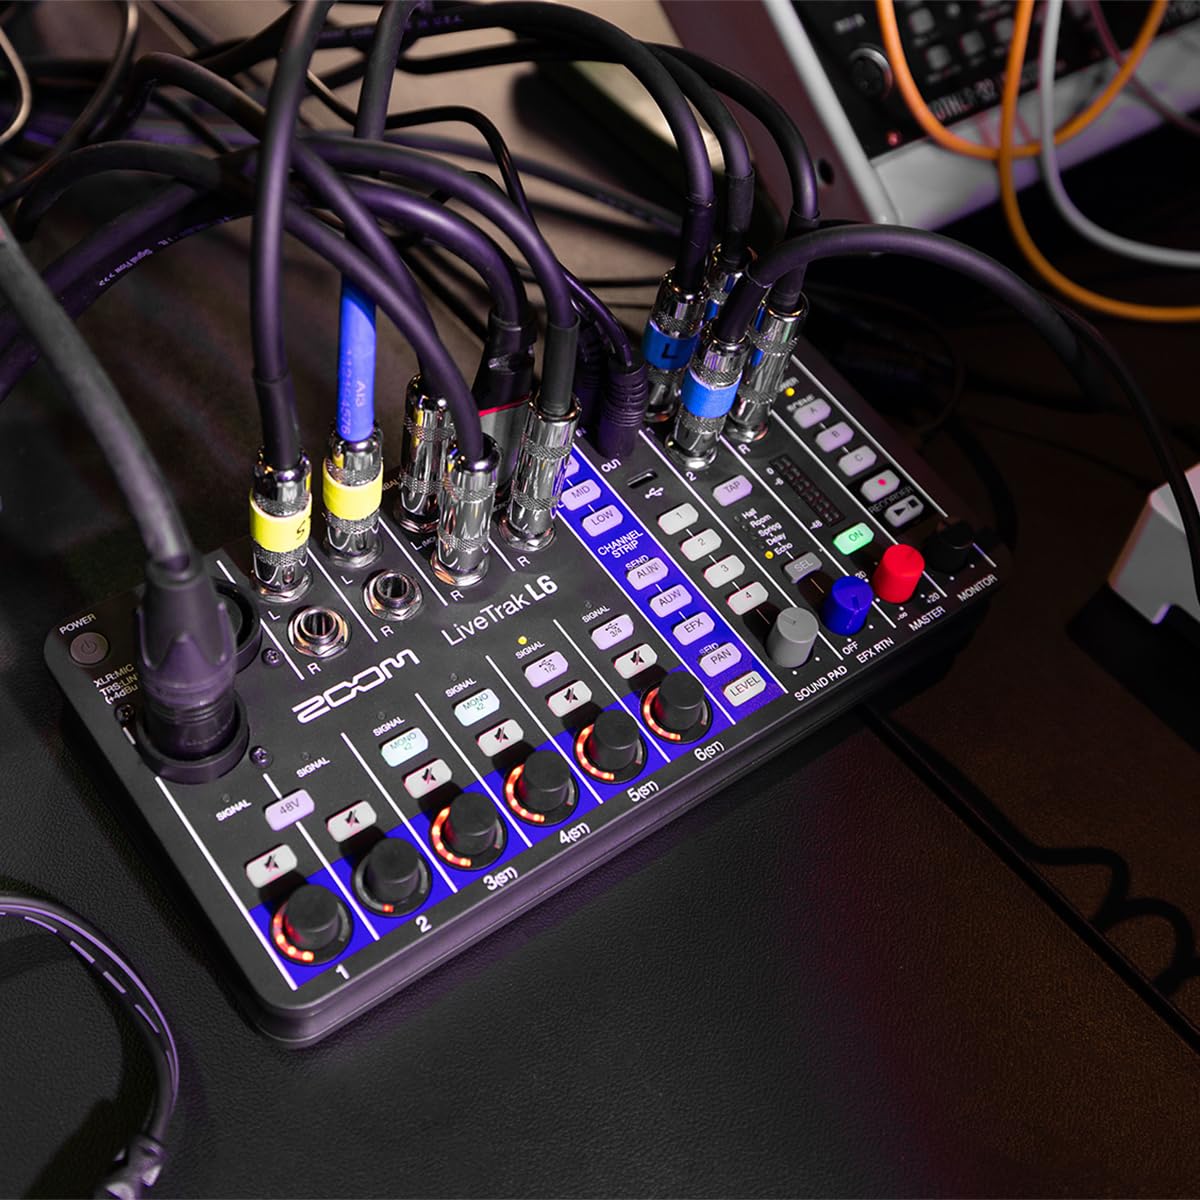
The Zoom LiveTrak L-6 is a compact mixing board that can also serve as a stand-alone 32-bit multitrack recorder. It offers most of the necessary features that you probably need in a mixing board/recorder hybrid unit, but it doesn’t provide some of the more advanced features that you might want from Zoom’s comparable L-8, -12, and -20 lineup, or in Tascam’s Model 12.QUICK OVERVIEWThe Zoom L-6 is first and foremost a compact mixer. Everything is managed through a minimalist interface that has you manipulating sound via the encoders at the bottom of the 6 channels in conjunction with the buttons down the center blue channel strip of the device. Since the L-6 does not have an LCD or OLED screen, the controls and features are not complex. Everything is immediately accessible. As a multitrack recorder, the L-6 “just works” by inserting a microSD card and hitting the RECORDER button which results in a project folder being automatically created and populated with WAV files for each of the individual channels plus the stereo master. While the compact form factor and variety of inputs can work for any kind of musician, or even podcasters, the L-6 works best for the musicians who love compact synthesizers but don’t need the features or price tags of a Bluebox or a TX-6. For more detailed information, search my name in YT for a first impressions summary of the L-6 along with specific tutorials.HARDWAREThe L-6 is compact and probably smaller than you think. The length and width of the L-6 is almost one Roland Aira plus one Pocket Operator squished together. The shell is mostly hard plastic with a slight offset tilt to it so that the face and inputs are subtly angled toward the user. There are rubber pads on the bottom that keep the unit in place on a desk. There are two XLR -1/4” mono combo input jacks for channels 1 and 2. Channels 3-6 feature ¼” L and R input jacks to send stereo sound to those channels. There are 6 encoders at the bottom left of the device that adjust all of the parameters for each channel. The encoders have a polished top with a textured feel on the sides. While those encoders are small, they have a weight to their smooth 360 degree turning action that lets you precisely dial in your adjustments. Each encoder has a tiny semi-circle orange LED strip around it so that the more you turn the encoders clockwise, the more they light up to give you some visual feedback to your adjustments. The gummy rubber buttons in the middle and right of the L-6 are predictably mushy, but responsive enough. They light up after you press them. There are two ¼” AUX outs, two ¼” jacks for L and R master out, and a ¼” stereo jack for the headphone out. There is a door to insert a microSD card on the side of the unit, right next to a USB-C port. There is also a USB-C port on the face of the unit in the middle. Even though it’s mostly plastic, the L-6 feels dense and fairly durable if you take care of it. I think the materials are adequate for the price.POWERThe L-6’s calling card is its compact design, so it works well both on a crowded desk or on the go. Your myriad options to power the device fit that versatile mold as well. The L-6 comes with a USB-A to USB-C cable and a wall adapter. You can use those to power the device via the side USB-C port. Or you can use a USB battery bank to power the L-6 via the USB-C port (see picture). Or you can install 4 AA batteries into the bottom. Or you can connect it to an iPad or computer via the USB-C port on the face of the unit to power it. I don’t get any line hum when using any of those powering methods. However, I sometimes get line hum if I try to power the L-6 with a USB cable that is plugged into a multi-port USB power tap that is also charging other devices at the same time.INPUTSIf you want to plug in a bunch of mics, the L-6 is probably not your ideal mixing board because it only has those two combo jacks to accommodate XLR plugs. There is an option to provide 48V phantom power to those two inputs, but phantom power is all or nothing for the two inputs, you cannot apply phantom power to only input 1 and not 2. Channels 1 and 2 are mono while channels 3-6 are stereo. The L-6 features 32-bit float digital architecture, which means it offers a very large digital dynamic range from soft sounds to incredibly loud sounds. As such, there are no gain adjustments for the inputs to be set by the user. Inputs 1 and 2 have two different analog to digital converters that will automatically switch inside the unit. So if you are capturing soft whispers with a mic in input 1, that will use the high gain preamp inside channel 1. But if you also record a loud cymbal crash with a mic in input 2, that channel will automatically use the low gain preamp. The inputs that feed into channels 3-6 only feature a single preamp inside. I think everything sounds clean and the preamps work well. You can also use the USB-C port on the face of the device to send digital audio to channel 5 or 6. This works if you want to add some sound from a phone or tablet. You just need to push the “USB” button above the encoder on channel 5 or channel 6 to route the sound there. There is also a 3.5mm TRS MIDI IN and MIDI OUT on the upper part of the L-6’s face.I should quickly note that there are no Hi-Z inputs on the L-6, so musicians who only play electric guitar or bass with passive pickups will likely want to pass on the L-6, or be forced to always run their guitar through a pedal or preamp first.MIXING BOARD USAGEThere are no faders or channel strips for the individual channels like you might see on a traditional mixing board, or on the much larger Model 12. Instead, the L-6 stays compact by having a single channel control strip down the center of the unit. To adjust the levels (akin to having faders) for each channel, first you need to press the gummy LEVEL button on the central channel strip to light it up and activate it. When LEVEL is active, each of the 6 encoders can be used to independently adjust the levels of the mix for the channels and the LED light that’s wrapped around the encoders will light up more and more as you increase the volume. The trade-off is that the L-6 lacks -dB markings. The other parameter adjustments work the same way. There is a 3 band EQ to adjust boosts or cuts for low, medium, and high frequencies. However, there is an extra button that will allow you to first change which mid frequencies are being targeted, then you can touch the MID button and adjust the boost or cut to that MID frequency. Thus, it’s a sweepable MID adjustment. You can also adjust panning and effect levels for each channel.To the right of the central channel strip are a list of 5 effects that you can apply. There is a tiny LED light next to the name of the effect and you can cycle through them by pressing the effect button. You get 3 reverbs, a delay, and an echo. There is a knob at the bottom of the effect strip that allows you to adjust the level of the effect send, and then you can go back and adjust the effect level for each individual channel. Only one effect can be active at any time, but you can keep the effect level at zero for any individual channel where you don’t want the effect to be applied. There is a master volume control knob and a headphone volume control knob on the lower right of the unit. There are tiny LED lights to give you some visual feedback about the master out levels with -dB markings on the side of it. There is also a COMP button to apply a master compressor as the last thing that can alter the sound before it goes out the master out and headphone out. The compressor isn’t adjustable, but it does squeeze the high end a bit while giving everything underneath it a noticeable push. It tends to result in at least a 2dB increase in overall volume that comes with that extra punch.There is a MUTE button above the encoders. Any individual track can be instantly muted by pressing that button to turn the mute on or off.The L-6 also features AUX 1 and AUX 2 outputs. Both of those ¼” jacks can accept TRS cables to send balanced signals to a PA or preamp, but the sound is only summed mono and it’s sent out of the tip of those cables. You can also plug in a TS cable to send the sound unbalanced. In the blue central strip there are AUX1 and AUX 2 buttons that you can activate and then use the encoders to send sound from any of the channels to those AUX outs. It gives you some more flexibility to use your board, and you can use an AUX out to set up an external effects send to route a signal through an effects pedal and then back in a different input/channel on the L-6.While you can’t immediately control EQ and panning and fader levels for all the channels instantly because the L-6 lacks those dedicated controls for each channel, I still find it relatively quick and intuitive to make my adjustments with the central channel strip and encoders. It’s better than I thought it would be and the upshot is that the device gets to be very compact because of it.SCENESThere are A, B, and C scene buttons on the right side of the L-6. They will store a digital scene of your mix that you can recall at a later time. However, it only records the digitally adjusted information to a scene, which is all the stuff that happens with the channel encoders plus the effect type. The knobs on the right side are not digital encoders, so a scene will not store your headphone volume, for example.MULTITRACK RECORDINGThe L-6 offers simple, straightforward multitrack recording. You’ll need a microSD card to record directly on the device, but it can be an inexpensive class 10 V30 card and it should work fine. The L-6 will format your card (to exFAT if it’s over 32GB) so you can start using it. To record, you simply hit the REC button. Once you do, the L-6 will create a new project folder with a time and date stamp as the folder name and it will fill the folder with .WAV files for each of the separate tracks and the stereo master. Recording stops when you hit the REC button to unlight it.There are some important things to note about this simple, no frills recording approach. First, all of the individual channels are recorded dry. That means you won’t hear any EQ, panning, or effects applied to those WAV files on the SD card. In contrast, the stereo master WAV file will have all of those parameters applied to the sound, though. Second, each time you hit REC the L-6 will record ALL of the tracks. It doesn’t matter if you only had one instrument plugged into input 1. All of the channels will still get separately recorded WAV files to go with that master WAV file. There is no way to arm and disarm individual tracks. Third, channels 1 and 2 are recorded as mono WAV files, while channels 3-6 are recorded as stereo WAV files. However, you can hit the MONO button above the encoders for either channel 3 or 4 and the L-6 will split your R and L signals to record them as mono WAV files. You need to hit the MONO button before recording, though. If you activate the MONO button during the recording it won’t work and you’ll end up with a stereo WAV file for that channel in your folder.After you record something on the L-6 you can play back your most recent recording. But the L-6 will play back the master WAV file, so you can’t make adjustments to your mix during playback. Additionally, there is no overdubbing with the L-6, which means you can’t record a drum machine and guitar first, then hit stop, then record a bass on a separate track, then hit stop, then record a synth on a separate track. It doesn’t work because there is no LCD screen on the L-6 to manage projects and folders. Every time you hit REC a new folder is created on the SD card, so there’s no way for the L-6 to work within a folder that already exists.All the WAV files are recorded at 32-bit with a 48kHz sample rate. I think they are quality recordings when I move the SD card over to my computer and play them back there. This has been the first time I’ve really used 32-bit recordings, though, and if you do take advantage of that very wide dynamic range, you likely will have to spend some time normalizing your mixes on a computer later to bring up those incredibly soft sounds while bringing down the really loud sounds so you can hear everything during playback on a variety of devices and speakers. The 32-bit recordings allow you to do that without introducing digital artifacts.COMPANION APPAt the time of writing this review there is an PC/Mac app that provides more nuanced control over the L-6. You have to download the app from the ZOOM website and install the software on your computer. If you are using Windows you’ll likely also need to install the included 32-bit drivers. After you install the software, you can connect your L-6 to your computer via the USB-C cable to the middle face of the device. That should also provide power to the L-6. The app is incredibly basic and feels like a simple single page of a web browser almost. But you can see the internal time and date for the device (which is used to create folders on the microSD card), as well as a host of other features. Through the app you can slightly adjust 2 parameters for each L-6 effect – usually a rate and a level. You can also set the AUX outs to be pre or post fader. The most extensive set of controls can allow you to map MIDI CC values to control certain parameters (like EQ settings) using a combination of a MIDI controller feeding signals into the MIDI IN port. In the app you can also set the MIDI OUT to be an OUT or a THRU.A MIDI clock signal can be sent to the L-6 to synch the tempo of the delay or echo effects to the tempo of your MIDI controller. However, please note that you cannot use the L-6 to synchronize any synths or drum machines through the MIDI out by sending clock or click signals. There is no capability to do that.SOUND PADSThere are 4 sound pads in the center of the L-6. You can record sound directly to a sound pad by holding one of the pads while holding REC. Or you can drop .WAV files into the Sound Pad folder of the SD card, but those files need to be 48kHz .WAV files (bit rate doesn’t have to be 32-bit). With the companion app you can choose to have the sound pads play a one-shot, an endless loop, or to keep playing while depressed. The audio from the sound pads does not feed into any individual channel, but instead that audio gets mixed into the master out sound. There is a gray knob to adjust the volume of the sound pad playback, but that same volume adjustment applies to any of the four pads you hit.INTERFACEThe L-6 will work as an interface, but I haven’t been able to truly push it as a 10 in 4 out interface. For starters, when I plug it into an iOS device, the iPad or iPhone can power the L-6 through the single USB cable, but I can only get 2in 2out interface functionality. With a PC, I haven’t really gotten the 10 in and 4 out to work, but I haven’t fully tested it with all the inputs being used. I think it can work acceptably as a 2in 2out interface, but anything beyond that might benefit from some firmware updates and drivers. Again, you have to think as the L-6 as a mixing board first, a basic multitrack recorder second, and an interface as a distant third.SUMMARYThe L-6 is not a universal mixing board that will work for everyone. If you need a lot of XLR inputs, it’s not for you. If you want a mixing board that allows overdubbing so you can build songs one track at a time, the L-6 is not for you. But if you have a crowded desk filled with synths and the occasional mic, the L-6 might be a good fit for you. If you also want the ability to take a compact mixing board on the go for live shows, the L-6 gets even better for you. And if you have all those needs and also like the ability to easily record your live show, the L-6 is a 5-star perfect fit. In a perfect world the L-6 would offer some kind of click synch control for compact synths, and maybe one of the channels could have featured 3.5mm inputs for maximum versatility, but those are minor gripes for the faction of people who want the basic mixing and recording features the L-6 offers in a compact form factor. If you fully understand the strengths and weaknesses of the L-6 and you still think it's a good fit for you, then you'll probably think it's 4 or 5 stars. It's been really solid for my needs and met almost all of my expectations, hence my 4 star rating.
A**R
Perfect for my needs
I'm really happy with this. It's tiny, it runs in batteries or USB power, and it has a *lot* of stereo inputs. A lot of other mixers have a bunch of mono guitar or mic inputs and not enough stereo inputs.It has a lot of functionality that is a little buried in the interface, but I usually don't have to mess with that on the fly and it's easy enough to learn where things are.When I got it I had some trouble with line nose, but then I figured out that I was running all my usb-powered equipment from the same power source, and different sources or ground loop isolators would sort that out no problem.
D**Y
THE MINI-MIXER OF MY DREAMS
This is a work of engineering art. The perfect desktop mini-mixer for home studios for small setups like mine. The recorder is a bonus making it a great demo scratch pad, and an easy pop it in your bag solutions for simple live audio capture.
T**O
Si estás pensando demasiado detente no lo hagas más. Pon en el carrito y dale a comprar
The media could not be loaded. La Zoom LiveTrak L6 es una mezcladora todo en uno perfecta para grabar, transmitir en vivo o hacer música. Puedes conectar micrófonos, instrumentos o incluso tu computadora y controlar el volumen de cada cosa por separado. Tiene botones para darle más graves, agudos o efectos como eco o reverb. Además, puedes grabar todo directamente en una memoria sin necesidad de usar una computadora. También tiene salidas para parlantes, audífonos y hasta para mandar mezclas distintas a otras personas. Es fácil de usar, compacta y está hecha para que todo suene bien sin complicarte la vida. Ideal para podcast, música en vivo, contenido digital y mucho más.
J**N
Size and USB power make this unit worth every penny
I like it. I was going to buy a mackie onyx mixer and after some shenanigans with the first ones of those that I got, i started looking at some other solutions. the l6 popped up on my radar and I'm glad that it did. my favorite things about it are it's size and bus/battery power. I haven't tried out the effects or sample playback capabilities, but honestly it's worth the price for the aforementioned features alone along with having reasonable transparent channels. I'm using it to mix my hardware synth gear with my daw which it is perfect for.
J**S
Pleasantly surprised with the quality!
Very happy with this Zoom L6 mixer, the sound quality is excellent and the features are really cool.
P**R
Groovy lil' mixer
Excellent small mixer. If I don't feel like going into the main studio, I use it as a secondary mixer for small setups on my desk.
Trustpilot
2 weeks ago
1 week ago