Desert Online General Trading LLC
Dubai, United Arab Emirates
Desert Online General Trading LLC
Dubai, United Arab Emirates


✨ Elevate Your Hair Game with the FrizzFighter! ✨
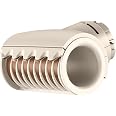
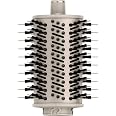
The Shark XSKHD4PA FlexStyle FrizzFighter Finishing Tool is a specialized attachment designed for the Shark FlexStyle HD400 Series. It utilizes advanced Coanda technology to effortlessly smooth flyaways and combat frizz, ensuring a high-shine finish on various hair types without the risk of heat damage.


B**E
It WORKS even on my toughest frizz section — but be aware of a few things
Pros:I have no idea why, but whenever I finish styling my hair, the left side of my head ALWAYS ends up with at least some frizz.I figured I’d try this attachment but half-expected to be sending it back, because no matter how hard I try, I haven’t been able to get that frizz to go away via other methods.This actually worked, to my amazement. That’s why despite any cons, I have to give it 5 stars. It does its job on a part of my hair I have never been able to tame before.Cons:1. So loud. Louder than any other Shark attachment I have somehow. It must be the way the air pushes through. I keep earplugs with my hair styling supplies, and I definitely recommend using earplugs for this attachment (honestly all Shark tools are loud, but this one especially).1. Doesn’t work for me for the top of my head. GREAT for that side-of-head frizz. But those pieces that stand up on top? I have not been able to get it t do a thing for those. Maybe someone more experienced could, but it did not work for those top parts at ALL for me, so if you’re buying it for that, I would say don’t.1. Lastly, the attachment is hotter than other attachments when you take it off, so just be careful. What I mean by that is, other attachments all seem to have a clear spot you can grab them where they’re not hot, and this one doesn’t. I think just because it’s so compact. It’s not a huge deal, just be careful.Tips:1. Keep earplugs handy where you store this attachment if you have any ear sensitivity at all.2. Try to grab it by the short end where the attachment goes in to take it out, the rest will be very hot.3. Use full air, full heat settings on this — these are Shark’s recommended settings for this, I watched a few videos to find out lol — but don’t press it into your head, just lightly use it on the outside, close enough for the hair to sort of attach, otherwise it will be too hot. And there’s no need to press it in, it works great just touching the hair.
B**E
Frizz-Fighting Must Have!
The Frizz Fighter attachment for the Shark FlexStyle is such a game changer! It smooths out flyaways effortlessly and gives a sleek finish without needing to pull out a flat iron. It’s the perfect alternative to a straightener when you just want to tame frizz and keep your hair looking polished. Super easy to use and way less damaging—definitely a new favorite in my hair routine!
J**S
Works well to take out frizz on my hair
I bought this as a separate purchase as it doesn't come with any standard package. I have thinning hair and because of this I tend to use thickening shampoos. This can cause my hair to get a bit frizzy. This works well to smooth out my hair. It is fairly easy to use once you get the hang of installing it on the dryer and using it a few times. I use it on a fairly high heat level and it doesn't burn me or dry out my hair or scalp. It doesn't take too long to dry my entire head, but I do let my hair dry naturally until it's about 80 % done. I guess you could just dry your hair with the regular dryer until it's just barely damp and put on the smoother if you don't have time to wait for natural drying. It's a bit bulky so it does take a bit of dexterity. All in all I am happy with the purchase though it is a bit pricey.
S**D
Newest attachment needed to try
The media could not be loaded. I get a lot of little fly-aways and saw the new Frizz Fighter attachment and decided it was worth a try. I watched a few videos on youtube and they showed the results and I thought it was something that I did struggle with. Most of the reviews didn't actually show how to use it so I took a few videos and hopefully it will help others. I am really happy with the results. It says to do it after your hair is dry and styled so that's what I did. I took a few videos throughout the process so you can see how much of a difference it made for me. I do use products in my hair but at the very end when it is time to use the frizz fighter I was done with all my products and just used the shark attachment. I am very happy with the results. There are directions on the top of the attachment that show you the direction it attaches and how to direct it through your hair. You are not feeling like a fish out of water. It even has little pictures.
C**E
Handy Smoothing Attachment For Your FlexStyle
I love my FlexStyle (like REALLY love it). My daughter and I both have dense, naturally wavy hair, and we use this dryer-and its attachments-to create smooth, frizz-less blowouts. Typically, we start with the concentrator nozzle to get the hair 60% (ish) dry. Then, we begin with sections, starting from the bottom, blowing out each section with the round brush attachment, using light tension until we reach the crown. From there, we reattach the concentrator nozzle and make sure we’ve dried any additional moisture, which is clutch for making sure your blowout doesn’t revert to a frizz bomb an hour later.Enter this smoothing attachment. I bought this after I’d had my FlexStyle for about a year, mostly out of curiosity. I wanted to see if it really added any additional benefit.The deets:-Once we’ve completed that last drying step mentioned above (popping on the concentrator nozzle one last time to clear out any extra moisture), we’ve been adding this attachment and using it as the final step in our blowouts.-Honestly? I’m pleasantly surprised. Gently applying the smoother with light pressure to the roots, then dragging it down the ends in even strokes, does indeed smooth out any remaining frizzy spots along the hair cuticle, and seems to eliminate fly-aways. It’s become the new final step in our blowout jam.Two tips:1. There’s a sticker on the attachment indicating which side needs to be facing the ceiling when you use it (and we always use this with the FlexStyle bent in the “L” position, as opposed to straight, because…who actually has arms that long?). I’d recommend NOT removing that sticker. It’s easy to attach the smoother with the incorrect orientation. So keep it on there to make sure you’re lined up correctly.2. After you’re all done with your blowout, rub a drop or two of your favorite hair oil into your palms and work it into your ends to seal your handiwork. And voila! Super-model hair!
Trustpilot
1 month ago
2 months ago