
DOWNLOAD THE APP


Customer Services
Copyright © 2025 Desertcart Holdings Limited
DOWNLOAD THE APP


⚡ Light up your ride, lead the pack!
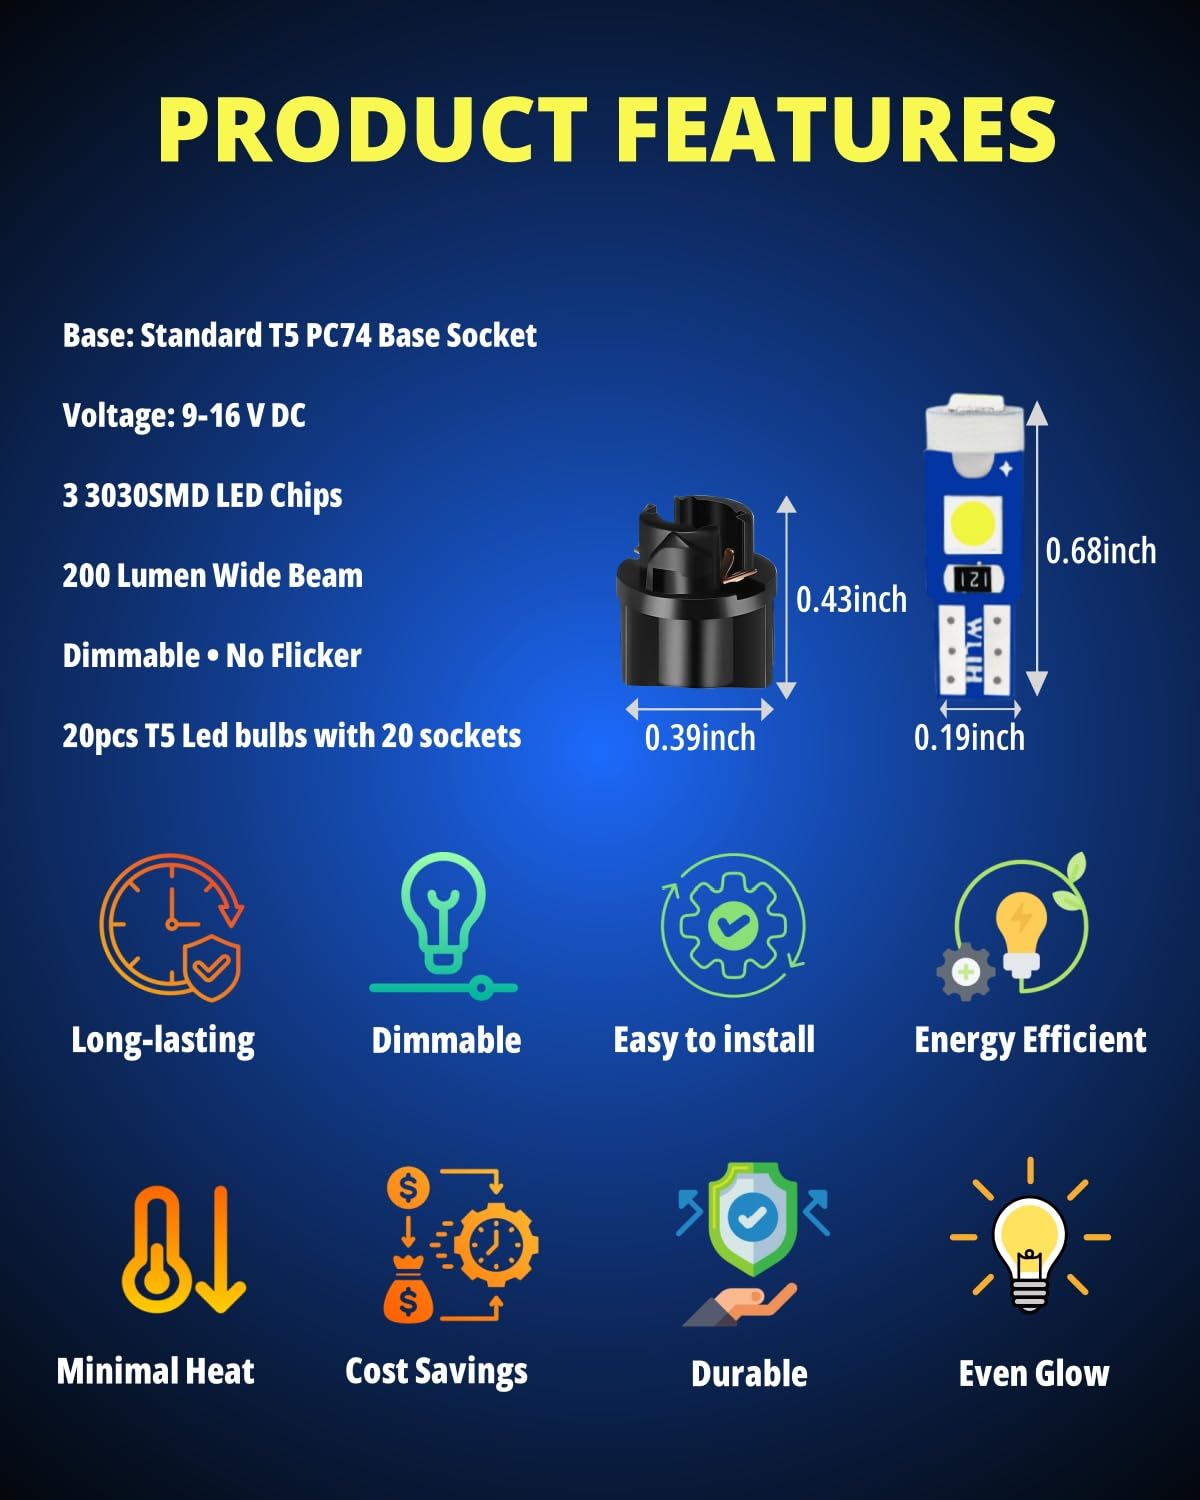
The WLJH 74 LED Bulb Dash Lights pack 20 ultra-bright, energy-efficient T5 wedge bulbs designed for automotive instrument panels. Featuring 3-directional 3030 SMD LEDs delivering 100 lumens at just 1.5W, these bulbs offer superior brightness and longevity (up to 60,000 hours). Compatible with a wide range of T5 sockets, they install easily with a twist-lock base and come with a 2-year warranty, making them the smart upgrade for any millennial professional’s vehicle dash.


| ASIN | B07S7D16CH |
| Best Sellers Rank | #72,941 in Automotive ( See Top 100 in Automotive ) #9 in Car Electrical Light Kit |
| Brand | WLJH |
| Bulb Type | LED |
| Customer Reviews | 4.2 4.2 out of 5 stars (3,673) |
| Date First Available | 1 January 2024 |
| Exterior | Polished |
| Item Weight | 32 g |
| Manufacturer | WLJH |
| Manufacturer Part Number | JM091620W |
| Manufacturer reference | JM091620W |
| OEM Part Number | Gloeilamp T5 - 17 18 37 70 73 74 79 85 86 2721 206 207 286 306 307 308 406 407 2721 27 37 58 70 79 85 86 |
| Position | Front Center |
| Product Dimensions | 2.08 x 0.51 x 1.07 cm; 32 g |
| Voltage | 12 Volts |
| Wattage | 1 watts |
G**E
tres bien
S**I
Ho acquistato queste eccellenti lampadine per sostituire quelle montate su di una vecchia moto di un amico e devo dire che sono davvero eccellenti. Rispetto ad altre hanno a mio avviso un grosso vantaggio: dispongono infatti di due gruppi di Led. Quelli "in testa" ideali per illuminare direttamente attraverso il cruscotto e quelle sui lati per illuminare anche sui lati del quadro. Ottimo venditore al pari del prodotto.
S**F
Easy to install, great results.
A**R
Very happy 👍
S**7
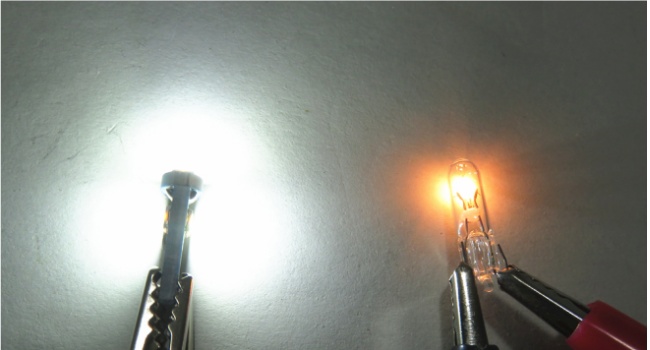
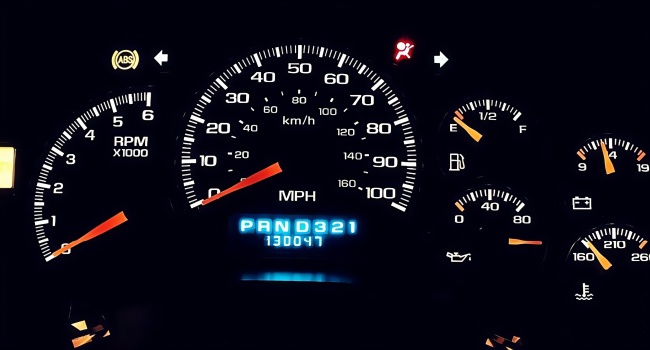
#103 Bulbs are $6.99 per pair and to replace a pair that is burned out costs the same as a kit that will do your complete instrument cluster and if you have to remove the cluster to change two bulbs then you might as well replace them all as generally once a bulb in car goes out the rest follow over the next few months. This creates an opportunity for an upgrade and improvement, Plus LEDS come in array of colors so you can go all Xhibit and Pimp Yo' ride! of course you could just want to do it as upgrade, it's easy enough! I chose Blue because it matched my stereo decks lighting (hey we all have our reasons) and wasn't disappointed at all. although my pics may not do it justice as I am a no photographer. Old greenishe factory Picture 1. Bright, very visual and aesthetically pleasing Picture 2 original factory dash and if you turn on your daytime running lights the blue shows well in daylight! although my pics don't do it justice. *Since I was already at it, I also put in a white instrument overlay and painted the instrument needles fluorescent rd picture 3. I mean since I was already working on it as it is and that was only a few steps more. This is above and beyond not related this product* Best of all, it's unlikely you'll ever need to change the LEDS again unless of course you keep the vehicle 20 plus years... ***I am not mechanic and this not mechanic's advice, just how I did it. follow at your own risk, results may vary, I am not in any way responsible for your decisions *** On a 2004 Jeep grand Cherokee you'll need a phillips head screwdriver , a needle nose plier and a sharpie. There are youtube videos that show how to do this also.. Step one: Remove plastic cover surround between the steering column and the cluster this is done by hand. Step 2: Remove the four screws that holding the cluster two below and two above. Step 3: Pull cluster out and remove , then unplug the power cord. Step 5 Remove old bulb clips and bulbs using a needle nose turn half of turn ( I suggest cleaning the contacts with alcohol and a Qtip) Step 5: Install LED bulbs in the clips and then back into cluster. Once all complete onto Step 6: Plug in power and turn on lights, any that didn't light up put and X with a sharpie on the back. Just relax this is not so bad Step 7. remove unlit bulbs and then remove them from the clip socket and rotate 180 degrees, the LEDs are polarity sensitive and this will correct any that didn't light. Slightly frustrating but still you've had worse outcomes and this manageable. Step 8 : Plug in check again, If all are lit. Step 9: Reinstall the cluster, screw the cluster back in place and replace plastic cover surround between the steering column and the cluster
Trustpilot
3 weeks ago
2 weeks ago