


🔥 Elevate your Raspberry Pi game with the ultimate 4-inch touchscreen companion!
The Miuzei 4-inch IPS touchscreen is a compact, high-performance monitor designed specifically for Raspberry Pi 4 models (2GB/4GB/8GB). Featuring an 800x480 resolution at 60 FPS, it supports HDMI input/output with audio, and offers precise resistive touch functionality compatible with major OS like Raspbian and Ubuntu. The included transparent case, copper heatsinks, and cooling fan ensure your Pi stays cool and stylish during intensive tasks, making it ideal for portable projects, gaming consoles, and real-time monitoring.


| ASIN | B07XBVF1C9 |
| Best Sellers Rank | #127,912 in Computers ( See Top 100 in Computers ) #3,039 in Computer Monitors |
| Brand | Miuzei |
| Color | orange |
| Customer Reviews | 4.0 4.0 out of 5 stars (1,126) |
| Date First Available | 15 September 2019 |
| Item Weight | 141 g |
| Item model number | raspberry pi 4 monitor |
| Manufacturer | Miuzei |
| Number of HDMI Ports | 1 |
| Number of USB 2.0 Ports | 1 |
| Package Dimensions | 18.01 x 15.29 x 3.71 cm; 141 g |
| Power Source | DC |
| Processor Count | 1 |
| Resolution | 800*480 Pixels |
| Screen Resolution | 800*480 |
| Series | MC21-4 |
| Standing screen display size | 4 Inches |
| Voltage | 5 Volts |
T**Y
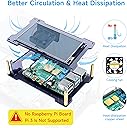
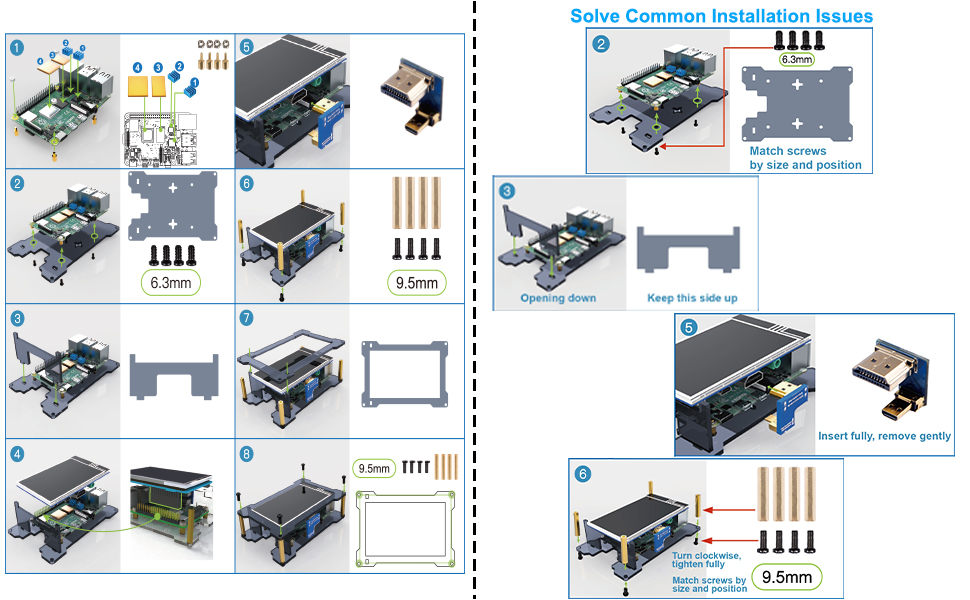
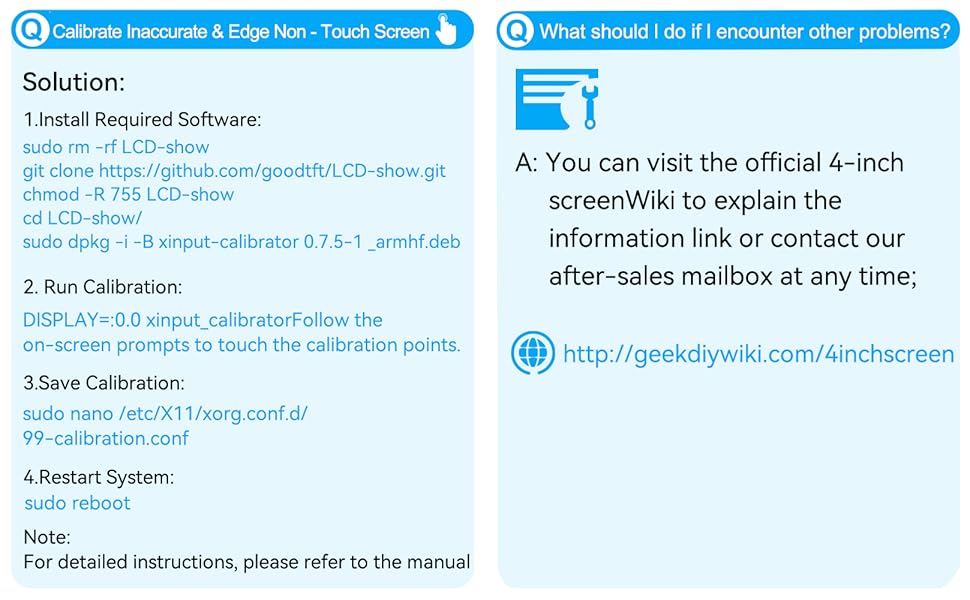
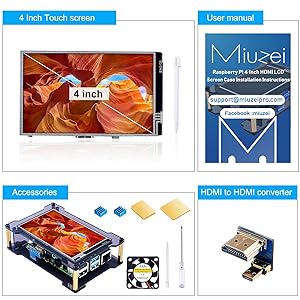
Most microcontrollers are used in a headless configuration, meaning once the initial configuration is done, there is little need for visual monitoring or feedback. However there are times when you need that monitor such as a network monitor, remote access (when there isn’t a wifi or computer to connect to), or portable applications (gaming, car ODB2, robots, etc.) This is when a small touch screen would come in handy. Hence the 4” Miuzei touch screen kit. It comes with a 800x400 touch screen, pen, HDMI “jumper”, four head sinks, 3 black acrylic pieces for a supporting case and mounting hardware. Assembly was very easy. The screen sits on the Ethernet/USB 3 ports and one of the acrylic pieces. A small HDMI jumper connects the HDMI full size port to the first HDMI mini on the Pi4. There is a small button that is used to control the backlight. I wanted to see how fresh install would be so using the website provided on the instruction card, so I downloaded the new Raspbian Buster with the touch screen driver already installed. After booting up the screen came up and I was able to use the pen on the screen. No issues what so ever. A few clicks later after configuring for WiFi, time zone, and keyboard, it was fully up and running. I would suggest that if you have something already up and running that you back up the image first before trying to install the driver. The screen is bright and viewable from almost all angles. You may have to run a pen calibration program depending far off the pen is from the contact of the screen. It should be noted that the screen can be used with any other device with an HDMI output. You will need an HDMI cable and a 5 volt USB power supplier to power the screen. Also the connector used for the touch screen uses 26 of the 40 GPIO pins. Being of the mind set of wanting to improve things, I can see three things that would be of benefit: 1) Adding a fan for cooling of the heat sinks and better air flow. 2) Access to the connector’s GPIO (if they aren’t used.) 3) A right angle header to have access to the other pins, including the 3.3 and 5.0 volt pins. This is a great kit. I like this a lot. It’s going to be used quite a bit. This really makes me want to build make a RetroPi game console, among other things.
N**H
Pictures are pi5 8gb I have bought similar minimalist touchscreen kits and by far this is the best you will get when it comes to overall quality. Not just the precision of the cut acrylic, but the hardware that they chose to include, the screen is very good despite what you read saying otherwise (it's 4 inches wide and $30, don't expect 4k resolution) but you will be able to read and do what ever is required with this screen. Another plus is it's a great case for passive cooling. Aesthetically, this thing looks so awesome with the transparent plastic/circuitry combo that I crave from my childhood inspired by Nintendo consoles and handhelds alike. The only negatives I have are that I can't turn the display off completely. Touch is inverted with the way I have it standing in my pictures which is how it will stay. (Which might be fixable but I'm just not smart enough to do that yet). If this is the kind of kit your looking for, buy this one.
E**7
I got the RasPi 4b to run ham radio apps in the field. You don't need a screen on the RasPi to do this; connecting with a Remote Desktop App on your phone shows a full high res screen on the phone. But it gets kind of tricky to do when you're away from your home Wifi so I like to have a screen display. The IPS display is beautiful. I ding it for the screen blinking and needing to power cycle on reboots. Please notice that I've rotated the screen so that my Pi can stand up on it's case. The default is with the cables on the bottom. There's a setting in Preferences>Screen Configuration that allows you to change it to any of the four rotations. Right click on the screen, change the setting then click the check box. I'm not giving step by step instruction but I'll share where things are and what they are called. Hopefully that's enough for you to Google-fu all the info you need into the first page results of a search. Full support for the touchscreen is built into Raspian. There's one utility to add for calibration but that's all. There's no need to download anything from the seller. You will need to edit some system files. Once again, I'm just going to outline the process; hopefully knowing what things are called will allow you to quickly find the info that I did. Actual settings that I used are the picture, your settings for calibration and "TransformationMatrix" will vary. 1) enable SPI from the Preferences>Raspberry Pi Configuration 2) edit /boot/config.txt and add the dtoverlay line. Somewhere near the end will be safe and work. 3) Reboot. At this time your touchscreen will be working but probably won't track you touch very well. 4) find and install xinput_calibrator. Run it and copy the output into the "99" file as it suggests. 5) The location of the xorg.conf.d directory where you have to create the "99" file will be in either /etc/X11 or, as in my case, /usr/lib/X11. 6) I'm sure I tried every method of swapping are rotating the touchpad tracking (many more than twice) and found only one works in general. That is putting a TransformationMatrix statement near the end of the "99" file. The one I show is for the 180 degree rotation ("Invert" in the Screen Preferences app.) Search for "TransformationMatrix", ignore all results that try to teach you math and you'll find one that simply lists the answers for 0,90,180 and 270 degree rotations. I got frustrated with people posting this and that and "solutions" that they said worked once then didn't. Specifically searching for "ads7846", the touch controller on this display, I found answers and settings by kernel and X11 gurus. Hopefully, this will be enough to get you going or for a better writer than me to do a better write-up. Hope that helps, e7, aka aa2mz
K**A
I bought this display with intent to replace my Pi3 for a new PiHole/Gravity Server with a console readout display (PADD) - It was the best economic option for what I needed. Things to know: 1: I didn't care to use the "Touchscreen" feature - so I have nothing to say - just needed a display. 2: I installed a Pi4 8GB B for this kit. 3: Assembly was moderately difficult - you may want to think about getting mini-MM Tools (hex-nut driver for example/needle nose tweezers). Aside from that not a problem. 4: Used a USB Key (mini) for storage (Rasbian had zero problems with this - aside from what I indicated below) 5: It stays cool - very fast compared to my Pi3 (granted this is not related to the display) Pro's Display comes with a nice bridge that uses one of the two HDMI ports. Bit tricky to install - but it works. Good Resolution - Great clarity Comes with cooling fan and some heat sinks Con's This display will not work on Command Line/Console (No Desktop booted) - if your not going to use the desktop - you may find yourself frustrated and have to do some digging. (Currently waiting on response) The Vendors/Manufacturers' provided OS Images (Rasbian) WILL NOT WORK if your using an USBKey for main storage - It seems he's expecting an SD card - very bad if your going to use an SSD/NVME/Etc. Rasbian Full Desktop will bring the display up just fine - however you may find it difficult to use the second HDMI Port depending on your approach - not sure what the trick is here - but by itself its fine. But if your building a server - you will be stuck with the GUI - attached image is an illusion where I'm invoking Xterm to run a console readout over the GUI - not ideal - but its doing the job. The biggest largest problem - is not the hardware - but the vendor. You email the guy - you will find your email completely and utterly ignored. Chat Support was OK - but smelled of basic Tech Support/Amazon.com (cant fault them for something of this nature really) I got Canned text email with little to no respect to the fact I disclosed my problem upfront - waste of my time really. I'll be happy to recant/edit if he actually takes the time to read and respond clearly/cleanly - I'll even go 5 Star if he fixes his Rasbian Images so the display will work on CLI/Console without GUI Desktop. Got a Second Key for that reason. #EDIT# He actually apologized and posted an image repeating the issue I reported - so there's hope yet. No updates on the image - but at least hes willing to work things out. You may have to be patient enough to communicate - but we'll see soon enough boot image gets repaired. #EDIT# Granted I'm using this for a possible unorthodox purpose - but I'd like to think there are others out there that would like to use this for Server purposes with a handy diagnostic/stat/console readout for any number of reasons. Most would not bother with a readout display - just a basic server - but I like seeing whats going on at a glance. One minor pet-peeve - I wish the case was fully enclosed - but I can live with it being open. Bottom line - its a great mini Pi4 with a display - but your stuck using the GUI Desktop unless your really good at *Nix/Pi magic - if not - be prepared to spend hours and hours figuring things out - don't expect help from tech support on "moderate to advanced" level of discussion. It does work as evidenced by my picture - but it could be so much better.
R**O
I have been looking for a good Raspberry Pi display ever since I first tried to attach an after-market, car dash-mounted, back-up screen to a Raspberry PI (back in 2013). At this point in time I have a large collection of displays that "sort of" work for me. But this Miuzei HDMI Touch Screen is by far the best Raspberry Pi display I have purchased to date. And it only cost $35; with case and fan. I highly recommend it. What I liked: - the HDMI screen image is sharp and crisp - the HDMI-2-HDMI connection to the Raspberry Pi is great - no board-2-board ribbon - there is room for me to access SOME of the GPIO pins - it worked perfectly on the first attempt to install the device driver (NEVER had that happen before!) - a website that gave me a set of instructions to download and install the display driver - downloadable PDF documentation What I did not like: - not much at this point Note - I did not use the downloadable Raspberry Pi disk image. I downloaded the display device driver and installed it on a disk image that I had already heavily modified.
Trustpilot
3 days ago
1 week ago