


⚙️ Master your motor’s speed with precision and power — no sensors, no limits!
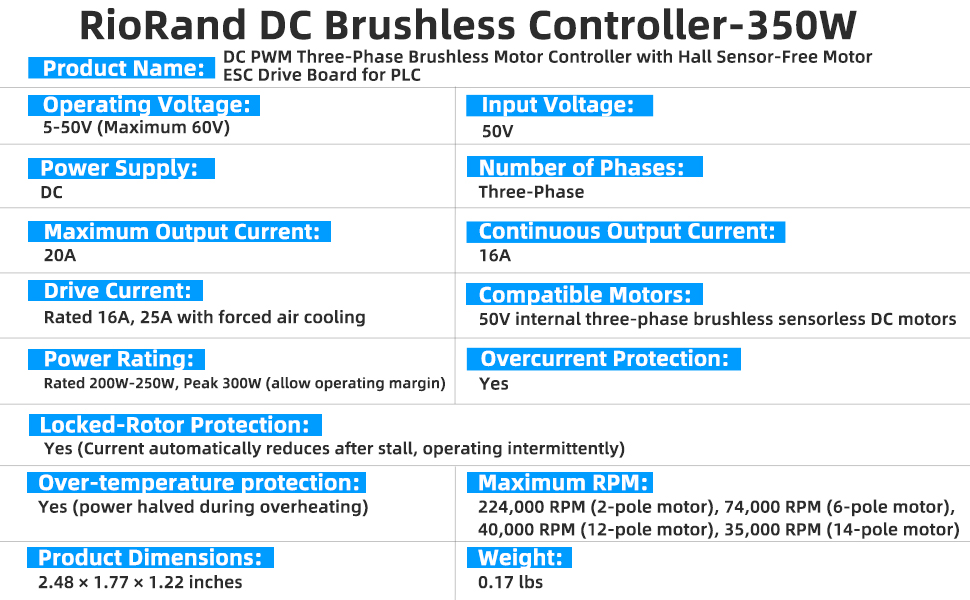
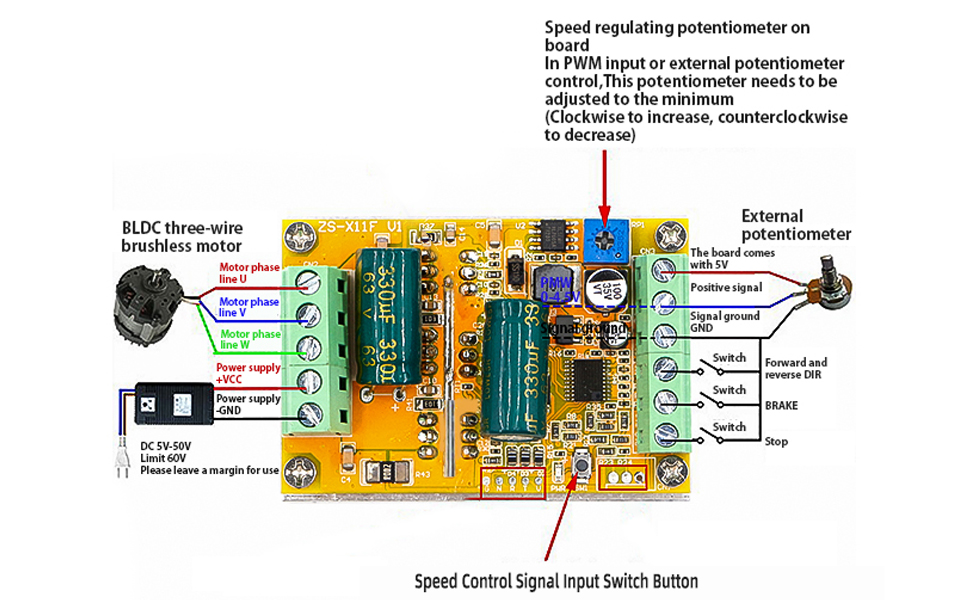
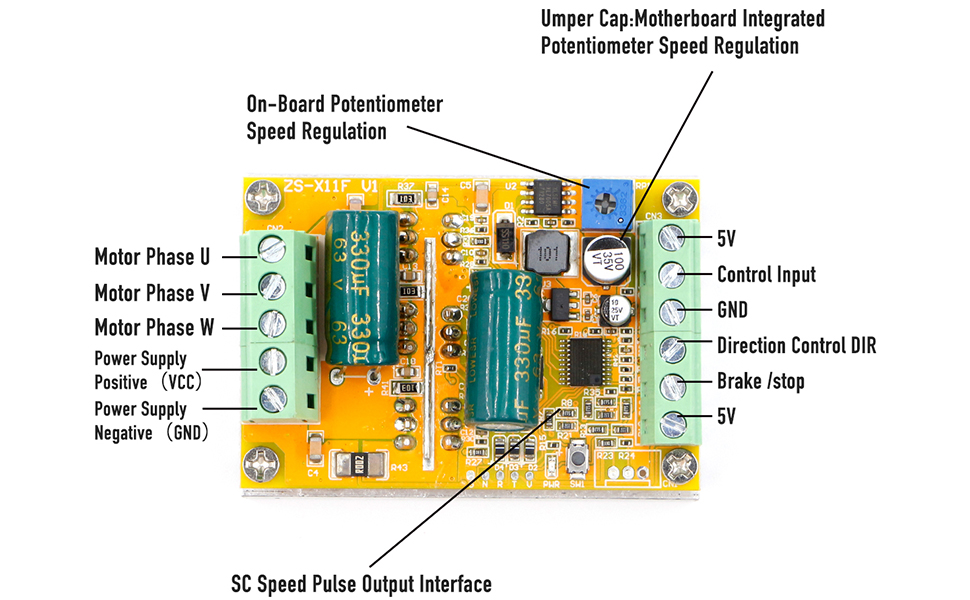
The RioRand 300W 5-50V PWM DC Brushless Motor Speed Controller is a high-power, three-phase sensorless controller designed for brushless DC motors. It supports multiple speed control signals, features built-in overcurrent protection, and includes a heat sink and potentiometer for stable, ready-to-use performance. Ideal for professionals seeking reliable, versatile motor control without the complexity of Hall sensors.


B**Z
Sweeeeet!
The media could not be loaded. I have been saving some 3 phase motors....BLDC and PMSM type, for a long time.This board is awesome. I can easily drive 24V PMSMs (see video). It stays winter cool to the touch!I want to stress that I'm no where NEAR the 380W limit of this thing. I hope another reviewer can attest to the max capabilities. But if you're looking at driving small to medium size BLDC or PMSM, this is a great option.I was going to upload a nice video of a gorgeous BLDC from a tape drive, but it's enormous. I'll just upload pictures...It drove a nice fat motor too (see photos).For anyone wondering, you can run hard drive motors, too. Looking forward to using these for some projects to reclaim bad or old hard drives! I actually tested this on a WD raptor spindle and some other seagate disk spindles. Works great. You just need to figure out which motor contact is the center tap. Remove this from what you connect. The remaining three should connect to UVW. It will spin just fine without a common terminal.Definitely usable. I didn't try the PWM control feature yet. I've been using the onboard potentiometer to control speed. If you want to use PWM or DC voltage for this, remove the jumper. It's not clear, but I think that's what it does. Connection a pot as shown in the photos gives you DC voltage control (like the onboard pot), and pumping a square wave into it instead will give you PWM control. The way the PWM input works, it probably just low-pass-filters the input signal. If it's PWM, it gets converted to DC voltage. If it's DC voltage, it goes through the filter the same way.If you want to run a BLDC or PMSM motor by variable speed (without speed feedback) this board is going to do it for you.
B**T
Worked great for me, but WATCH OUT - many questions/answers are for another product
The media could not be loaded. Note - many of the questions/answers displayed for this item are actually for the Hall Sensor version so please be careful and don't assume all those answers apply to this module. This listing is for the "Hall-less" version, meaning it's for controlling a 3-phase DC motor that only has 3 wires and does NOT use hall sensor monitoring.Some errors I noted in the Q/A section:- some Q/A indicate the module has "soft-start" - it does not, but see my easy hack to add it below*- some say to "remove the jumper" to use the external analog speed control - there is no jumper on this module, just be sure to set the on-board speed pot to zero (full ccw)- some say this module will not work with a Hall-less motor - that is WRONG, it is specifically designed to work with hall-less motors.- there are several different wiring diagrams shown in the listing, but the one that has pictures of the motor and power supply is what I used and seems to be correct.I used this controller to operate the fan motor from an EGO leaf blower that was trashed because the internal controller died. My fan motor has 3 leads - red, blue, and yellow, which connect to the controller terminals red to red, blue to blue, and yellow to green. I'll use this fan blower with some 18v cordless tool batteries as a sweeper in my shop and patio, and 18v yields plenty of air flow for that purpose.* I made a simple modification to perform a soft-start function, using a 470uf capacitor and a 1k resistor (see photo and video). Some experimenting proved that the external potentiometer speed control reaches maximum motor speed at about 4.6v, which can be achieved by placing a 1k resistor from the 5v terminal to the analog speed input. By adding the capacitor, the voltage on the speed input slowly rises when power is applied, so that the motor speed ramps up from zero to full speed in about a second, greatly reducing the strain on the power supply, controller, and the motor. If you want a slower start-up you can increase the size of the capacitor, but leave the resistor at 1k. If you increase the resistance above 1000Ω the motor will never reach full speed.
J**E
This review tells how to work the PWM settings Button !
This thing works great ! But the directions are lacking on the PWM settings so if you're trying to figure out how to change them ,Like i did for a few days ! This is how to do it ----- Press and hold the button and then turn on the power and after a couple of seconds release the button then press the button to get the light to flash 1, 2 or 4 times after that you have to press and hold the button about 4or 5 seconds until the light turns back on solid and it should work . For me i had to try it on each of the settings and ended up using the flash 2 times for using a gpio pin on a raspberry pi for a homemade cpap blower for now 2 different 3D printers. I hope this helps someone and saves some headaches !
Trustpilot
3 weeks ago
5 days ago