Some deliveries may take a little longer than usual due to regional shipping conditions.

DOWNLOAD THE APP


Customer Services
Copyright © 2025 Desertcart Holdings Limited
DOWNLOAD THE APP

♻️ Turn waste into garden gold—effortlessly and continuously!
The VIVOSUN Outdoor Tumbling Composter features a spacious 43-gallon dual-chamber design for uninterrupted composting. Its 360° rotating octagonal bin with deep fins simplifies mixing, while air vents optimize oxygen flow for efficient fermentation. Constructed from galvanized steel and durable plastic, it’s built to withstand the elements. Includes waterproof garden gloves with digging claws for added convenience.


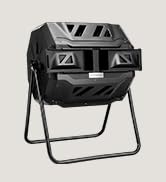


| Best Sellers Rank | #1,218 in Patio, Lawn & Garden ( See Top 100 in Patio, Lawn & Garden ) #1 in Outdoor Composting Bins |
| Brand | VIVOSUN |
| Capacity | 43 Gallons |
| Color | Black |
| Customer Reviews | 4.3 out of 5 stars 9,621 Reviews |
| Material | galvanized steel |
| Product Dimensions | 26.25"L x 23.6"W x 36.5"H |
| Shape | Octagonal |
B**S
Works great
Was sort of a pain in the rear end to put together. Save yourself the torture and use a drill. Otherwise it came together nicely and works great!
B**H
It’s Awesome (once it’s put together)
This composter is exactly what I’ve needed! It’s easy to turn, contains the smell, and is massive while also being compact! I took one star off because assembly is SUPER DIFFICULT. It took me over an hour and a half to get it put together and the instructions are terrible. The center divider seems useless and more in the way than anything, getting it in the brackets while installing the final pieces was extremely difficult. It has gaps as well, so it’s difficult to assemble. When empty, it’s very light and easy to move. Overall, I have about 5 gallons of compost already that I just had in a bucket on my porch in it, and there’s still so much room!! It’s easy to till and the doors slide open and close pretty easily (they do stick a little bit). But overall a great product and I’m excited to use it and grow my composting amount/process.
D**S
Well made, very sturdy
Love it! Easy to put together and very sturdy. Doors could be a little bigger, but otherwise, can’t wait to try it.
R**N
Excellent Compost Bin
It has been 4 years since setting up this product and even in direct UV light, it has not shown any signs of discoloration, distortion, or drying out but the steel pipe frame is showing signs of rusting out in some areas so be sure to either recoat the frame or you can touch it up in some spots as they happen. Great product nonetheless and at a great price. Assembly can be a bit weird and confusing but once you get two sides going, the rest is a piece of cake but follow the directions as there is only one way to assemble this product. I would definitely recommend this product.
C**E
Will probably complete its intended use, would not buy again
Although this bin appears like it will do its job, I would not purchase this one again. First, it was not the easiest thing to assemble. I did put it together by myself but it required, what felt like, 1 million bolts to be put in while holding the pieces just right so there wouldn’t be a gap in between them. The doors are even smaller than the picture makes them look. A standard shovel does not fit through the door. If you plan on using manure for compost then you can plan on using a mini shovel or your hands to get it in there. I also have a medium kitchen bowl for food scraps that spills everywhere if I try to dump it in. Everything has to be put in with my hands. Because of this, I am also concerned how difficult it might be to get the compost out when that time comes. My last complaint is the lack of good handles to turn the bin with. I will say that it feels pretty sturdy after it’s all put together. The base doesn’t look or feel like it’s going to fall apart while the bin is turning. I originally felt like it wasn’t going to be big enough but after starting our first batch it does hold more than a person would think. We use it for our small chicken coop clean outs, yard debris and food waste for a family of four.
J**D
Sturdy for the Price!
Instructions for this thing sucks but it works well and is affordable. Didn’t take long at all to build once I found a YouTube video lol.
B**T
Leaked immediately. YUCK
I put this together by myself, and as some have commented, it is kind of a pain. There are 56 small screws and nuts (and 2 larger screws and nuts), so an electric screwdriver is extremely helpful. A ratchet to hold the tiny nuts, while you tighten the screws would also be helpful. It comes with a screwdriver, but I didn't use it. I used my electric screwdriver. I wish it came with a small ratchet that fits those nuts, as that would have been helpful to me. I used my fingers to hold the nuts while screwing in the screws, and my fingers were pretty sore when I was done. Getting the sections of the bin to fit together is a bit awkward, especially at first, but it can be done by one person. Getting the bin divider to fit into the track inside the bin was a PAIN IN THE *&^%^. The directions are lacking, so you don't know which way the divider is supposed to go in, and it doesn't fit easily either way. There are arrows on the end points, but I couldn't figure out what they were pointing to. There is nothing in the directions about which way it is supposed to go in, or what the arrows mean. I eventually got it into all the tracks, but there was a lot of cussing involved. It appears to be very sturdy and I've nearly filled up one side. The one major thing I didn't like about it was that the bin comes in 6 or 7 sections that you screw together. After I got it together, I drug it out by the back door and dumped some old veggies etc in it that I'd been saving in my kitchen compost bucket. It was pretty gross and runny. Well, the runny stuff leaked thru the seams in those 6 or 7 sections. It dripped runny, gross stuff all the way out to the corner of the yard where I drug the big composter. It almost immediately starting drawing flies all over my pathways and on the composter itself. It's been a week or so and it doesn't seem to be leaking as bad now, but if I had to put one of these together again, I'd probably try to seal the edges of those sections so it doesn't leak as bad. There are also holes in the bin, so if your compost gets runny, it is going to leak thru those holes. So, I always stand back when I'm turning it. I'm guessing those holes are also going to allow insects in, so I'm expecting maggots at some point. Not looking forward to seeing that.
T**.
Easy to assemble, does what its supposed to do. Patience is key.
Easy to set up and easy to use. Doesn't take up much space at all, especially around your garden. The composter has two separate sides for two different batches of compost. There is a sliding door on either side that makes it easy to check on the progress of your compost easily. We start one side and leave the other side empty for a while so that were able to turn it and mix it up easier. It doesn't have a handle or anything but it has grooves to grip and turn it. The biggest sticking point about this item is BE PATIENT. This is just a compost bin, it doesn't magically make compost, that happens naturally. Fill it up, wet it down, keep it spinning, and you'll be composting in no time!
Trustpilot
1 day ago
3 weeks ago