Desert Online General Trading LLC
Dubai, United Arab Emirates
Desert Online General Trading LLC
Dubai, United Arab Emirates


🛁 Repair with flair, not despair!
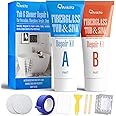
The Tub and Fiberglass Shower Repair Kit is a versatile 3.7oz solution designed to effortlessly repair chips, cracks, and dents in various surfaces including fiberglass, porcelain, and acrylic. With a perfect color match for multiple shades and an eco-friendly, non-toxic formula, this kit is a cost-effective alternative to professional repairs, ensuring a seamless finish without the need for additional paint.


D**N
Good results!
This worked well to repair a 3-4 inch crack in my shower wall. The product is easy to use but a little messy and very sticky. Be careful not to get it anywhere you don’t want it. I used several pairs of vinyl gloves. I was able to match the color perfectly. Beware, it only took 2 miniscule dots of the brown color to mix a light almond shade. It would be very easy to add too much color, so be cautious. The little spatula worked well to spread the product. Resist the temptation to put it on too thick. I waited 24 hours then sanded a little, as directed, but the sanding didn’t really do anything and seemed unnecessary so I didn’t go very far with that. Overall, the repair finished to be shiny and smooth. The repair is not very noticeable unless you look for it. Also, I only used about half the product, so I have some in reserve if I need it again. Would recommend!
N**A
Works Great!!
I had several small chips in my almond tub. I got this to repair the chips.My process:1. I taped around the chips as close as possible using painters tape.2. I mixed the formula as instructed. To match my tub I only slightly put the tip of the toothpick in the brown...use less it will go a long way. I got very close to my almond with this amount.3. I used an ice cream stick to apply the formula to each chip..I took the side of the stick to remove the excess by sliding it across the filled area. You don't want it too heavy or you will need to sand it much more.4. I removed the tape around each chip immediately after I applied the formula and let dry 24 hrs. I left a tape marker next to the chips for reference so I could see where to sand the next day.5. The next day I used the 320 grit first and a wet napkin to lightly sand down and wipe each area. Once the areas were smooth, I used the 1000 grit to lightly sand the areas. Use a very light touch to sand. I wiped the area with a damp napkin in between sanding. It removes the particles and makes the area easier to sand. I was able to get a good color match for my tub.I was pleased overall with the ease of use and that the product worked fast. It dried to a hardened finish and held up well when I was sanding...staying in place. With time and patience, the product works as stated. Will see how it lasts when used.
D**O
Be careful with the color
I used this product to repair a joint in my kitchen granite counter top. The instructions for use of the product were good and the product worked as advertised.However. BE CAREFUL WITH THE COLOR! The joint color came out much darker than expected despite the fact that I used only the smallest amount of color.It is also important to mask the edges of the area you are working on. I used two layers of masking tape, and after the product cured, I used a metal putty knife to scrape away the excess. I am pleased with the result except for the color. I think with a little more experience I could have done a better job matching the color.
W**.
Money saving custom color match.
What a great product, it saved me a lot of money and or living with an obvious repair. I wish I had taken before pictures because I don’t think you would recognize ln an after one that there was any damage. One thing I would caution is the coloring, like directions say use a VERY small amount on toothpick, I made several small batches, then took the closest one and mixed in more A&B to dilute further to achieve a light bone color.
A**A
Works but doesn't last
Purchase this as my tub was starting to show visible little rust spots and little punctures on the floor when using this it works great very easy instruct however three stars due to the fact that after 6 to 8 months, the material peels off or removes from the tub. Went in the bath you can see the material float in the water.
K**C
great!
This worked great! I stupidly had some scrub in a glass jar by the tub and it got knocked in one day and chipped the finish. You can't even see where it was anymore! Beware the pigment is STRONG, add like 10% as much as you think you'll need, stir well, then consider if you want more. I ruined 2 batches with excessive pigment before I got it right, then filled 3 chips, and there is still plenty left for next time. The sandpaper on the other hand, the 3 patches used it all up. Easy enough to buy a new sheet though if you need to do a lot of patching. Get the super fine stuff like they give you.
T**
SO awesome!
This stuff is the best! My Fiberglas run had a huge hole in it, but I had all of the pieces, so I filled the hole first with spray foam (Great Stuff) and then glued the pieces to the hardened foam. Then, I applied this repair kit epoxy to completely cover the damage and it looks amazing! There was a LOT of product included in this kit, so I even have some leftover still. It was so easy to work with and dried as hard as the original tub material. A tip for color matching: start out with the teeny-tiniest amount at first because a speck of color goes a LONG way!
D**Y
Tub sealer!
Very hard to match color it did seal what I wanted used touch up paint to match!
Trustpilot
2 months ago
5 days ago