Elevate Your Entertainment Game! 🎮
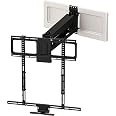
The MantelMount MM540 is a versatile above-fireplace TV mount designed for screens ranging from 40" to 80" and supports up to 90 lbs. With patented features like auto-straightening and heat sensor handles, it ensures a safe and stylish viewing experience. Its full-range motion capabilities allow for 27" of vertical travel and 30° swivel, making it perfect for any room setup. The mount also includes paintable covers and cable management for a clean look.


| Color | Black |
| Material Type | Iron |
| Minimum-Supported Screen Size | 44 Inches |
| Maximum Compatible Size | 80 Inches |
| Compatible Devices | Television |
| Maximum Tilt Angle | 9 Degrees |
| Mount Motion | Swivel |
| Mount Type | Wall Mount |
M**C
75" Samsung Frame TV and Mantel Mount
6/12/2023This is exactly what I was looking for to go above my in wall fireplace. There is an 8" deep metal mantel that is directly above the fireplace and the mantel mount clears it w/ no issues. Installation was a bit cumbersome. I installed the mount alone, but needed another pair of hands to hang the TV.I'm hoping to add some info for others that are looking into hanging this TV.- I wanted this mostly as an art piece when not watching TV.- Everything is mounted behind the TV on the mount bars- I have a Bluetooth speaker system (soundbar and subwoofer) soundbar was a bit difficult installing as my specific one is preferred to mount the bottom rather than the back. So I needed to buy the extended soundbar bracket.- The TV was mounted on the lowest level, so I saw a picture of someone buying an additional metal bracket to extend the length of the soundbar bracket. Cost $3 at Lowes. Easy fix, just make sure you try to do this ahead of time.- Items mounted behind the TV: Samsung frame video box using the Mount Plus MP-06-02 Cable Box Mount and a flat HD digital antenna.- I completely skipped the instructions that asked you to do math. You can eye the mount for the most part and see where the TV will end up, you can always take the TV off and adjust the mounts higher or lower if need be.- The pictures show TV in the resting position and in its casual TV watching position.- So many compliments on the mount and the TV. People think it's real art just sitting on the wall.- FYI the Samsung Frame is meant to be flush on the wall. This mount will make it stick out almost 10" from the wall. It is still extremely beautiful when the art is cycling through and you really can't tell it's not flush on the wall.- The mount is solid and it is held in place, from any position you stop it in. For me it's usually all the way up or all the way down but it would hold its place in the middle with no stress on the frame.I hope this helps. I will add more pics in the future.
J**G
Excellent as always
This is the 4th Mantelmount I have owned, and the quality is exactly what I expected of such an excellent product.Not cheap but worth the price.
S**N
seems to work pretty well -- a few notes on installation
Overall I'm fairly satisfied with the product so far. I've only been using it for a day, but so far I'm happy with the decision to buy a mantel mount.A few details: I hung a 75" LG TV with a Samsung soundbar. This TV is approx 75 lbs + the soundbar (several lbs). I used the lag bolts into studs on my wall. I have amateur DIY skills. I'm also a technical writer (this will become apparent in my review style).Here are my notes:- Before Installation section -- it should have mentioned to check that you don't have a wall outlet that conflicts with the center line of your mantel. While you can position the wall plates (horizontal bars) off-center, the wall arm has to be centered on your wall. I couldn't go higher or lower to avoid my wall outlet (due to TV size and wall space), so I ended up installing the arm 2" to the left of center. In the end, it wasn't that noticeable being off-center. (this refers to section 2.6 in the manual.)- How hard is it to pull down? Definitely not something my 10-yr-old will be able to fully do. When it's fully upright against the wall, you have to apply quite a bit of downward angle pressure to move it. Marketing materials oversell the ease of positioning. Once it's down, you can adjust the position easily enough, but when it's fully upright, it's hard to pull down.- Before Installation section -- it should indicate what type of soundbars are compatible. If your soundbar has the screw mounting holes on bottom (like my Samsung soundbar) rather than on the back, you'll need to order special brackets to fit on this mount. (I ordered these brackets: https://www.amazon.com/gp/product/B085Y64NMS/). You'll also need screws and washers for your special bracket.- Time required for installation -- I started at 10am and was done at around 4pm. I needed help from my wife and kids to position the mount arm on the wall and to hang the TV onto the mount (about 10 min. total help). The mount arm is heavy. I'm a measure-twice-times-cut-once-kind of guy, so for more experienced people the installation could be much faster. I was worried about drilling the holes in the wrong place on my wall and not having enough space for the TV, but the placement worked well following the instructions.- Instructions are decent. The guide aims to be brief but sometimes lacks more elaboration. I'll call out specifics here. Given the difficulty of adapting to lots of different TVs and scenarios, it's a tough task and the instructions do a respectable job.Notes from the guide:"1.3 Select Screws and Spacers:" There are A LOT of extra bolts and spacers are provided here to accommodate different versions of TV. You will have a lot left over (like 30 pieces here)."1.8 If Installing a sound Bar, attach the Sound Bar Wings" -- due to the jutted-out angle of brackets to adapt my soundbar, I had to add the soundbar partly after hanging the TV. It worked all right but was a guess as to the right angle for these wings. Note that adding the handle/heat sensor becomes more difficult with the soundbar positioned there. My soundbar extends below the handle. I thought maybe I wouldn't need the handle, but you definitely need this handle to pull down the TV, especially when the TV is 75"."3.2 - Verify the Positioning of the Mount with Stud(s)." This was definitely the most helpful step. This is where I realized that the paper template lacked information about the wall arm mount's position, which conflicted with my wall outlet. I didn't realize this conflict until I put the mount arm + wall plates there and was verifying the placement. Verifying this saved me from error here. BTW, the arm + wall plates are heavy and I needed help from others to mark the wall and check the level while I held it in place."3.7 - Attach TV Brace to the Lifting Arm." The TV brace piece seemed wobbly and insecure. Given how sturdy the arm mount is, this piece where the arm connects with the TV feels kind of precarious to me."4.4 Attach TV Brace to Vertical Braces." My vertical braces extended to almost the flush edge of the TV brace (see pic). This makes me fear that someone could knock it offline and might make the TV come off or something. The screws holding the TV brace to the vertical brace seem pretty insignificant. I wish it were attached in a more secure way here. I have a fear that the TV will slide off and hurt someone, but so far this is only in my head. I thought that the TV Vesa mounts were standard screw holes so am confused why the pic in the guide shows about 3 inches on both sides of the vertical brace."5.1 Adjust the Lifting Force for the TV." Re "It may take multiple revolutions to reach the desired tension." For my TV, it took about 10 minutes of revolutions. Think 50-100 revolutions, not just "multiple." I didn't have a deep socket extension so had to reach in from the side at an odd angle with my socket wrench. BTW, here is where if you don't have the right tools, you will regret it. Skinned my knuckle reaching in through the side to turn this bolt."5.3. Adjust the Bottom Stop positions and Level the TV, if necessary." Couldn't really figure this part out, but didn't seem to be a problem so skipped. Turning the screws didn't seem to do anything for me."5.8 Install the Wall Place Covers." I was unaware that I'd have to drill my own hole here with a special bit. So far the cover is kind of useless. With such a large TV, the mount is entirely hidden anyway so I am not concerned about this. Even so, it asks for a unique drill bit attachment here that might be unexpected.Overall, the instructions aren't bad at all. I just wanted to pass along my notes and experience in going through them.
Trustpilot
1 day ago
3 weeks ago