

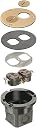

Arlington Flush Floor Box Kit (Brass)
Product ID: 347294295
Details
- BrandARLINGTON
- ColorBrass
- MaterialBrass
- Product Dimensions4"D x 4"W x
- StyleBrass
📏4-inch diameter flush fit
🔌2 x 15A tamper-resistant outlets
🛠️Easy install in wood & concrete
Buy anything from 5,000+ international stores. One checkout price. No surprise fees. Join 2M+ shoppers on Desertcart.
Desertcart purchases this item on your behalf and handles shipping, customs, and support to Israel.
⚡ Power up your space with style and ease!
The Arlington Flush Floor Box Kit (Brass) is a polished, UL-listed recessed floor box featuring a 4-inch diameter and 3.25-inch depth. It includes two tamper-resistant 15 amp outlets, a durable brass cover, and all installation hardware, designed for easy mounting in existing wood or concrete floors. Perfect for professionals seeking a clean, safe, and elegant power solution that blends seamlessly into any environment.
| ASIN | B085SXKXV1 |
| Best Sellers Rank | #175,149 in Tools & Home Improvement ( See Top 100 in Tools & Home Improvement ) #375 in Electrical Outlet Boxes |
| Brand | ARLINGTON |
| Brand Name | ARLINGTON |
| Color | Brass |
| Customer Reviews | 4.4 out of 5 stars 70 Reviews |
| Finish Type | Polished |
| Global Trade Identification Number | 30018997007347 |
| Installation Type | Recessed |
| Item Dimensions D x W x H | 4"D x 4"W x 4"H |
| Manufacturer | Arlington |
| Material | Brass |
| Model Number | FLB3520 |
| Product Dimensions | 4"D x 4"W x 4"H |
| Specification Met | Ul |
| Style | Brass |
S**N
Perfect.
Looks great! Love that it’s flush with the floor and was easy to install.
A**G
Sturdy and very nice design
Easy to install, very sturdy. Photo is without plate as I wanted to test these.
J**T
Could do with better instructions.
Does what it’s meant to do, but instructions could be better. It’d be nice to see what depth it’s meant to be set at as opposed to guessing and shimming.
R**Y
Flush even with floor
Great item. It’s flush like it states and looks great on our floor
J**E
Installation Tips
This is not a difficult installation if you have the right tools. You will need a 3 1/2" hole saw, a router with a 1/4" rabbeting bit, a 6x32 tap and a valve lapping tool. First off you should practice this on a scrap piece of 2 by 10 before taking on your finished hardwood floor! Let me say that again; unless you do this all the time you need to practice this on a scrap piece of wood. As with any power tool you need to wear your eye and ear protection. When you use the hole saw be cautious as the large cutting surface will grab and violently twist the drill out of your hand. If your drill has a side handle be sure to use it. Take it slow and easy and let the saw do the work. Drilling a pilot hole first will also help keep the saw from skipping when you first start. Prep the box by using the 6-32 tap to cut threads into the box for the cover plate screws. For some reason my box did not have threads and you don't want to damage the nice brass cover screws trying to force them into non-threaded holes. Finally you will want to install the top cover and gasket to get the final finished height. This will be important in the next step. After cutting the 3 1/2 hole use your router and rabbeting bit to cut a 1/4 rabbet that will be deep enough so the finished box (this includes the gasket and top cover plate) will be flush with the floor. In my case this was about 7/16" but you will want to do this operation in small steps. As you get closer to the final depth it will be more difficult to lift the box out of the hole. That is where the valve lapping tool helps as it will easily lift the box out of the hole. Take your time getting down to the final depth by taking small cuts. OK now that you've practiced on a scrap piece of wood it is time to tackle the living room floor. First you must be absolutely sure you are installing the box in a compatible location. By this I mean you are not trying to drill through a floor joist or on top of electrical, plumbing, HVAC or other equipment that might be directly underneath your desired location. Drill a 1/8" hole all the way through the floor and go underneath the floor to verify the drill bit is indeed in a good location. If the drill came out too close to any obstacle you will at least have a good reference point for the final location. Plus a 1/8" hole is a lot easier to fix if you have to relocate the box. Before you start cutting the hole do yourself a favor and make a plastic tent around the work area. A couple of chairs and some black spring binding paper clips will keep the plastic in place. You are going to make a lot of saw dust and this will keep the mess confined to a small area. Now lets get our PPE on and get started. First enlarge the pilot hole slightly (it should be smaller than the drill bit in the hole saw arbor). To get the hole saw started you want to make sure the drill is perpendicular to the floor. If you are kneeling you can put the drills grip between your legs to help keep it from twisting out of your hands. Once you've cut through the finish floor you may need to stop and remove the wood from the inside of the hole saw before cutting the sub floor. Remember to go slow and let the saw to the work. Now that the hole is completed you will need to start on the rabbet cut. You will want to make several small cuts to get to the final depth instead of trying to make a few large cuts. Definitely wear eye and ear protection for this. As you get closer to the final depth the valve lapping tool will make it easier to insert and remove the box. Take your time and gradually sneak up on the final depth. Now that you've got the hole finished go ahead and secure the the box to the floor and complete the electrical phase of the install. I wholeheartedly recommend this box and hope these tips help.
B**X
Works As Advertised. Orifice in the floor may need to be modified slightly.
Bought this to replace a receptacle that created a significant bump in the middle of a wood floor. Replaced the old receptacle with this one and a flat plug, removing all but a tiny bump above the floor surface, which disappears under the rug that covers that area.
V**.
The answer to all desk lamp and end table lamp problems
This is a great thing. I did not install it myself becauae it took a lot of drilling for the hole in the floor.
D**T
Poor quality
Product came as described and the installation video was very helpful. The problem came after installation one of the outlet plugs did not work. Poor quality
K**C
Perfect floor plug
Great product and price. This is the 3rd one we have.
S**N
Looks good and easy install but too expensive
Good but too expensive
Trustpilot
1 day ago
2 months ago