


🚗 Elevate Your Ride with ECOTRIC's Vented Hood Louver!
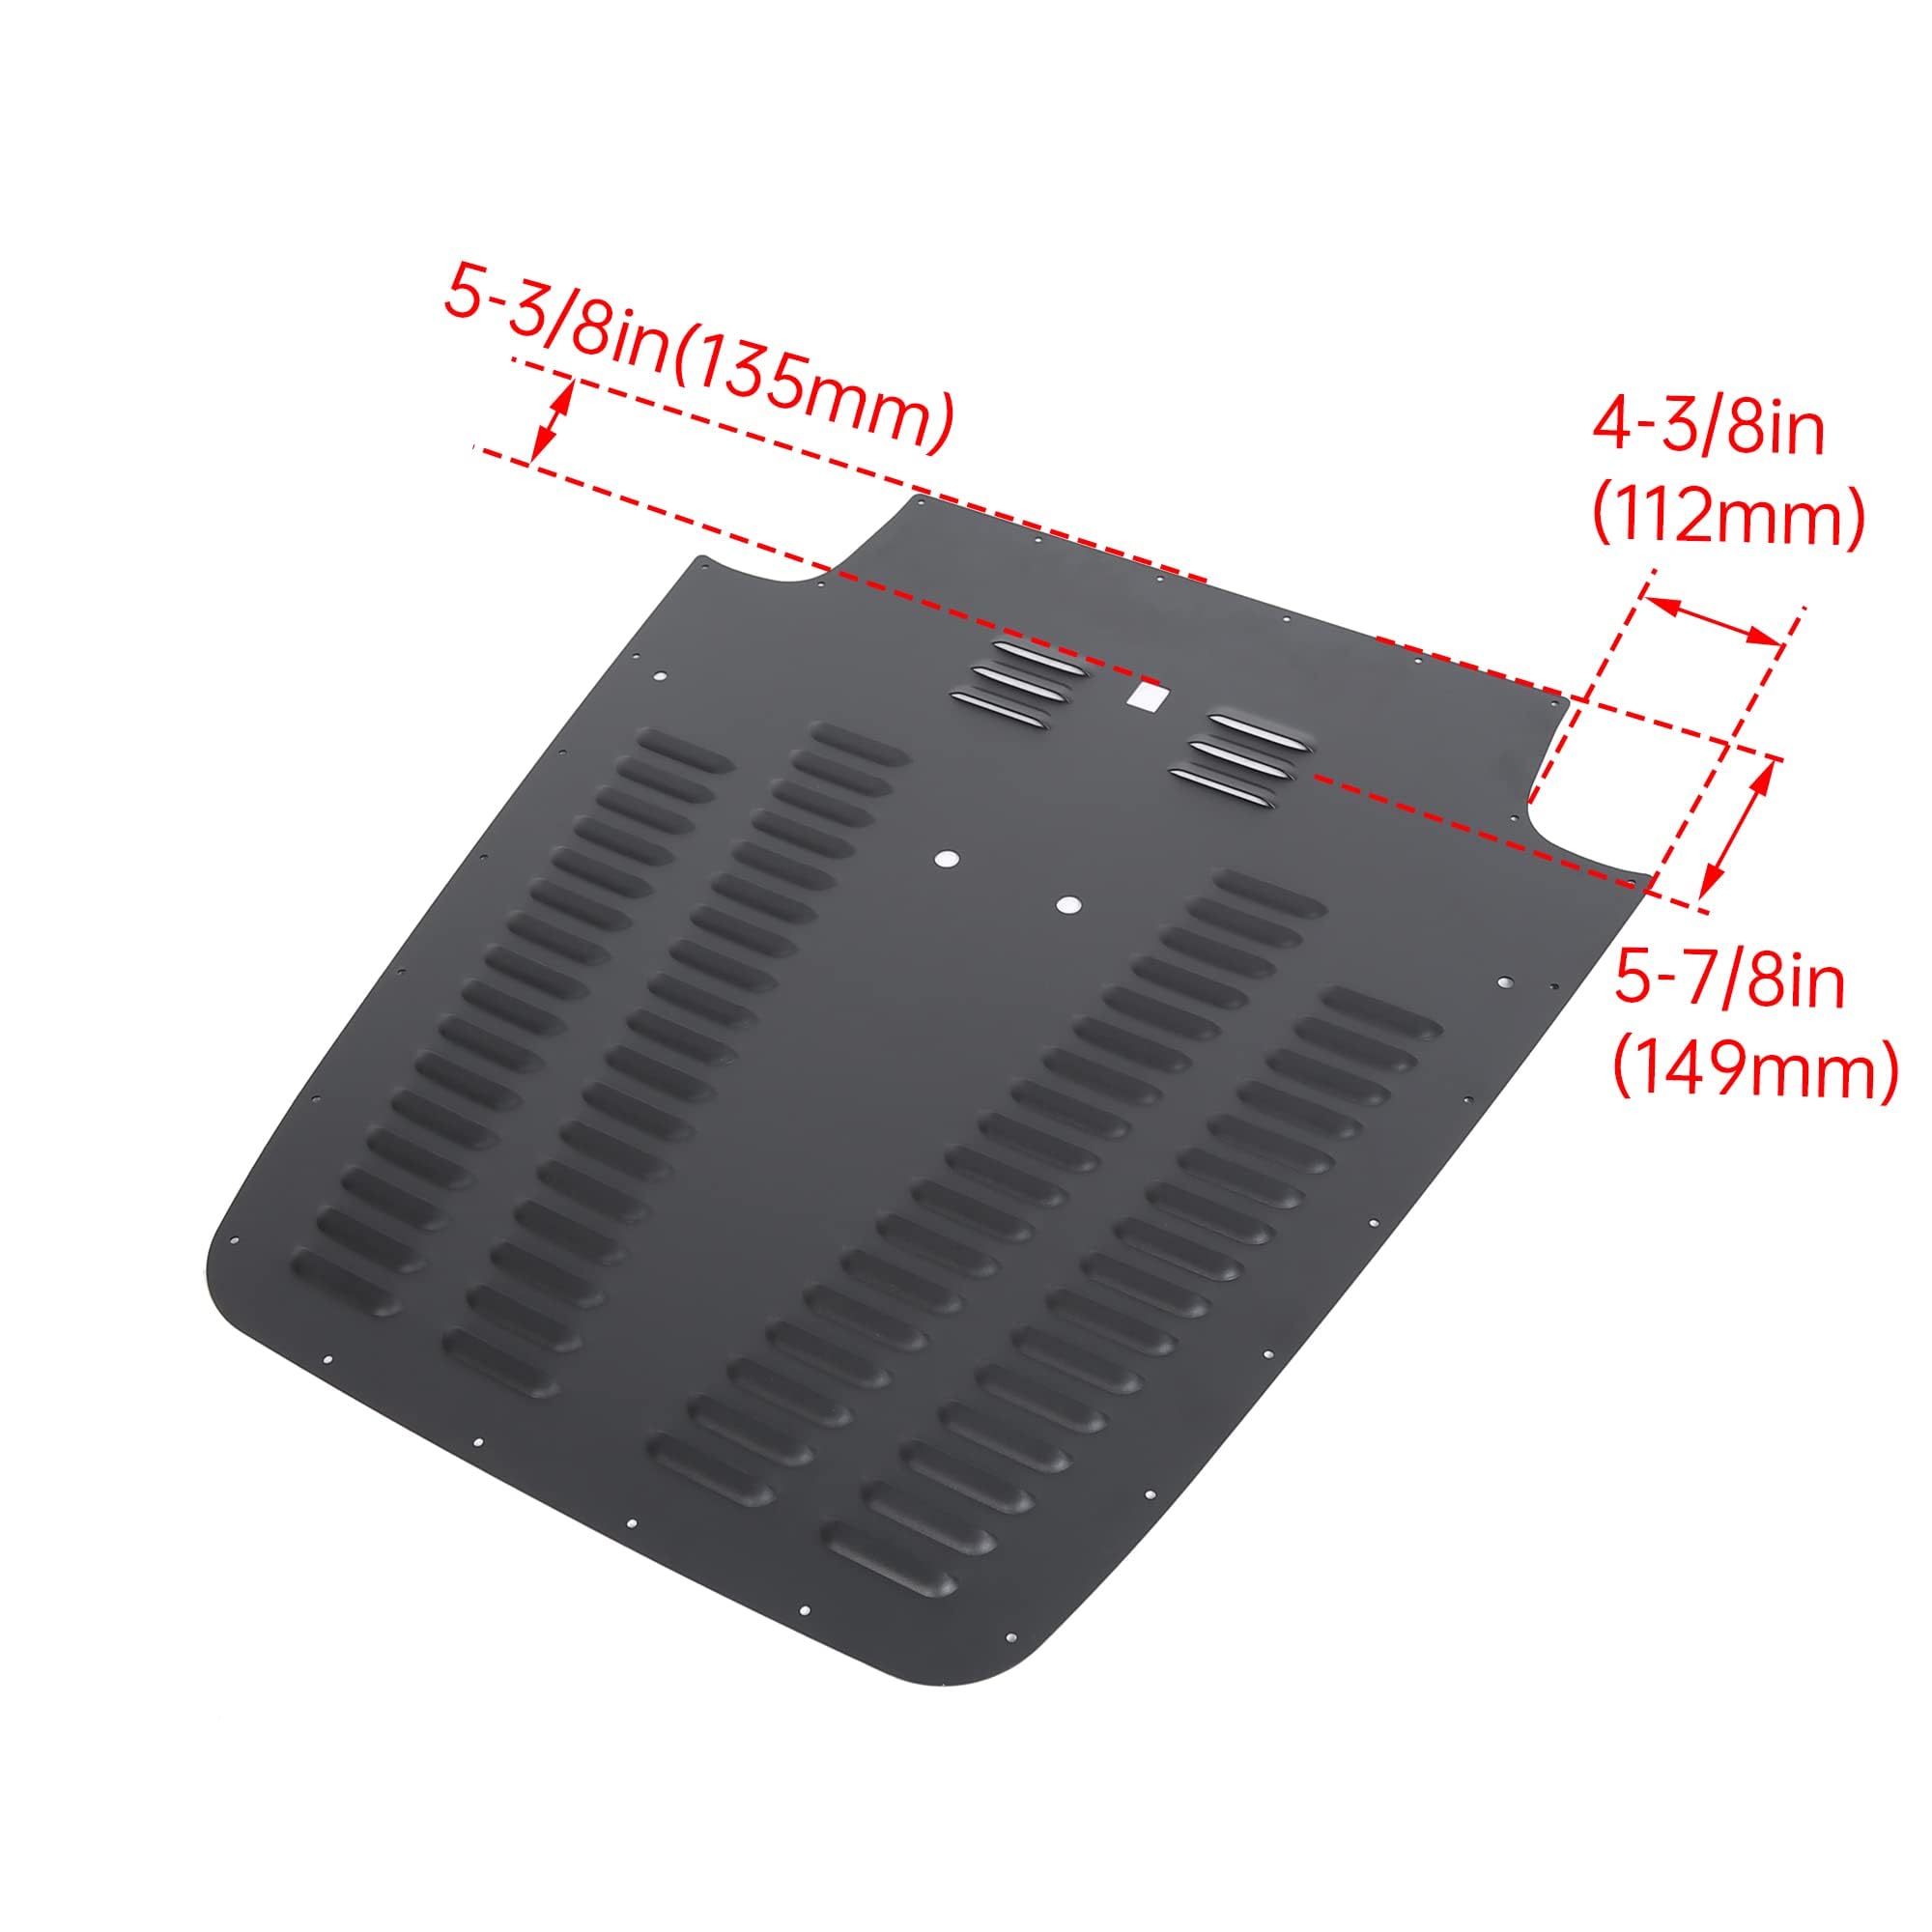
The ECOTRIC Aluminum Alloy Vented Hood Louver Kit is a high-performance accessory designed for 2003-2006 Jeep Wrangler TJ and LJ models. This kit enhances engine cooling by allowing hot air to escape, ensuring optimal performance. Made from durable aluminum with a sleek black powder coating, it withstands harsh weather conditions while providing a perfect fit and easy installation.


| Brand | ECOTRIC |
| Color | painted |
| Exterior Finish | Painted |
| Material | Aluminum |
| Style | Modern |
| Auto Part Position | Front |
| Vehicle Service Type | Truck |
| Fit Type | Vehicle Specific Fit |
| Manufacturer | ECOTRIC |
| Automotive Fit Type | Vehicle Specific Fit |
| Global Trade Identification Number | 06974718203029 |
| Model | VC-LYAM-307S |
| Item Weight | 10.48 pounds |
| Package Dimensions | 35.59 x 32 x 1.81 inches |
| Country of Origin | China |
| Item model number | VC-LYAM-307S |
| Manufacturer Part Number | ET-005 |
D**T
Very nice indeed. Worth the price over spyder
Good product. Nice and thick steel. Good powder coat. Nice template and instructions. If you follow it to the letter your install will come out great. Here are some recommendations based on my install. 1. Takes about 4 hours if you have never done one. I kept second guessing myself but stick to the instructions and the install will Go well. 2. Take your time with lining up the template. They make it easy to line up the windshield bumper holes. Use a pen in each hole but make sure the pen is the same width as the holes. I used a tapered pen in each hole and line up was a breeze. 3. Ditch the recommended grinder in favor if a jig saw with new metal blade. I tried both and the jig saw is faster, makes easier and straighter cuts. My Jigsaw cuts were cleaner and less jagged for when you later have to Clean them up with a file. I guess if you are a professional with a grinder then choose that. I am not. 4. Remember that all your cuts will be hidden anyway so don’t agonize too much and just cut that mother. 5. After your cuts, and you have drilled all the screw holes, take the louvre off and now is the time to clean and wax your hood before final assembly. You’ll be glad you did this now. Now mount the louvre and finish the job. Mine came out perfect.. good product. Better on the wallet than the spyder brand and except for theirs having a spider cut out on it. It is indistinguishable. As for me, the spyder wasn’t worth $60 extra to advertise their stuff. After install I can immediately see the cooling benefit. This should help with that heat soak problem.
D**N
East way to add some extra ventilation of under hood heat
Ordered this and it arrived quickly. Undamaged, with decent finish. All hardware was in the box, but I didn’t use it.Taped entire hood, to avoid scratches, make drawing lines easier. Removed footman loop holder, windshield squirter and both rubber hood bumpers. Laid out template, taped it down, and used a spring loaded center punch to mark all holes. Placed an old sheet under the hood to catch metal debris.Used a 1 inch hole saw, and opened all holes after punching. Use some self control, to prevent plunging hole saw into engine and breaking sh1t. After holes were drilled I used a ruler and connected the holes together with a Sharpie, to use as a cutting guide.. using my harbor freight air nibbler I quickly buzzed all the cuts, making 4 holes in the hood.A metal file knocked down the burrs, and after a quick scuff with a red Scrotchbrite pad I hit the hood with some black Rustoleum high temp paint and primer, to hide the yellow under the vent panel. (Test fitting the panel, I was unhappy with the yellow showing through the vents. The black killed it)I elected to use some self tapping black pan head sheet metal screws. I used number 8 x 1” and I did one corner, made sure everything was still lined up, then did opposite corner. Checked figment again, and did two remaining corners, and worked my way around the panel until all holes were done.Reinstalled the loop, bumpers and squirter and called it good. The vents do let some heat out, especially when driving, but realistically, the entire underside of the jeep is open, and when driving the heat is sucked out anyways. On looks alone it was worth it, time will tell if it makes a difference on anything else. The black screws are a lot easier to install rather than the stupid stainless bolts they included. They look better too, for me at least.If the finish fails, I’ll just unscrew it, hit it with some rattle can Bedliner, and screw it right back on.
S**T
Easier than you think!
So cutting holes in your hood does cause some pucker factor, but the template worked just fine. Do remove the hood, will make your job easier to work on. The hood vent arrived early with all the hardware. It was safely packed too. Decent construction with durable materials. Looks great, not too thick, not too thin, and YES it works. You can see the heat pouring out of the vents. If you too have noted the melting insulation on wires and hot vehicle interior, this hood is for you.
A**N
Great Bang For Your Buck!
I was a bit hesitant on ordering this for my TJ vs the spider type brand. I am absolutely pleased with the quality and finish of this product. It came with detailed instructions, hardware, cutting template and even a tool list. I am a big fan of not having someones logo stamped on my jeep, so this was a great choice for me. I will be recommending this to my dad, if its available for his JK. I'ts fully functional, hence cutting the holes in your hood. It has been cold and rainy in my city but i know this is going to be a great way for heat to escape from the engine bay.
A**.
Easy to follow instructions
Great fit easy to follow instructions looks great... Hardware is not very good broke several bolts with little torque. Would absolutely buy again tho.
D**Q
Looks great on Jeep
Pur based to reinforce hood and enhance look. Looks really nice.
Q**Q
A must have for TJ owners.
I am so glad I bought this hood vent. I had many random electrical issues like random engine shutdowns, fuel issues, mystery jeep things.. After installing the vent in my hood I no longer had any overheating issues, my A/C was way cooler, and I no random shutdowns or fuel issues. Between adding the vent ( lowering under hood temps) and some 40 amp relays I have gone 10 months issue free. Also my hood vent Did come with the easy to use template. Installation does require some mechanical ability, a drill with a step bit or small holesaw, and jigsaw or similar. Would definitely recommend.
I**Y
Keep the engine bay cool!
Follow the instructions, take your time, measure twice cut once. Fits perfectly!
Trustpilot
1 week ago
3 days ago