📺 Elevate Your Viewing Game with Eyoyo!
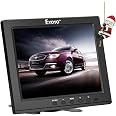
The Eyoyo 8 Inch HDMI Monitor is a compact, high-resolution LCD display designed for versatility and convenience. With multiple input options and a built-in speaker system, it caters to various applications, from teleprompters to gaming setups, ensuring a seamless multimedia experience.


B**R
Decent small monitor for the money. Here are Raspberry Pi config.txt settings to get it working.
I bought this monitor for a Raspberry Pi 3 in order to configure the system if network connectivity were not available. The screen is sharp, bright, and has a decent viewing angle. The stand is just tall enough that the HDMI cable doesn't cause the screen to tip over. The on-screen controls are a bit of a pain to work with, but generally you don't need to mess with them.I did a bit of experimenting to get the right settings for this monitor; out of the box the Pi rendered the screen with a squashed image. Don't change the monitor's internal (via the menu) aspect ratio settings from 16:9 to 4:3. The 4:3 aspect ratio seems to be yet another layer on top of the signal, and I had to switch back to 16:9 to see anything again.On the Pi, you will need to modify your /boot/config.txt to correct settings to get the most out of your screen. There are two modes you can run the screen in:- Video-only = 1024x768 resolution. Noticeably sharp pixels; best image quality. No audio.- Video + Audio = 960x720 resolution. Muddier pixels; degraded image quality. Has audio.Below are the /boot/config.txt settings you need to set for both modes above. This only list the changes from the default settings, or settings of note:-------- Begin config.txt for Video-only mode:################################ DVI mode settings :# uncomment this if your display has a black border of unused pixels visible# and your display can output without overscandisable_overscan=1# uncomment if hdmi display is not detected and composite is being outputhdmi_force_hotplug=1# uncomment to force a specific HDMI mode (this will force VGA)# 2 = standard VGA resolutions:hdmi_group=2# 16 = 1024x768 @ 60hz:hdmi_mode=16# uncomment to force a HDMI mode rather than DVI. This can make audio work in# DMT (computer monitor) modes# DVI mode = 1# HDMI mode = 2# force to DVI mode for PIXEL:hdmi_drive=1-------- Begin config.txt for Video + Audio mode:################################ HDMI mode settings# uncomment this if your display has a black border of unused pixels visible# and your display can output without overscandisable_overscan=1# uncomment the following to adjust overscan. Use positive numbers if console# goes off screen, and negative if there is too much border# These settings ensure that all pixels are visible:overscan_left=34overscan_right=34overscan_top=24overscan_bottom=24# uncomment if hdmi display is not detected and composite is being outputhdmi_force_hotplug=1# uncomment to force a specific HDMI mode (this will force VGA)# 2 = standard VGA resolutions:hdmi_group=2# 16 = 1024x768 @ 60hz:hdmi_mode=16# uncomment to force a HDMI mode rather than DVI. This can make audio work in# DMT (computer monitor) modes# 2 = HDMI modehdmi_drive=2
R**T
Supports HDMI, RCA, VGA. Bonus USB power out and OK sound. Perfect for Pi-like deployments
In a world of monitors the size of a bedsheet, it's easy to overlook that sometimes small tasks call for small monitors.This is not a primary monitor for a thousand column spreadsheet or a CAD modeler. It's great for passive monitoring like status indicators for a build or for carrying to setup servers that will spend most of their lives without a monitor.My favorite feature of the Eyoyo is that it has every video input that matters. HDMI is there, of course. but it also decodes the older analog input from RCA jacks or a VGA DB-15 connector. If you're hooking up a "classic" gaming console or tiny computer (Original Pi, the C.H.I.P, or even a video iPOD (cable not included) having that RCA composite video input is super handy. It also supports HDMI, which provides sound and video on the contemporary connector. You can leave all the video connections plugged in and switch between them via the on-screen display.The unit is small enough to keep in your bag of tricks if you're having to enter the pre-boot environment, such as BIOS for a server upgrade or backup recovery for a normally headless system.Text was clear and bright.As a bonus, there is a 5V/1A USB output for power. This is useful for things like an LED "ring' light (not for the camera itself), powering Single Board Computers, or powering network gear. This is a power-ONLY USB-A.I could never really get the aspect ratio right when testing on my iMac. I think that MacOS just hasn't had to support 4:3 in so long that it just doesn't. Honestly, that's a bit of a silly combination and I didn't research it much. This monitor Just Worked in high resolutions on all the tiny computers (CHIP, Pi, Pi Zero, old desktop Linux, UNIX systems, game boxes and more. Text mode, though tiny, worked as well as all the respective GUI environments.It does come with a bracket that's probably best mounted to a wall. The wires at the bottom edge can be a bit crowded when the cables have to exit and them make a right turn to miss the desk.In all, I appreciate the size because I share it between several systems that are USUALLY network connected. Picture quality was good and the variety of hardware connections is handy for a gadgeteer.
A**R
Great customer service
I ordered this 8 inch Eyoyo monitor while I was away so it sat a long time at home. When I finally got to it and tried to use it the monitor would not recognize inputs from RCA... All other inputs worked but my project required RCA in.. I wrote to the company and got an almost instant response. With just a couple emails back and forth to confirm my address etc it was done.. New monitor arrived no charge. Great service.
M**C
2 out of 2 are defective!
This is the second Eyoyo monitor I ordered. The first would not display an image on any input. I reordered and got a second monitor. This one has a red registration issue and does not line up with the image. Are any of these monitors any good? Garbage for the price. Will try another manufacturer for a replacement.
ترست بايلوت
منذ شهر
منذ يوم واحد