💨 Elevate your kitchen air game with silent power and sleek style!
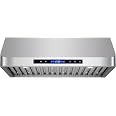
The COSMO COS-QS75 is a 30-inch under cabinet range hood featuring a robust 500 CFM airflow with twin centrifugal motors for efficient ventilation. It operates quietly at 40 dB on the lowest setting and includes energy-efficient 1.5-watt LED lighting for superior visibility. The unit boasts a premium stainless steel finish, soft-touch controls, and dishwasher-safe ARC-FLOW filters for easy maintenance. Convertible from ducted to ductless with an optional carbon filter kit, it’s designed for modern kitchens seeking performance and style.


| Air Flow Capacity | 500 Cubic Feet Per Minute |
| Material | Stainless Steel |
| Noise Level | 40 dB |
| Mounting Type | Under Cabinet Mount |
| Included Components | Premium Stainless Steel Filters, Hardware, Damper and Remote Control |
| Controls Type | Touch |
| Voltage | 120 Volts |
| Number of Speeds | 3 |
| Item Weight | 53 Pounds |
| Light Source Type | LED |
| Wattage | 49.5 watts |
| Filter Type | Baffle |
| Item Form | under-cabinet mount |
| Specification Met | ETL |
| Ventilation Type | Ducted |
| Vent Hood Design | Under Cabinet Range Hood |
| Manufacturer | Cosmo |
| Control Method | Touch |
| UPC | 869369000010 |
| Brand Name | COSMO |
| Model Info | COS-QS75 |
| Item Weight | 53 pounds |
| Product Dimensions | 22 x 29.5 x 10 inches |
| Item model number | COS-QS75 |
| Capacity | 500 Cubic Feet |
| Annual Energy Consumption | 96 Kilowatt Hours Per Year |
| Installation Type | Under Cabinet Mounting |
| Part Number | COS-QS75 |
| Special Features | Easy To Clean |
| Fuel type | Electric |
| Airflow Displacement | 500 Cubic Feet Per Minute |
| Material Type | Stainless Steel |
| Batteries Included? | No |
| Batteries Required? | No |
D**S
The Best!
The media could not be loaded. This is going to be long review, but I think it is important if you are going install this yourself, that you read it.First, I recommend you take the time to research what kind of connection you currently have. Even if it means removing your current range hood and reinstalling it. You cannot do this half way if you want the great suction this fan is capable of.Second, this range hood is heavy. It is easily 3x as heavy as our old one. Our old one was not one of those white. 20 year old hoods either. This one needs at least 2 strong people and a third normal person to install, unless you have a jack.Lastly, buy/order the right kind of duct tape (foil kind) for attaching it. You do not want to do all the work of installing this and then hear it whistling or leak air.Okay, now let's talk about the width. You need to have 24in clearance between the stove top and the hood. This is much wider than my previous hood so we ended up being exactly at 24in after we installed it. This meant my 6 foot 3in husband loses sight of the food he's cooking when he is standing in front of the stove top and looking down. He said it is worth it since we will eventually be getting new cabinets in the next couple of years.When installing this range hood, the template that comes with it works great to mark the holes and make your pilot holes. Remember to account for any tile and move the template up a little. This range hood also had its holes closer in then our previous range hood so we had to add 1 1/4in plywood to the underside of the cabinet for the new screws to be attached to. This meant a trip to Ace, cutting two different pieces, gluing them together, then screwing them into the underside of the cabinet with more wood glue. This was for safety and for reassurance it wouldn't fall down on us while we were cooking a month from now. I personally would rather go beyond the standards then meet them.We originally had a rectangular ducting attachment but it was easy to remove the cover from inside the cabinet and disconnect the rectangular opening from the main vent. This was about a foot above from the new range hood vent. We did this before attaching the range hood to the underside of the cabinet so we would have plenty of room. The circular ducting that comes with the range hood fit perfectly to both sides of the range hood and the home ducting.The last part of the installation you should take into consideration is the plug connection this range hood comes with. Mine needed to be wired in, so I cut the plug off, strip the black covering back 5 inches, and made sure not to cut any of the cables inside. With the house power off, I attached them to my home connectors easily with a wire twist thing (don't know what they're called).Now about the product itself. I love the range. This range hood has two fans and a lot of power. It was less expensive on Amazon than the big box stores and is much nicer. It looks professional and the filters are so fancy looking.Overall, I came across more obstacles than I realized in changing out a range hood on my own, however, this was completely worth it. The noise is there when you have it on anything more than the first level, but I don't really care about noise when I'm cooking, I want the suction power and light. The light is very nice. I like having LED instead of halogen bulbs as well.This range hood is awesome and I'm so happy with it. Please just remember to ask for help because it is very heavy and you probably should have 3 people.Buy it and enjoy having a wonderful and beautiful range hood!
A**Z
Nice Range Hood
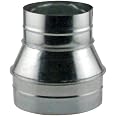
After reading reviews about installation I felt confident in my abilities to install. The hood is a good sized hood and it did take me 3 people to install it. For anyone looking at installing it themselves, I offer up these considerations before starting.1) I hoped maybe I could get away with only mounting it with 4 screws to the underside of cabinet. Once I got it open and lifted the unit and re-read the directions, I realized it needed to be installed to wall and under cabinet for my application.2) I needed to remove (4) 3" tiles from my backsplash in order to mount the 4 screws to the wall. I had the tools to do it and could not tell until I removed my old hood that it needed to be done. The template they supplied help Identify with 4 tiles to remove.3) I read other reviews and found it common to install the 8” duct to a 6” exit duct via a reducer duct found at my hardware store. That was an easy job, again just a little time and tape etc.4) I installed the 4 of the (hammer in) screw mollies supplied in box. Lifting the unit into place and attaching to the wall was a task and I used stacked boxes to hold it near the position until we were ready to lift and attach. (Use boxes that allow access to all the screw holes on rear and upper holes.) Once we installed the 4 rear screws slightly tight, we adjusted the elevation with more boxes until it was tight up against upper cabinet. We then installed the 4 upper screws that pulled the hood up tight. Once installed on upper cabinet, we tightened the rear screws.5) Now the electric hookup. I had a hard wired hood and this unit had a plug. Some reviews had people cut the plug and wire it into a junction box. Instead I installed an outlet in the upper cabinet area where the ducting came up. Again, I have experience in that so it was just a couple dollars and more time. Plugged in the fan and it worked.6) Ducting install was pretty effortless. I installed the 6” portion of the 8”-6” reducer to my existing duct. Had to tweak and bend to make it fit but eventually taped it in place. I used the flex duct supplied with the unit to connect hood to the 8” duct reducer. Easy!7) Loudness. The unit is loud but every review said that. I wanted good suction and moving air makes noise. Even at low setting it makes a lot of noise.8) What I didn’t really anticipate is the size of the unit. It sticks out from the wall enough to encompass my whole range, love it. I ended up having the minimum height from range to hood per their spec. I’m 6’ tall and it is easy to smack my head or turn on touch sensitive buttons on the front of the hood if I’m not careful. Gotten used to it now though and I’m good. My plan was to remodel the kitchen in a few years and use this hood when I do. I will fix some of these issues then.9) I give this unit 5 stars so far. I think I’ll like the baffled, removable, washable filters. I hated my screen on the last hood. It was always greasy and dirty looking. I will remodel with an 8” duct instead of a reducer as it may be contributing to more noise and less evacuation but for now, it works great.
T**B
Great product
Great look in my new kitchen. It has great pulling power and it is quiet. The lights are plenty bright. Took 2 people to install. One negative, the installation template was off and unusable as is so we improvised. Still would recommend and buy again.
ترست بايلوت
منذ أسبوعين
منذ شهرين