


🚿 Elevate your bathroom game with sleek, smart hygiene!
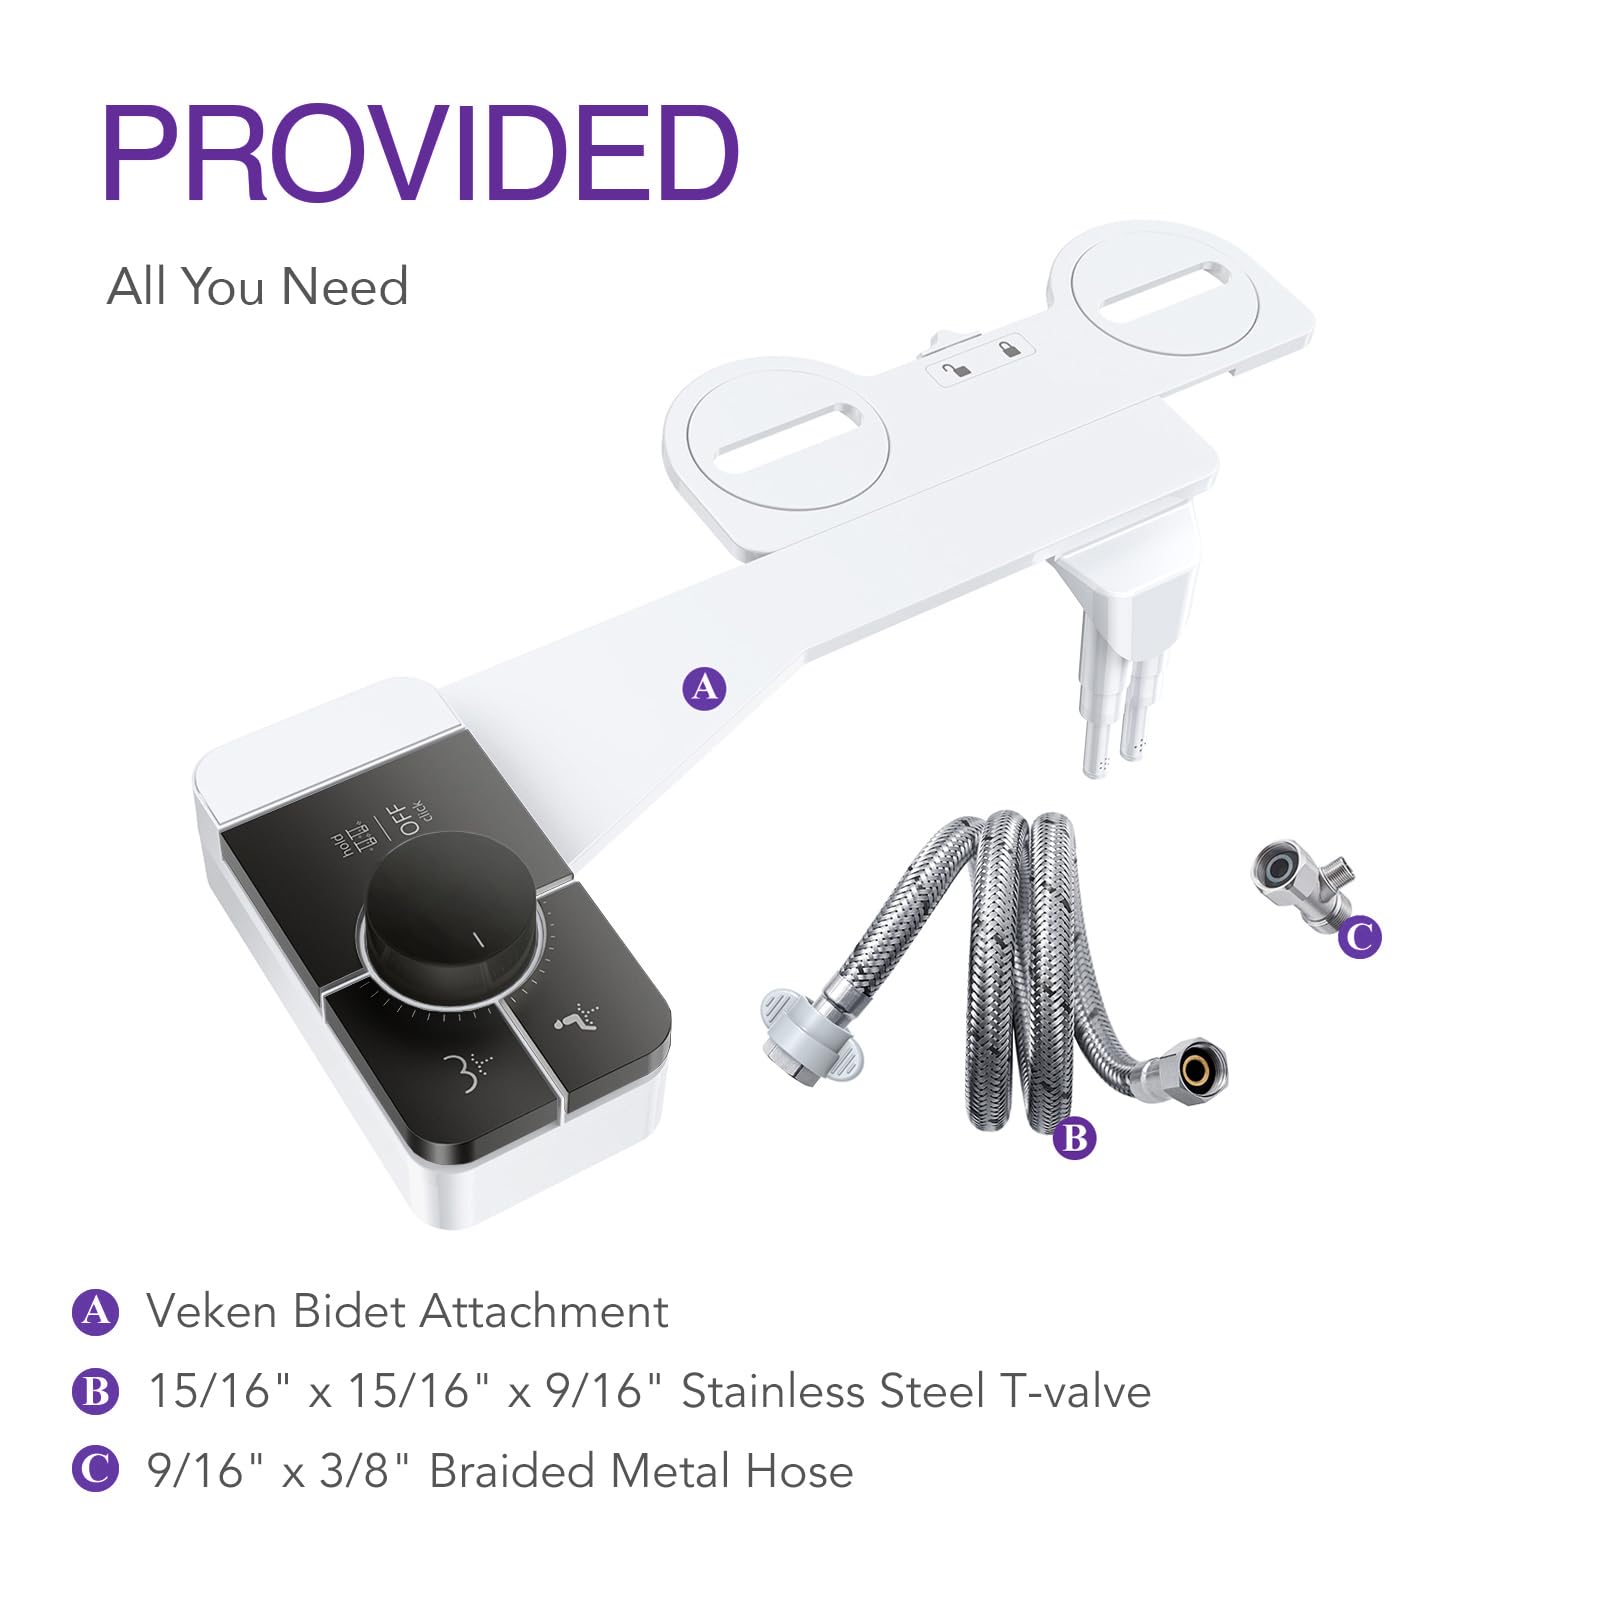
The Veken Bidet Attachment BDC3V111 is an ultra-slim, non-electric bidet featuring dual nozzles for feminine and posterior wash, adjustable water pressure, and a self-cleaning retractable nozzle. Made from durable ABS with stainless steel fittings, it fits most standard toilets for quick installation, promoting eco-friendly hygiene with a polished contemporary finish.


| Brand | Veken |
| Recommended Uses For Product | Bathroom |
| Mounting Type | Wall Mount |
| Finish Type | Polished |
| Material | Acrylonitrile Butadiene Styrene |
| Color | Black |
| Number of Handles | 1 |
| Included Components | 3/8" x 3/8" Braided Metal Hose, 7/8" x 7/8" x3/8" Stainless Steel T-valve, Veken Bidet Attachment, 1 x Fixing Plates, 1 x Installation Instructions |
| Special Feature | Posterior Wash, Feminine Wash, Adjustable Water Pressure, Ultra-Slim, Non Electrical, Nozzle Self-Cleaning, Easy-detach |
| Handle Type | Push Button |
| Style | Contemporary |
| Installation Type | Single Hole |
| Model Name | BDC3V111 |
| Number of Pieces | 1 |
| Handle Material | ABS |
| Item Weight | 1.43 Pounds |
| Handle Location | Center |
| Speaker Cutout Diameter or Length | 0.47 Inches |
| Spout Design | straight |
| Hose Length | 17.72 Inches |
| Is Electric | No |
| Manufacturer | Veken |
| UPC | 850029083849 |
| Product Dimensions | 15.55"D x 8.27"W x 4.32"H |
| Part Number | BDC3V111 |
| Item Weight | 1.43 pounds |
| Item model number | BDC3V111 |
| Finish | Polished |
| Item Package Quantity | 1 |
| Special Features | Posterior Wash, Feminine Wash, Adjustable Water Pressure, Ultra-Slim, Non Electrical, Nozzle Self-Cleaning, Easy-detach |
| Batteries Included? | No |
| Batteries Required? | No |
| Warranty Description | 2 Years Warranty |
L**E
Wonderful Installation & Functionality
I purchased the Veken Ultra Slim with the push buttons and have found the installation and functionality to be everything that I hoped it would be. I was initially cautious after reading some comments about this bidet leaking but suspected that installation errors could account for most problems people encountered.Installation was very simple and generally pretty quick. The first thing I did was prepare by selecting my tools, cleaning the toilet and the surrounding floor. I also found myself a thick towel to lay on the floor to provide some cushion. Ready to proceed, I turned the water off, flushed the toilet and removed the seat. Next I disconnected the water line that connected on the toilet side.One of the most important steps in installation and possibly the source of many complaints, is the water line connection points. The hardware provided by Veken is of high quality, so as long as you do not cross thread the connectors and use thread tape, then it should not leak at all. Thread tape? Yes, go to the hardware store and buy a small role of thread tape so you can wrap the threads. Thread tape is typically 1/2" in width and costs about $1 at Home Depot. I typically wrap the male threads about 1-1/2 times, making sure you wrap them in same direction as you will screw on the connector. You do not want to wrap the tape on too thick as it may prevent the connector from tightening all the way. 1-1/2 turns is enough to seal the threads and once the connector is tightened, it should not leak at all. If it does leak, it is most likely an installation error. I freely admit that when I applied my thread tape, I was not paying attention and wrapped it on the wrong direction. When I tightened the connector, it caused the tape to move and cause a leak. I realized my mistake of wrapping it the wrong direction and the did it correctly and it did not leak at all.I will also say that I appreciate the ability to unlock the bidet from the mounting plate so easily for cleaning. I initially wanted to buy the Veken model with the round slim turn knob but noticed that it did not incorporate the quick disconnect feature that this model has. It is my hope that Veken will update the model with the round turn knob with the quick disconnect, and if they do, I will certainly buy it.Lastly, after using the Veken bidet for a few days and finding that it is functions perfectly, I bought a second one. The installation was less than 10 minutes on the second one since I already had some practice. Using the thread tape, I have not had any leaks on either of out units.Great Buy & Highly Recommend!
M**N
Easy to install, good price : quality value
BEFORE PURCHASING: I used the handy measurement graphic on the item description to ensure it fit my toilet and seat - it did. I highly suggest you do, too.IMPORTANT NOTE: I always read reviews prior to any purchase and did so with this bidet as well. I typically read a couple dozen and call it good. I didn't happen to notice the particular "issue" I encountered, so here it is: The item photos suggest that the spray nozzles themselves are always visible, so imagine my disappointment when I unpacked the pieces only to see............no nozzles on the bidet, just two posts where they should be! For a couple minutes I thought I had surely received a factory defective unit. After a few minutes of head scratching I assumed that they would release and extend once the water was turned on and they were pressurized by hitting one of the "on" buttons. I unexpectedly verified this after getting everything connected, turning the water back on, and hitting the "on" butt button..............with my face squarely in front of the not-yet-extended nozzles. SURPRISE! The wife got a big kick out my dripping face. STORY MORAL: don't despair - the nozzles are there.I'm not quite certain why anyone would have difficulty getting this bidet connected. The item description gives clear measurement instructions to ensure proper fitment; instructions in the box are certainly clear enough and don't entail a large number of steps; the parts were all there, the T-connector is steel, no plastic parts - no problem. I got it all connected in about 15 minutes and we were off to the races with NO LEAKS.HELPFUL HINT FROM A NON-PLUMBER: I used one, single wrap of teflon plumber's tape on each fitting that had an exposed thread (the fitting off the bottom of the toilet's water closet, one of the fittings on the T-connector, and the one on the body of the bidet itself that the water line connects to). Remember to always wrap in a clockwise direction while looking directly at the hole of the fitting! The nut fitting will screw in that direction and will appropriately seat the teflon tape as it will "ride" along in the direction of the nut being screwed over the taped fitting. If you put the tape on backwards, screwing on the fitting will unseat it and push the tape backward, compromising the tightness of the connection and leaving room for leaks.I just installed this yesterday, so I don't have a lot of usage to report on yet. What I can say is that once extended, the nozzles seem to be aimed perfectly based on their positioning at the very center of the toilet bowl's back edge. Make sure to line them up this way! We did dial the pressure way back to about 3 on the dial at Wifey's request. For the money, it's a quality piece, installed quickly and easily, and seems to do the job. I can't yet comment on the self-cleaning function, but will assume it won't have any issues. We are on well water with heavy iron and a fair amount of hardness in our water, so I expect we may need to replace this in several years, but for the cost of this bidet attachment, I'm almost tempted to buy a replacement NOW so all I'll need to do is just swap out the actual bidet body and won't need to disconnect/re-connect everything (other than the water line to the bidet).If you're in the market for a bidet attachment, it's worth giving this one a try. Though it's our first bidet, I'm confident saying that this one is a pretty safe bet for the relatively low cost involved. If it's YOUR first run at a bidet attachment, I doubt it gets any simpler than this.
Trustpilot
1 day ago
1 month ago