
🚀 Unleash Your Inner Jedi with a Wall Mural That Speaks Volumes!
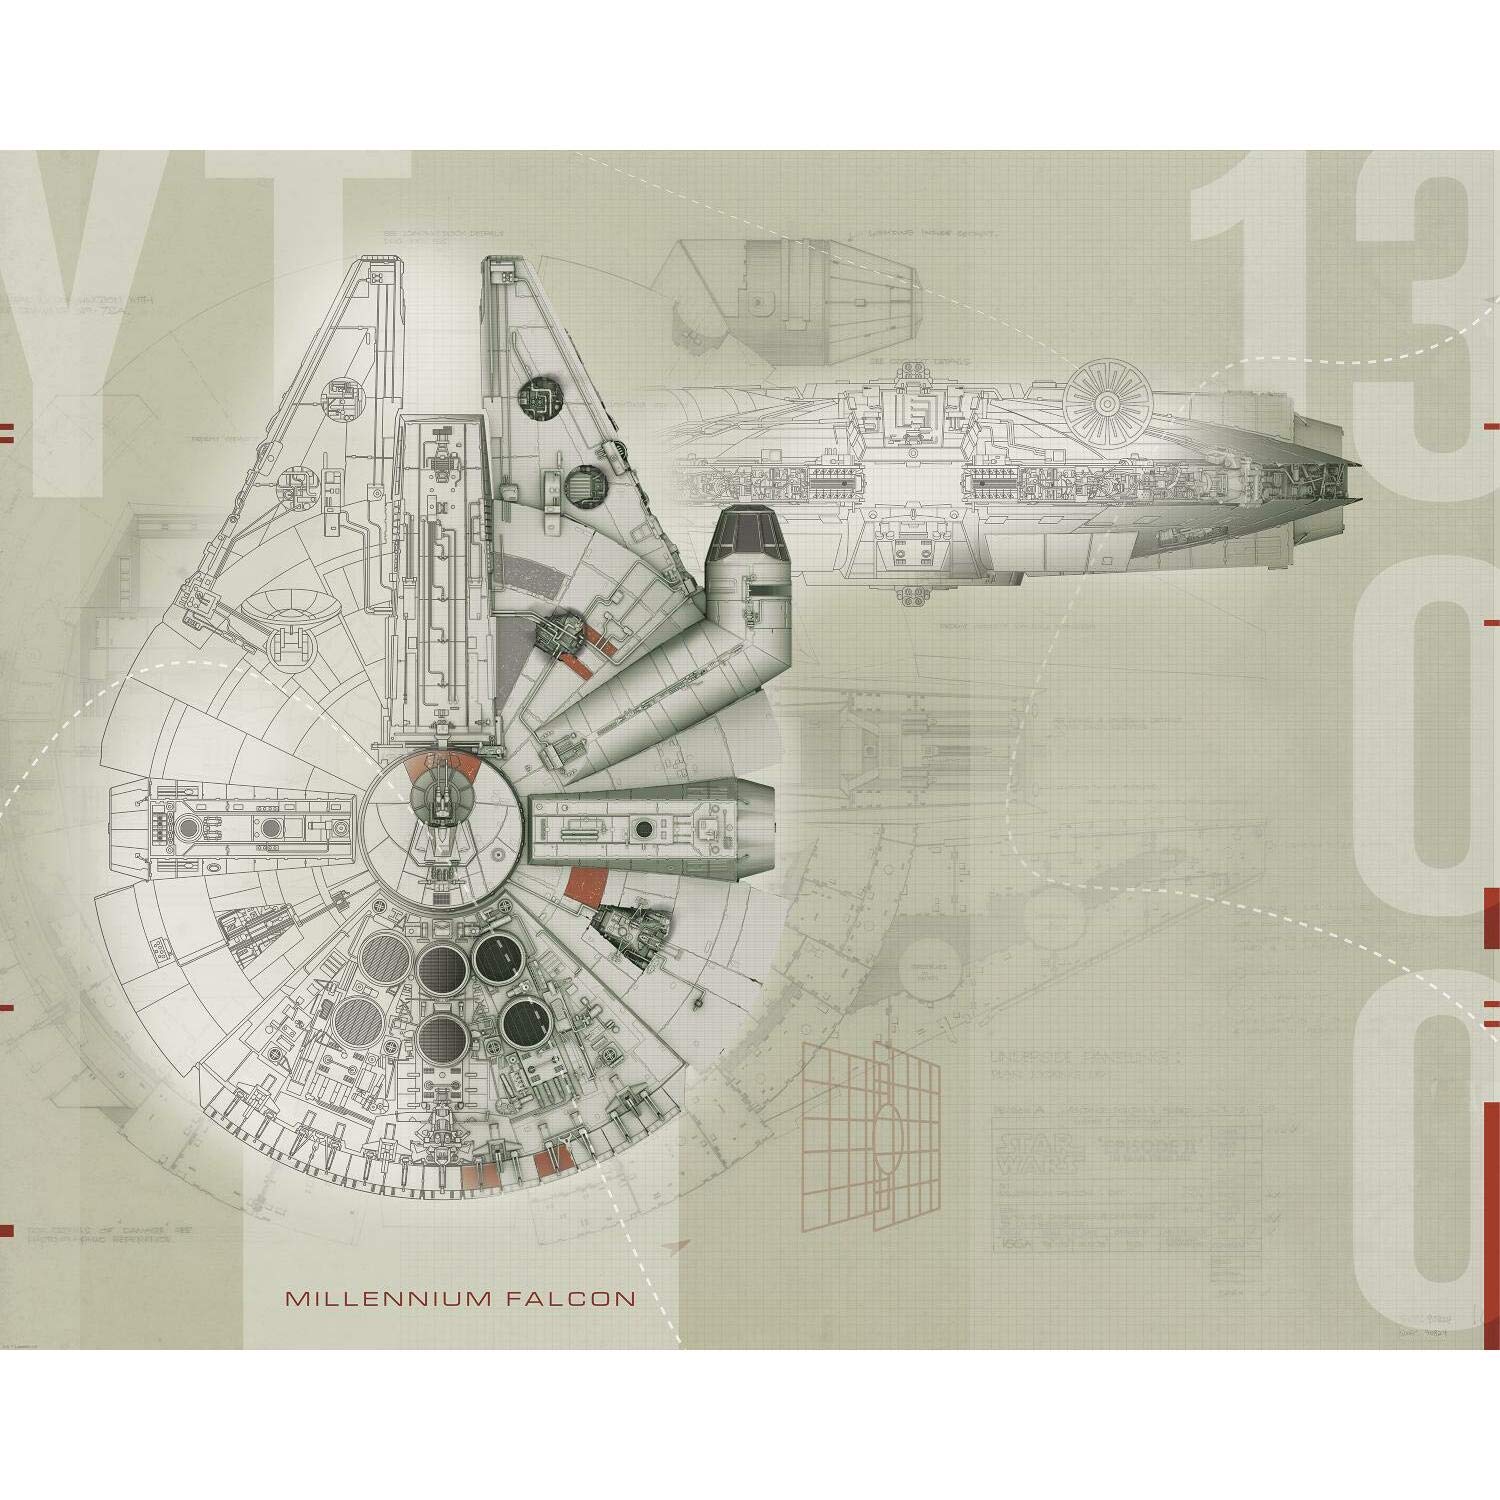
The RoomMatesJL1401M Prepasted Wall Mural features a striking 7.5' wide by 6' high design of the iconic Millennium Falcon. Made in the USA, this mural comes with five 18-inch panels that are pre-pasted for easy application—just dip in water to activate. It adheres to any smooth surface and is both washable and strippable, making it a perfect choice for those looking to add a touch of Star Wars magic to their space.
S**Y
Not as hard as you think
Not hard to put up, however it's way easier with two people. You really gotta soak this with water. We found that the best way to make sure that there's proper covered with water was to roll it up while we had it in the wallpaper water container. That way you get an even coat of water on the adhesive. If you just don't get in you'll have air pockets in it and then those will leave dry spots on sheets what you don't want because that just causes an air pocket.But if you take your time you'll figure it out and it looks great when it's done.
T**T
Awesome - Exactly as described and easy to install
This is an awesome wallpaper mural for any 1-200 year old. It is exactly as described and made of a very durable material that is easy to work with.Picture 1To complete the project you will need a step stool or ladder, a tape measure, level, pencil to mark wall, a scissors or exacting knife, a clean spray bottle filled with water, a wallpaper smoothing tool, a pair of good fingers and thumbs, a lint-free rag, most likely some kind of alcohol drink (I used vodka and cranberry, but beer and other alcohol drinks work just fine), 2-3 hours depending on how obsessive compulsive you are, and if you are a lucky enough Star Wars Geek to have a regular friend/Girlfriend/partner it is helpful.We have a pitched flat roof (they exist in Arizona-trust me) so I measured from the top starting point to the bottom-Six (6) Feet and 1-inch (fudge factor) and marked a level line using a 3-Foot Level at the bottom with an Erasable Colored White Pencil because we painted the wall “Black Magic.” I then did a vertical line using the level so I could line up the bottom left corner and know it was “straight-enough.”Picture 2The mural consists of 6-equal sided panels. They come on a sequential roll and you cut each segment.Picture 3After cutting, we placed the panel on the dining table covered in towels and sprayed the backside with a never used spray bottle filled with water. Use it liberally and make sure it is coated everywhere and on all edges.Picture 4After spraying the backside take each end and meet them in the middle (this is called book-ending, do not crease seams.Pictures 5 and 6Loosely roll up to the looped end and stop. You do not want to make any creases.Wait 4-minutes with a single panel rolled. Do not start a second panel until you are completely finished applying and smoothing the panel. It won’t save any time spraying them ahead of time and you will most likely ruin the panels by gluing them together. This project will probably take you at least 2-hours unless you are a professional wallpaper hanger (and I doubt you are).Picture 7Put your step-stool by the vertical and horizontal lines you created for the first panel. Unroll the first panel and remove the wallpaper from itsself so now the bottom back is completely exposed. Line up the bottom left corner and then gently smooth the wallpaper up until you have removed the top half and applied that as well. Make sure the panel is straight using the vertical line you created. If you get this panel crooked, all of the panels are going to either run uphill or downhill, or you will not have matched seams. If it is off by a fraction of an inch I wouldn’t sweat it unless you are lining up exactly with the ceiling or floor-this is why I left an extra inch for a fudge factor.Picture 8After you are satisfied with the position of the first panel, use the wallpaper smoothing tool to remove air bubbles. Be careful not to press too hard or you may mar the finish of the wallpaper. Make sure that all of the edges are applied firmly. Swipe the wallpaper smoothing tool both vertically and horizontally across the entire panel.Picture 9Then using a damp lint free damp rag smooth out the panel even more and to remove any excess glue.Be sure when using the wallpaper smoothing tool and the rag that you are always wiping completely out to the outer edges so all excess air and glue will be removed for a smoother finish. Always swipe to the right especially when you have two panels butted-up.After you are satisfied with the position of the panel, move on to cutting and wetting the next panel.When you are satisfied with the position of the two panels next to each other, use your thumb pressing firmly down on the seam to make sure it is matched as closely as possible pushing the new panel to the left to butt-it-up as tightly against the seam of the previous panel. As with the previous panel, make sure to smooth the panel with the wallpaper smoothing tool and your damp rag.Picture 10When you are done, hopefully it will look like this. We tried to make sure the bottom of the panel was lining up with the bed or dipping slightly below it for the best visual. Our wall was 11‘7“ so we had just a little over 6 inches on each side of the panel.As advertised this Miral is 10 1/2 feet wide by 6 feet tall.This project was quite simple as long as you have a few basic tools and time to do a good job.
K**I
Easy peasy, good quality, just do it.
It was a lot easier than I anticipated and pretty good quality. I even have slightly textured walls and I love it...looks amazing. I failed to read the directions and I spent a good five minutes trying to peel off the back haha.. you don't do that. After reading the instructions all I did was cut one piece off, spray the back with water, rub and sprayed it again, then stuck it on the wall. Its still adjustable once it sticks to the wall until it dries. This makes it nice to align the pieces up together fairly simply. Then I took a dry cloth and smoothed each piece out right after I got it where I wanted. Once on the wall I also resprayed the edges before putting next piece on, to assure long lasting adhesion.It took maybe two hours to complete on my own. I've never done wallpaper. This was my first time.. I also was doing laundry at the same time, so maybe an hour and a half..It was actually fun to me to hang up. I can't wait to do the rest of the walls..There's no option to add a photo right here. I will though if I find a way.
O**.
Room the Wall Mural does not work. This was going into a young man's bedroom.
I find that the room I want to put this wall mural in does not work. There are too many obstructions such as a wall electric plug and two wall heating/air conditioning vents. I understand the end return window wasMarch 28, 2022. I am wondering if you will make an exception.The Wall Mural is in good condition. It was not been damaged in any way. And you respond please?
A**.
Easier and better than expected!! A+ graphics!!
This turned out better than expected. Easier than expected. And my 12 yr old son LOVES It!!!I did it by myself. Take your time and have plenty space. It is much better with smooth wall. I had a textured wall that I smoothed out with joint compound it didn’t come out perfectly smooth. But Wallpaper still adhered nicely , tho in spots you can slightly see the texture of wall. I made sure I had all items/tools needed before starting. I measured out format on wall then I cut 1st panel. Then Using regular spray bottle on a mist saturating paper and edges. Look “booking” up. I was confused at first but googled “wallpaper booking” simply explained w/ photos. Easy peasy. While adhesive was activating 2-3 mins. I wound cut next panel. Then I’d adhere the prepped panel. Align and smooth down. I did need to spray edges and corners a bit. I used white washcloth to rub on/adhere and also to wipe any excess water or bubble out. Be careful not to apply to much pressure when removing bubbles at first. Paper may/will crease or bunch. Once done with adhering the panel I wound spray next cut panel, and then cut next while waiting to activate. And continue to repeat. It really was much easier than expected. And the graphics / print of wallpaper is great!!! Very very pleased!!! We’ll see how it holds up 😉
L**I
Fun item, easy to install
Very cool item, easy to install. I recommend adding glow in the dark paint to some of the stars for more fun.
H**Y
Love, love, love for any Star Wars fan
Fantastic mural for any hard core Star Wars fan. This turned out amazing in my sons room (see picture), my partner wanted this in our bedroom, our sons room was the compromise :)All in all this took about 2 hours to install by myself. I highly recommend using a spray bottle with water to wet the panels and then make sure you book the ends (fold over each side to let the glue activate). We live in a rental and it’s awesome to be able to personalize our space without worrying about losing our damage deposit.Oh and this mural is HUGE 10.5 feet by 6 feet, just as described so you need some serious space to do it justice.
C**4
May the force be with you
Great product. Fast shipping. Read the instructions before you do anything!!! I cut it into the 6 strips, paused a wallpaper tray and got it done with in a couple of hours. It looks amazing. This is a picture so it’s not sharp. It looks awesome!! My kid loves it in her room.
M**.
Bonito pero mejorable
Puesto en la fachada de un bar temático. Queda muy bien pero se despegaba y hubo que volver a darle cola en algunos sitios.
A**L
Love this!
My 7 year old thinks this is pretty epic and I'd have to agree. Easy to install if you've hung wallpaper before. Time and patience are key. I could see a rushed install making this mural look bad. I even had to wrap it around a corner and it looks great!
Z**A
Kid was delighted!
Recommended! You need to give yourself a bit of time and 2 pairs of hands is useful. Looks fabulous! We painted the wall a glossy black so that the edges blended nicely.
Trustpilot
1 week ago
3 days ago
