
DOWNLOAD THE APP


Customer Services
Copyright © 2025 Desertcart Holdings Limited
DOWNLOAD THE APP

🚀 Unleash Your Creativity with Every Print!
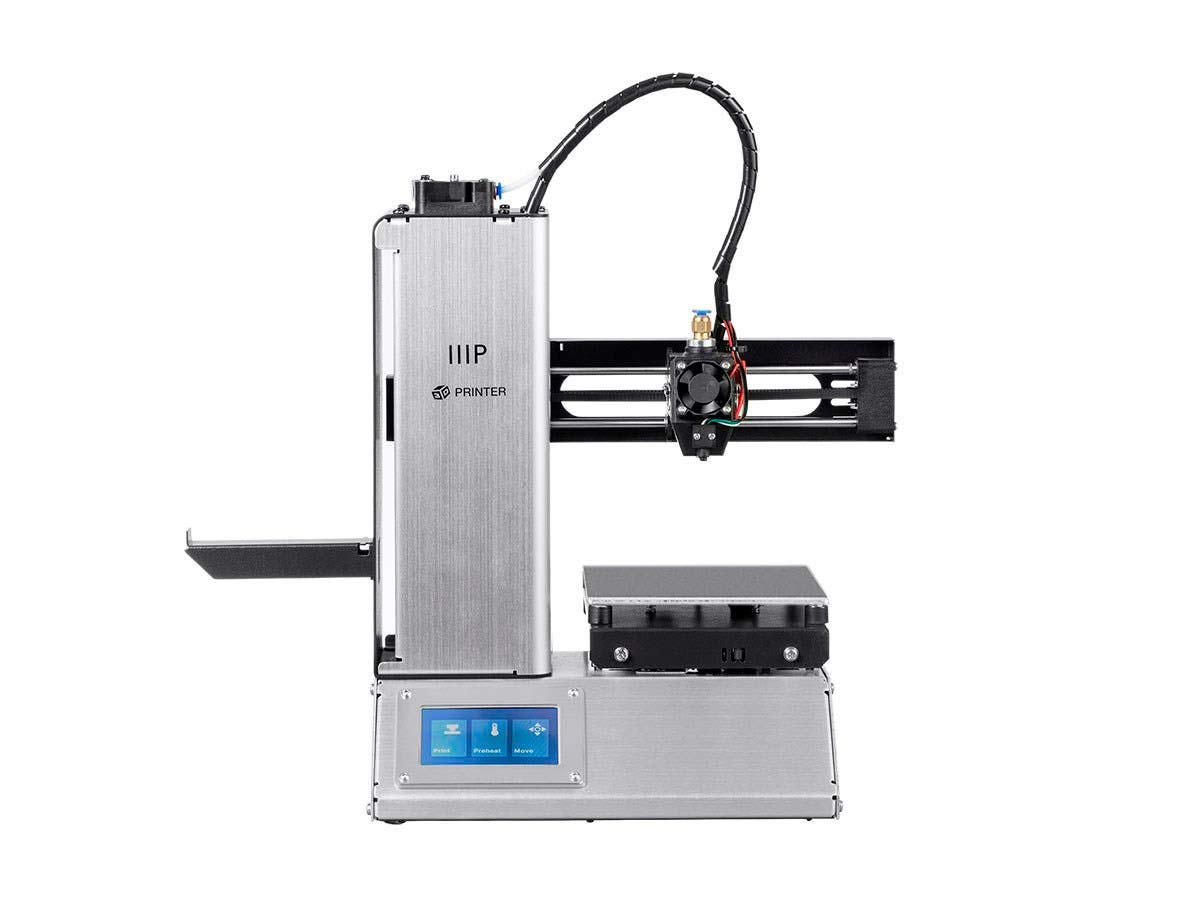
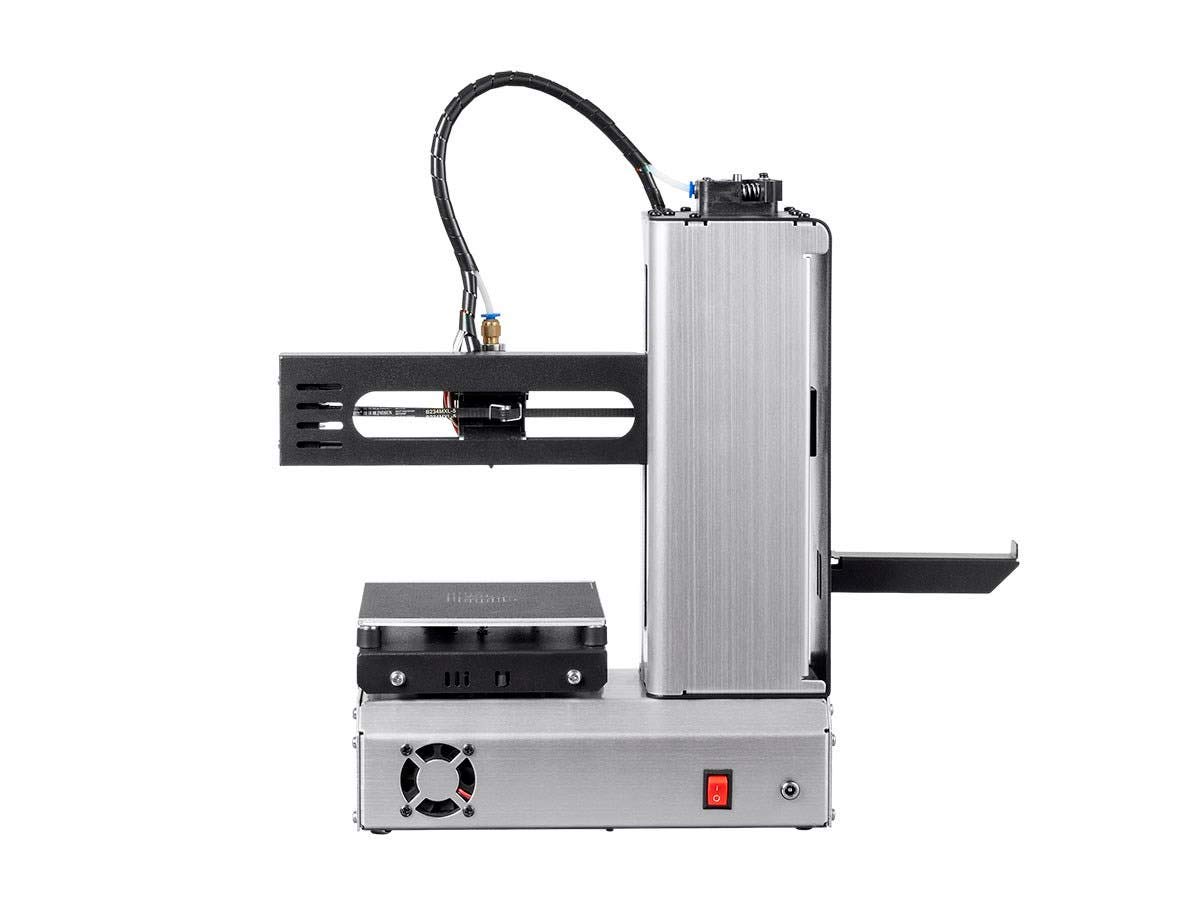
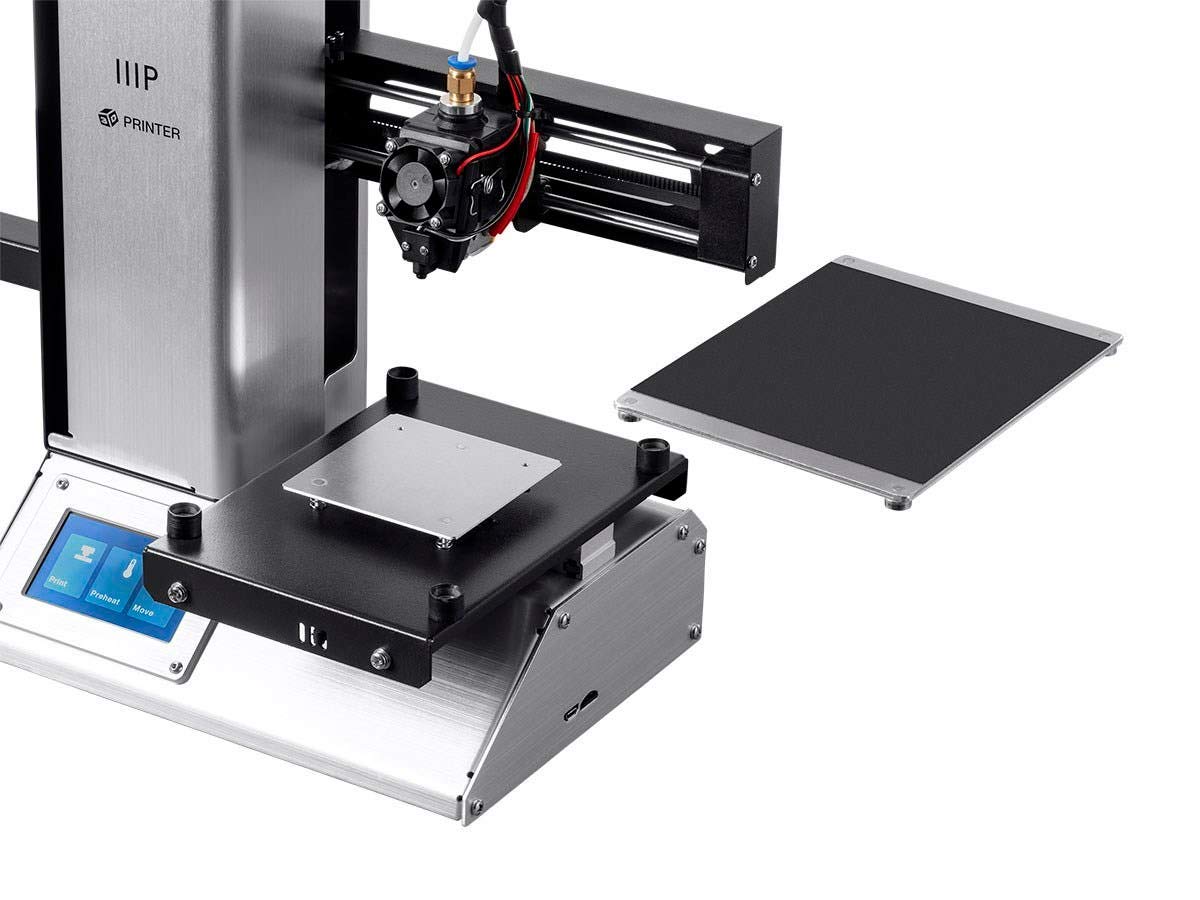
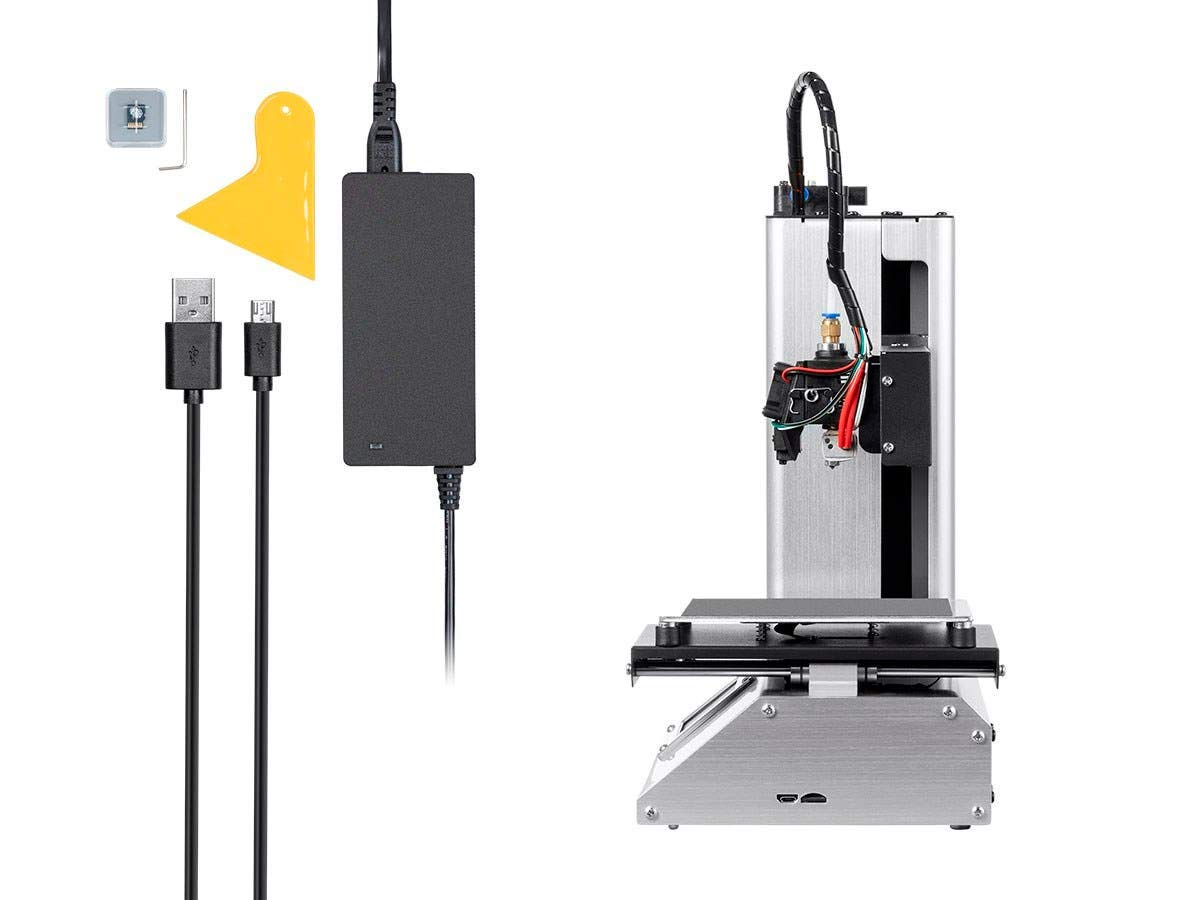
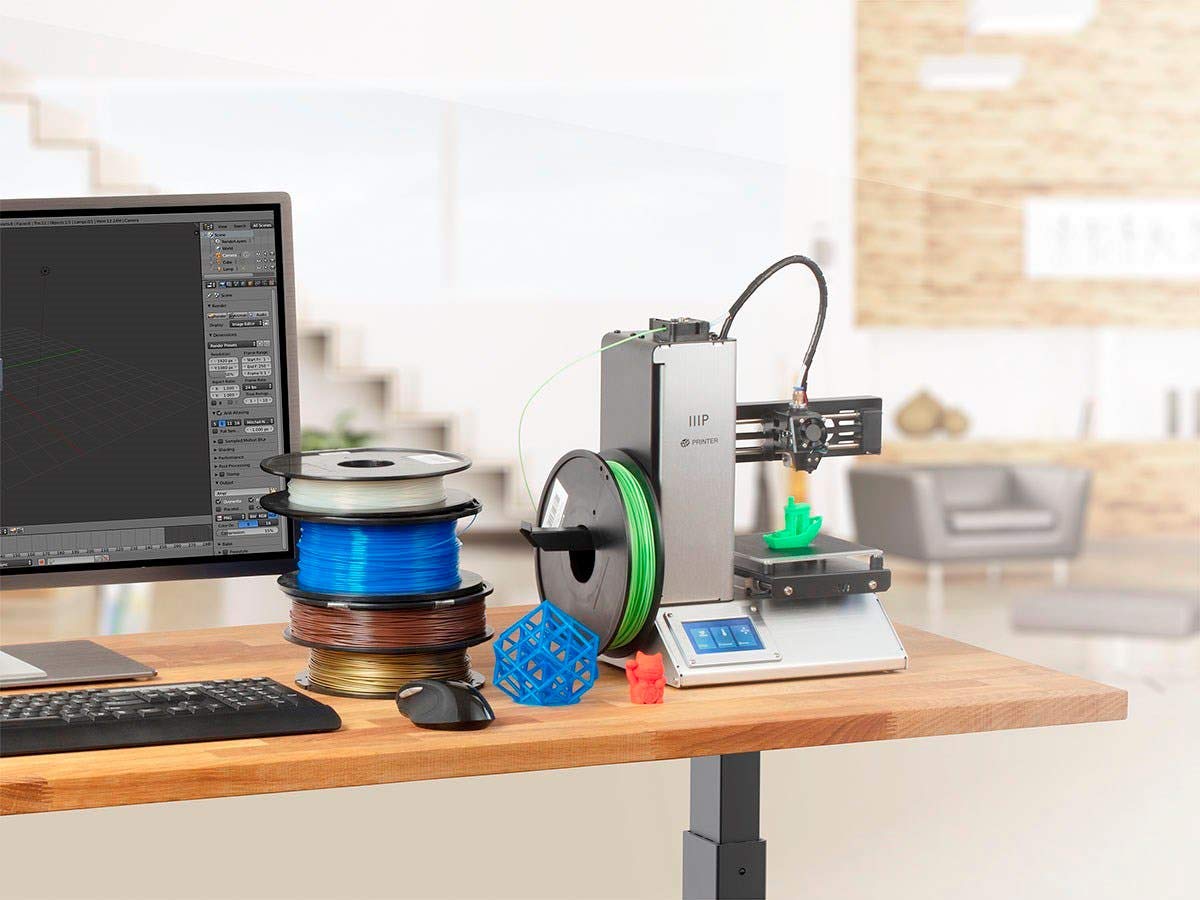
The Monoprice 133012 Select Mini Pro 3D Printer is a compact, fully assembled 3D printer featuring a 120x120x120mm printing area, auto bed leveling, a user-friendly touch screen, and a durable all-metal hot end. With a maximum print speed of 180mm/sec and a removable magnetic build plate, it’s designed for both efficiency and ease of use, making it perfect for professionals and hobbyists alike.
T**A
A budget printer that produces very nice prints reliably
I bought this Monoprice Select Mini 3D Printer for a young friend for Christmas and I am completely satisfied with it as an exceedingly affordable entree into 3D printing.I've owned Monoprice Maker Select 3D printer for 2 years now and my young friend has printed quite a bit on my printer. When Monoprice came out with this smaller, highly affordable printer, his experience with my larger Monoprice printer made this Select Mini a natural choice for gifting him. He was here for Christmas break so I helped him set the printer up and he printed non-stop for 2 weeks and I had the opportunity to work with the printer closely during that time.The features of this printer are quite impressive considering the price. It has a smallish build volume - 4.7" x 4.7" x 4.7" - but larger models can be split up into pieces or sized down. And really, the recipient (a 16 year old) has not found the build volume to be especially limiting. It has a heated bed. It's quite compact for people who are short on space. This would likely fit in any dorm room. It also comes fully assembled and ready to print. This is especially nice for people who have zero experience with 3D printing. You can print via a microSD card, a USB cable connected to your computer or over wifi.There is a 3.7" color IPS screen on the front and the user interface is very friendly and easy to use.I am writing this review for people who are completely new to 3D printing so experienced users will likely want to skip this. First of all, 3D printing is about as hands-on, DIY as you can get. For example, every filament is different - even from the same manufacturer. There can be variances in diameter, variances in printing temps, etc. That will affect your prints. The settings in your slicer are also critical and tweaking those settings is a part of the process. Your print bed must be very level and on this printer, that is done manually. It will seem daunting at first but soon, you'll be able to do it in your sleep. The main thing to understand is that there is a constant learning curve. Especially with a budget printer. However, there is a vast community of 3D printing folks who are extremely helpful and have posted countless videos and blogs that are filled with helpful information. There is likely an answer out there for any issue you will encounter.The included user guide is pretty good for setting this printer up the first time. It's also available at the Monoprice website for download. The printer ships with a plastic spatula for removing your prints, a tiny Allen wrench for leveling the print bed, the filament spool holder, the power adapter, a USB cable, and a microSD card that contains important files. More on that later.I suggest that if you purchase this printer, you order at least one spool of PLA or PLA+ filament because it only comes with a sample amount of filament. I have had great luck with Hatchbox brand. Be sure to order 1.75mm PLA. This printer will also print other kinds of filament but PLA is the easiest to print and is best for beginners, IMO. Also, I suggest buying some filament cutters like these Hakko CHP-170 Micro Soft Wire Cutter, 1.5mm Stand-off, 16 Gauge Maximum Cutting Capacity and some inexpensive calipers to check filament diameter FineSource Electronic Digital Caliper Inch/Metric Conversion 0-6 Inch/150 mm Carbon Fiber Gauge Micrometer Extra Large LCD Screen Auto Off Featured Measuring Tool - BlackThe microSD card comes with the install files for Cura, free slicing software you install on your computer that allows you to adjust your printer settings and send the model to your printer, as well as monitor the printing process. It also comes with a model of a cat to print. The included sample of filament is enough to print this cat model. Cura will need to have certain values entered that are specific to this printer and that is covered in the manual however, there are updated Cura settings available for download from the Monoprice website.I suggest after ordering that you watch a number of the great YouTube videos that demonstrate how to set up and print with this printer. It will make it even easier to start printing right away when your printer arrives. You should also read on various 3D printing websites about the basics of 3D printing that are common to all filament printers and then pages that are specific to this printer. There are also many videos that cover the modification I suggest later in the review.I purchased a small, tool bag for my young friend to keep his tools and supplies handy. I added a box of gallon zip lock bags to store his filament in because PLA can absorb moisture from the air so should be stored in something air-tight. I also place my printers on a single, ceramic tile so that I am sure it's on a completely flat surface. A 12" x 12" tile or larger is plenty big enough for this printer. You can buy single tiles at Lowes or Home Depot.Straight out of the box, the first print was quite decent (and looked fantastic to some other friends who had never seen a 3D print) and we had no issues with printing at all. We tweaked the settings a little for the filament we used and the next print was even better. Again, 3D printing is a hands-on process. We immediately printed a replacement knob for the printer which is easier to turn and it looks great and fit perfectly.I do have a concern about the gantry, which the print head moves along. It is only attached on one side and I can see at some point that it could begin to sag, which would definitely affect printing. There are already a couple of modifications that require only simple, 3D printed parts and a metal rod and some linear bearings. The parts cost ~ $25. This mod is next on my list. Search "MP Select Mini X Gantry Support + Camera Mount [Reinforced and Realigned] by svideo" on Thingiverse for the 3D printed parts and links to the necessary hardware.I also added a piece of glass to the print bed because I'm used to printing on glass and it provides a mirror finish to the bottom of prints. Google and you will find a template someone made to cut the glass the correct size. I just used glass from a cheap, Dollar Store picture frame and a thermal mat to adhere it to the bed, but you can use small, bulldog clips instead. FBApayipa 400mm x 210mm x 0.5mm Silicone Thermal Pad for CPU GPU HeatsinkThere are hundreds of thousands of models available for free on several websites. Thingiverse is one of the largest and you can find loads of models to print, all free for your personal use.Make no mistake - this is a budget printer. However, it's wonderfully affordable and produces nice prints reliably. NOTE: It's often on sale on the Monoprice website so check prices before buying.
P**B
Needs big red "check engine light"
The media could not be loaded. Let me explain: When computers first came out in cars, those of us hard-core mechanics hated the fact that we lost a bunch of gauges and were given a "check engine light". To make matters worse, we had to go by some fancy dancy piece of hardware to read the error code.Ok, the dinosaurs were then wiped out by a giant asteroid, we had an actor or two (who really knows?) as president, and the computers in cars have more or less taken over everything but ordering your special brew of coffee at Starbucks.Let me just say, this printer is great -- it's my first one, so I can't really compare the output to any of the top-notch brands, but 98% of them come out better than I originally expected. Price is right, and you have really got to take a hard look at buying 4 or 5 of these compared to a biggees.. Well, ok it only prints a 4" cube, but most of my stuff right now is that size.So what does that have to do with a "check engine light" you ask...Ok -- can you imagine your car not doing self diagnostics and telling you that your anti-skid break's are working or that the automatic transmission isn't connected? Sure, I don't know 100% if it's actually doing those things but there is some warm fuzzies knowing that it probably should be doing so. There are some diagnostics going every time you start up the card. All I can say is that I haven't had any major accidents, or been tee-boned by others in my life.So what does this have to do with this printer?There is no self-check or diagnostics in this printer as far as I can tell. Yes, there is a "Home Axis" button -- but actually that is the tip of problem -- it should do more.You get in your car, push the break peddle, and expect the car to stop. Everyone around you expects your car to stop. Sleazy lawyers make a good living when your car doesn't stop.. You expect it -- the manufactures design diagnosis into the car to continually check for it. It's even the law.Why can't you expect this printer to work like you expect the printer to work? It's so damm close to doing that !So here's my issue -- after printing a few great prints -- the first I've every done myself, the motors drove it's extruder head (the thing that the hot filament comes out of) into the bed, tore holes in the print surface off it, and might have bent up the print nozzle.Let me make this very very clear -- the MOST important calibration on these printers is the distance from the print nozzle to the print bed -- we are talking about one 10'th of a mm or more accuracy or more here - the thickness of a piece of paper. This printer completely and totally lost the ability to do that calibration and put itself out to pasture.. (OK customer support was great, and it's on it's way right now to be repaired free of cost)So what did I do next? -- well of course I did the smart thing and bought another one... I Got 30 or 40 really cool prints (I'm now to the point where I can create my own designs, crude yes so far -- using freeCad and cura -- but I can really get an idea of what these things can do)Then of course, the exact same thing happened -- lost Z calibration, nozzle into the bed, ripped up the covering -- but I caught it before it did too much damage.So -- here's what is actually happening -- its so stupid, and cheap to fix, and should have been caught at manufacturing time. Someone was trying to save a penny or two, or maybe software guys were designing hardware. I've spent hours talking to Customer support and getting my printer shipped back because of it.This printer is using a very tiny mechanical limit switch with a very thin spring steel bumper arm on it to detect that infamous "Z" axis height position. In fact -- this printer has absolutely NO idea of where the print head is other than its relative position (number of steps) from the home position. AND (yes, it gets worse) -- it has NO way to know if it missed a step, (something got in the way) and is totally out of alignment. (more than one step out of alignment on any of the three axis is going to cause a bad print)What happened was for some reason, is that the printer lost it's Z position and then slammed the print head down so far that it bent that tiny little spring steel arm on the most important part of this printer -- the "Home Z position" limit switch. It then tried to use this wrong position as it's Home, thinking that the position was ok, not having any way to verify that it wasn't, and proceeded to tear up the bed the next time it ran.This is a 2 cent part, that I finally figure out that I could bend - because who in there right mind would ever make this super critical part, that the entire adjustment of the printer is based on, able to be bent? Why would I even expect that?But I got past expecting that engineers don't make mistakes, and ending this tiny piece of spring steel back to a more workable position. Note that bending spring steel is not a high accurate operation, so I needed to re-calibrate the bed height compared to the printer nozzle Z home position. Trust me, after you've calibrate the bed height a few times, and you won't think it's a big deal -- it takes a couple of minutes.Helpful Hint: Use 2 pieces of paper, a big flat one on the bottom, and a 1" or so piece you slide under the nozzle. Big piece shouldn't move when you move the printer head. upper piece should be difficult to slide under printer head, and then head should then be hard to move. Congratulations, you've now calibrated the print head vs bed height to 0.10 mm!Back to my story -- lets just say my next print was gorgeous :-).I called product support -- the folks there completely missed this. When I finally prompted them with the right question - the guy on the chat line admitted "this could happen", referring to the bent limit switch arm. Had I not seen this happen twice I would probably not figured it out either.So here's my beef with this printer: 99.8 percent of it is working great, really especially for the price. But the MOST IMPORTANT PART on it, at least for getting accurate repeatable prints, is a 2 cent piece of cheap bendable steel, that anyone in their right mind would never expect to be there!There is no "check engine light" concept on this printer -- there's no self diagnostics -- in fact, there's probably nothing in the printer that could even drive this type of diagnostics.Easy to fix if it happens, just be sure to bend the bumper arm in the middle, you can reach it from the slot that the arm holding the spool of filament rests on. Be sure to re-level the bed after the you re-bend the arm.But IT SHOULD NOT HAVE BEEN BENT!I measure it -- it bent at least 2mm !. Keep in mind that layer height of the print is 0.2mm or so!But can this happen in normal operation? -- If you continually need to re-calibrate the bed -- it sure is ! It's not the bed or the print head that's getting screwed up -- it's this nice little happy bottom Z axis limit switch arm!VERY STRONG Recommendations: (about $2.00 in parts)This bottom-Z-axis limit switch should be optical limit switch for better accuracy and repeatably - There is at least 2mm hysteresis between on and off due to the arm bending (watch the attached video) -- and read all the reviews saying that you have to should "Home" it multiple times to get any accuracy out of it-- This cheap bendable arm is the WHY! It would be "best" if all 3 "Home" position limits switches were optical - but the Z-axis position is super super super (times a billion) critical.My other thought is that the hardware needs to be able to figure out if the printer is actually moving when it's asked to step. As I said, the print head was driven into the bed (two different printers) and they were both making an awful racket when the the bed wasn't moving, or was scraping the metal off the print head. Hell, even a microphone here to know it's making too much noise would be helpful. The motors stalled, and yet the software didn't know about it. If the motors simply were able to send out a signal when they rotated once (48 steps) -- and stop the thing if you ran it a couple of revolutions and didnt' see a rotation step.The filament heater didn't come on a couple of times when I started a print. The motor that pushes the filament into the head joyfully kept spinning against the non-moving filament the entire print job.. It was a wonderful totally invisible print with the exact same density and optical optical characteristics as air -- which would have been nice, but I was using white filament at the time.. In other words, nothing was printed, and the printer had no clue that was happening. Come on!Understand that this is a inexpensive printer, and the manufacture is going to cut corners. -- but what I'm asking for is just some basic critical simple idiot proof diagnostics, and alerting mechanism to indicate something isn't right in Denmark.In other words, this printer (and ALL printers like it) needs a "check engine light", and some basic sanity level sensors to drive it.Honestly, if I knew the printer could tell me when it was broken, I'd give it 6 stars, and recommend it to all my friends.. This problem is just plain stupid..-----------------I attached a video of the Lower Z axis limit switch getting triggered on a "Home" cycle. This is after I bent it up.It was completely flat before I did so. I probably changed the Z limit position about 3mm -- further than I really needed -- but it's now printing fine so I'm not complaining. Look at the arm bend! See and hear that hysteresis! This is the switch that NEEDS to be a optical.. But till then, what's above explains how to fix it -- Bend the arm in the MIDDLE, don't just pull it up and bend it at the point where it's joined to the actual switch.
P**Y
Buena calidad
Es muy compacta y la calidad de impresión es buena. Lo único que tuve problema fuera conectarla por WiFi a mi dispositivo, pero realmente uso la micro sd solamente. Es bastante buena por el precio.
L**N
Works flawlessly out of the box
this printer has worked perfectly for me, the issues the other reviewers seem to be encountering must be due to incorrect slicer configuration (user error, it took me a few tries to get that right myself) or poor QC.
A**R
Great Value and Quality, Up and Running Within 10 Minutes
The MP Select Mini is a great entry-level 3D printer. I started my first print 10 minutes after unpacking the printer and it was successful on the first run. It's compact and looks great on my desk. While I do plan to eventually upgrade to a printer with a larger and hotter build plate, this printer helped me learn a lot about 3D printing. I've printed almost a whole kilogram of filament so far after about 3 months of owning it - I mostly print small parts but if you build larger objects you'll use it up faster. The quality is acceptable to my inexperienced eyes, keep in mind that the lower the layer height the longer the print takes. I use Slic3r on OS X, using settings I found on the printer's subreddit (mentioned below).A friend of mine bought an Anet A8 kit around the same time as I bought this and he is STILL having issues with his printer. Meanwhile I'm printing away. I love it.Pros:- Up and running within 10 minutes, no assembly required.- Large, active community backing it (see /r/MPSelectMiniOwners)- Small, relatively light. good if you move around a lot (as I do because of school)- Looks great, solid build quality apart from the dial on the front face which is ridiculously hard to use precisely- Can print both PLA and ABS (as well as some other materials apparently)- Works with OctoPrint- Can't beat the valueCons- The included Microsd card is garbage and WILL corrupt files. Get a decent card ASAP, or connect to usb or use octoprint.- Preinstalled buildtak is probably impossible to get off (though you probably don't need to remove it unless you accidentally melt part of it like I did)- Cancelling prints sometimes causes the motors to turn at full speed and sounds like the belts/gears are grinding until you kill the power.- Bed only goes to up to 60oC which is a little bit cool for ABS.
L**R
Perfecta
Una maravilla... Ajusté la cama UNA SOLA VEZ y, desde entonces, ha impreso perfectamente durante semanas. Como referencia, tengo otra impresora mucho más grande, de esas populares basadas en el modelo de Prusa, que debo ajustar casi a cada impresión.. Además, esta impresora realiza mejores impresiones a 0.2mm que mi "Prusa" a 0.1mm. Su único defecto es que sólo puede hacer piezas pequeñas.Sin duda, si no quieres hacer piezas que sobrepasen sus capacidad de tamaño, si no quieres demasiados problemas ni pasar horas armando una máquina y si no quieres gastar 10 veces más en otros modelos con capacidades semejantes, esta es la impresora que quieres.Debo agregar que yo adquirí esta impresora cuando estuvo en 140dlls por lo que fue una verdadera ganga.. Al precio que la tienen ahora, no sé si sea la mejor opción.
A**R
Llevo 2 semanas con la impresora en uso intenso con diferentes marcas de PLA sin problemas!!
Me parece una excelente impresora para imprimir proyectos menores a 12x12x12 cm. Tengo una Dremel mas cara en precio que esta y la usaba para imprimir cosas pequeñas. Ahora con esta, dejaré la Dremel para objetos mayores y no desgastar la Dremel. Esta es más lenta pero puedes incrementar la velocidad en tiempo real a prueba y error sin sacrificar calidad. Ya lo hice y ya encontré ese balance. Claro que la recomiendo y mas si es por menos de $4,500 Mx.
Trustpilot
4 days ago
2 weeks ago