


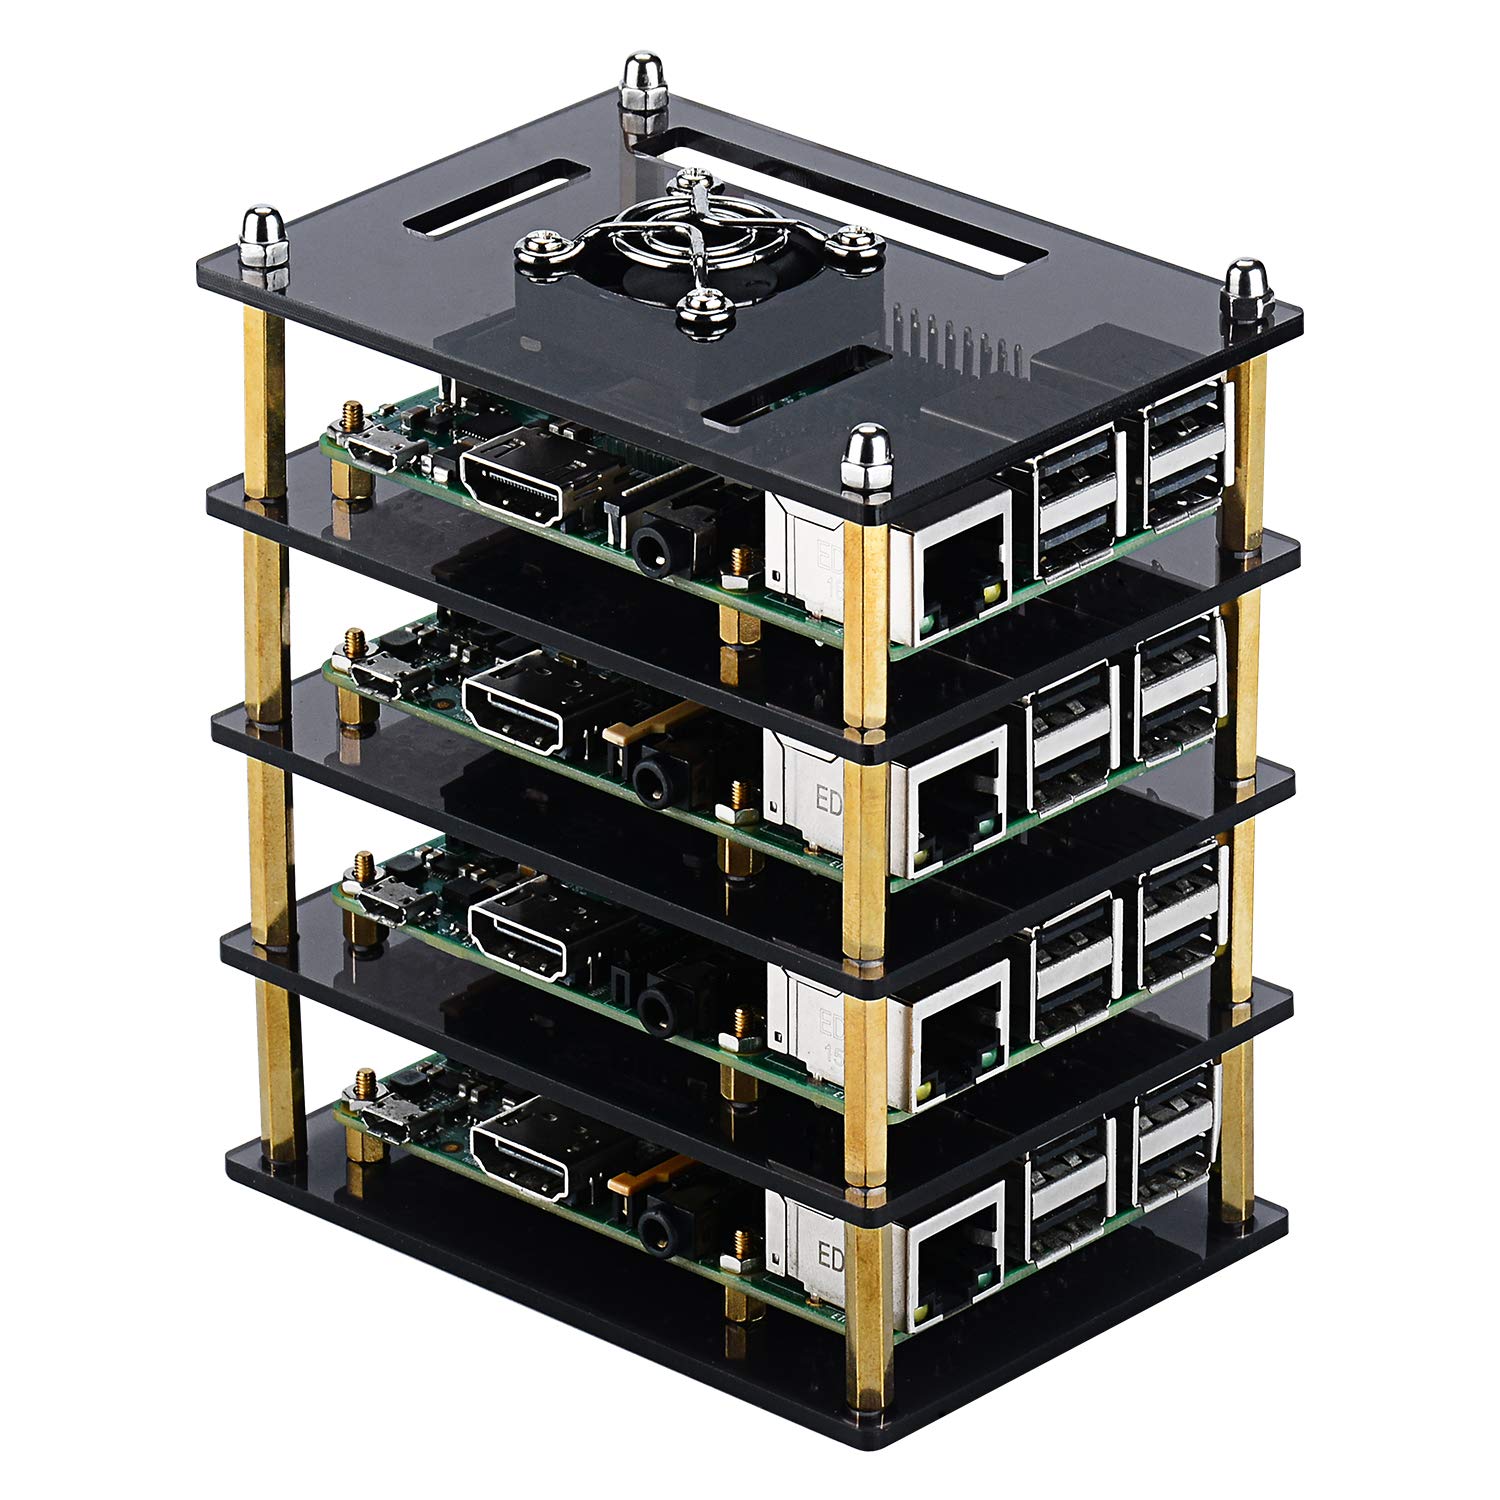
💡 Stack It, Cool It, Love It!
The iUniker Acrylic Raspberry Pi Cluster Case is a versatile and stylish solution for housing up to four Raspberry Pi boards. Made from durable acrylic, it features a built-in cooling fan and air vents to ensure optimal temperature management, making it perfect for tech enthusiasts looking to enhance their Raspberry Pi experience.
| Enclosure Material | Acrylic |
| Colour | 4 Layers-Brown |
| Cooling Method | Air |
| Case Type | Raspberry Pi |
| Fan Size | 120 Millimetres |
| Item Weight | 100 Grams |
R**R
Nice kit!
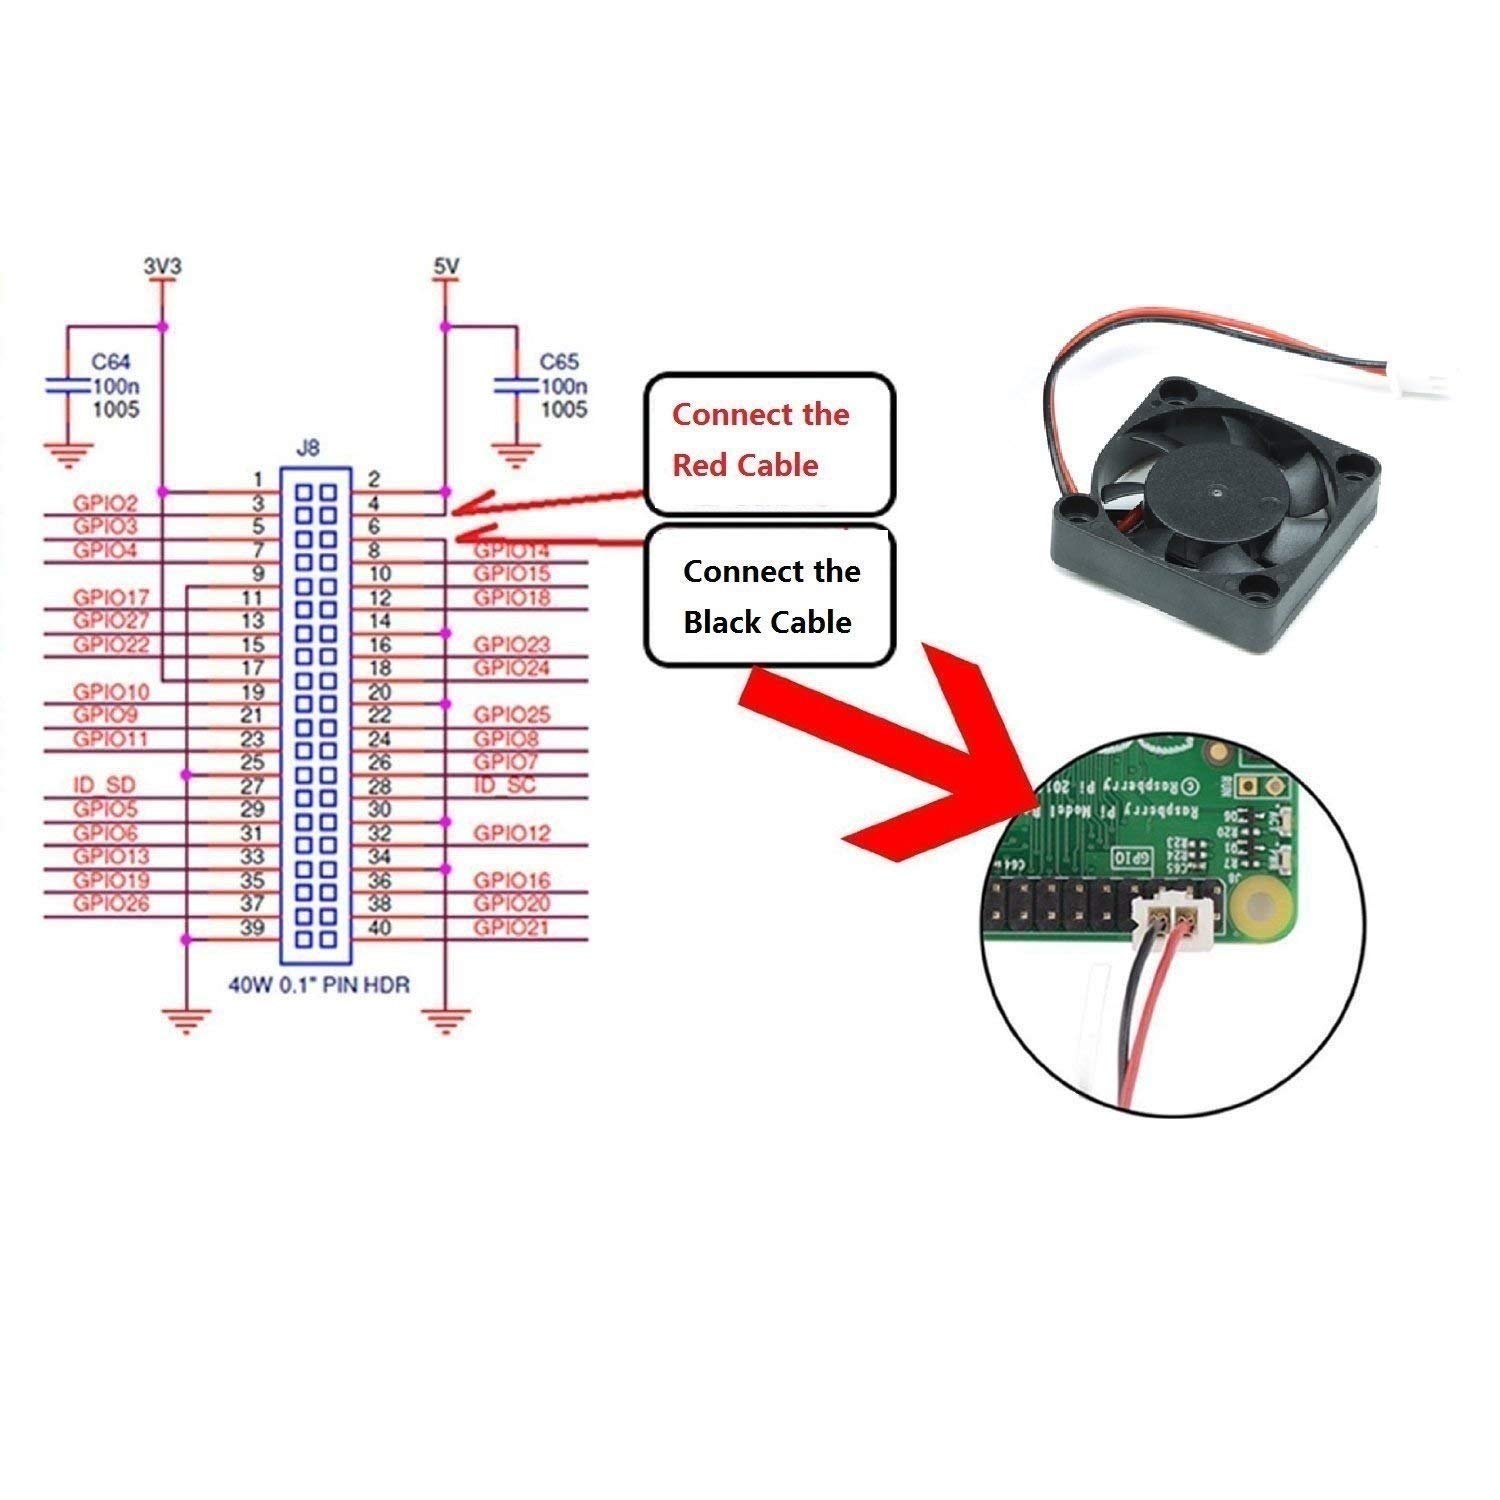
This is a very nice kit if you have multiple Raspberry Pi's. It was very easy to assemble, doesn't require that you have three hands, and provides a nice looking package with what appears to be good airflow (see the picture). The only tools you'll need are a pair of pliers or small wrenches for the nuts. The hardest part was getting the nuts that go onto the Pi standoffs threaded. You just have to be careful that you don't damage the Pi board with your pliers while you hold the nuts in place.Pros:- Easy to assemble. The kit comes with a nice assortment of heat-sinks and enough 'goodies' to stack up to 4 Pi's. I only needed to, so I just built it as two-tiers. The screws and hardware are all in well-marked packages that make it fairly easy to determine what is for what. They even include a little screwdriver for the screws, and if your fingers are dexterous enough, you may not need any other tools.- Absolutely quiet. There are options to run the fans in quiet mode or full speed. It could be that my hearing isn't that great, but I don't hear the fans at all on high, so I left them that way.- Nice looking. Take a look at the picture I attached. It's a nice looking stack. Mine only has two Pi's in it, but I've very happy with how it looks. Access to the ports is good and it makes for a clean installation. I've kept the remaining parts in case I decide to add another Pi in the future.- Good value. The price is right!Cons: None, really. It was fun to build and nice to look at.FYI, I added a RavPower 2.5amp 6 port USB power block and some 6 inch micro-USB cables (also available here on Amazon) to reduce the number of outlets that I need and to clean up the installation. Both Pi's are running cool and have plenty of power (red power LED's on).I do have a couple of suggestions for iUniker about the instruction pamphlet:--- Since the little bags with parts in them are labeled with text like 'For Mounting your Fan' or 'For Mounting your Pi', modify the instructions to use the same information so you know which baggie to use for a specific step. It ultimately became clear, but not until I dumped out the contents of all of the bags into separate piles so I could clearly see what was in the bags. So instead of saying in Step 3, 4x "small head screws" through the bottom panel, I think it would be clearer to say something like "4x screws and short standoffs from the 'For Mounting your Pi' bag.--- Determining which direction the fan should go was not as easy as it could have been, as the instructions say to make sure the label of the fan faces to the CPU chip. The problem is that unlike the picture, the fan doesn't have an obvious label - there is one, but it's black like the rest of the fan, with no writing on it so if you don't look closely, you won't see that there is a label and you could mount it backwards.--- The cutout for the fan on the plastic panel that holds the fan is offset to one side slightly so it lines up with the CPU on the Pi. This isn't mentioned in the instructions, and if you aren't focused on it, it is easy to install the fan so it's not directly over the CPU. I didn't catch this initially, and had to disassemble down to the middle panel to move the fan to the other side so it would be directly over the CPU. A little note about that would be nice, saying something like "Ensure you install the fan so it is directly over the CPU".Overall, this is a very nice product and I'm very happy with it, and recommend it!
I**O
Such a great cluster rack!
This iUniker cluster rack has helped turned my mess of a desk (with multiple RP cases) into a fairly neat and clean configuration. All parts were present (and a few extra screws/nuts thrown in for good measure), all the fans worked, and so long as you follow the installation directions (with very specific screw directions), it worked for me perfectly.The only tricky part of the cluster installation is peeling the protective layer off of the acrylic pieces. I ended up (carefully) using a knife to get under it, then pulling the protective layer up until it peeled off the edge. I wish it had a pull tab or something to make this process easier, but I'm not sure how they could do that since these pieces are cut from one big sheet.*** Other parts to my setup for those who want to replicate a known working configuration ****One of the reasons this setup is so clean is there is no power cables going to the RaspberryPi units. This cluster rack works with with the compact Power-over-Ethernet (PoE) hat from LoveRPi available on amazon here: https://amzn.to/38NqkFC (referral link). Note: The "Professional" version WILL NOT FIT (I know because I tried), so make sure you are ordering the compact version. The compact version WILL fit, but it's a VERY tight fit with the fans, so install with caution. Important Note: The PoE hat uses the GPIO pins that the iUniker instructions tell you to use, but it comes with pins that you can plug in to that serve the same function +5V and GND.If you're new to PoE devices, they require special equipment to make it work, but its worth it. You're going to need a PoE switch (or multiple PoE injectors) to make it work. The device I use is the Netgear GC108PP here: https://amzn.to/2UZ1FKn (referral link). There are cheaper PoE switches, but what I like about this device is that it is a managed switch, all ports are gigabit speed, and it can power both my PoE devices and non-PoE devices flawlessly. The "management" part of it means it gets its own IP address, and I can see statistics about how much power my devices are using, and how much data each one is using. It also notifies my email and phone if a device loses connection (or if my switch itself loses network). It has been handy in letting me know when my internet service provider is having an outage, and I'm not at home.The final piece of my particular setup that you see in the photo is the NAS. This NAS isn't sold, nor supported anymore, but still works okay for my needs. It's the Netgear ReadyNAS NV+, which has 4 hard drives in a hot-swappable redundant RAID array, so that if any of the drives die, I don't lose any data. All my RP4 systems are using different shares on this NAS as their primary storage media. This NAS (now 11 years old), is a little loud for a desktop setup, so I've been thinking of upgrading to a QNAP or Synology NAS. Synology are cheaper, but QNAP are much more powerful. I haven't tried either, so no affiliate links on this one - take a look at both and see which you prefer. They both have pros and cons.The RaspberryPi is such a great device, and I have no regrets or hesitation about recommending the the iUniker cluster rack.If you read this far, I hope some of this information helps you out. If so, please hit that "Helpful" button. Thanks!
A**R
Gret value. Will buy again soon.
Pros: The active cooling fans and heatsinks keep my stack of Raspberry Pi 4s (known for getting really hot after a few minutes) cool to the touch. The Pi 4s in my stack are all running web servers, and the fans have no trouble cooling the entire stack. The clear design is really nice and aesthetically pleasing. Cable management is also very easy due to my headless setup (4 power cables [one for each Pi] + WiFi). I have had these servers continuously powered on for about 3 months, and they're still running strong. The tower is easy to setup, HOWEVER...Cons: ...the assembly is best done with adjustable pliers and a proper screw driver. The product includes a small disposable screw driver that is good enough for assembly, but it may leave some loose standoffs. The bottom of the tower doesn't have any rubber feet, so it can easily scratch the surface it is on (although I personally don't mind this). One minor annoyance with the fans is that they begin to make slight rattling sounds after some time. Keep in mind that I have been running my stack non-stop for the past 3 months, so this may not be an issue for you.Overall, this product is pretty good, and I wouldn't hesitate to buy it again. If you're on the fence about it, just buy it. You won't regret it.PS: It includes heatsinks for Pi 2, Pi 3, and Pi 4.
S**.
Not difficult to build with basic tools
If you're mechanically inclined and a have a few basic tools: #1 phillips, small pliers, possibly a small socket or nut driver then this thing is very easy to build. The included instructions suck, but I was able to build mine from the pictures here.I love having my different pi-based servers in one package like this.Component quality varies some. The acrylic is nice and the fans are quiet. Not sure how long they'll last but I don't even notice them for now. Will probably replace with something high quality eventually.A couple of notes:* I found it better to use the screw side of the short standoffs on the raspberry pi itself. If used the other way around the nuts can be difficult to install (limited space).* The tall standoffs are of poor quality. Take care when aligning them between layers. They don't all stand completely straight. This could be easily fixed if you have a belt or disc sander.* I managed to zip tie an Anker power supply and Netgear 5-port switch to the bottom. With very short cables and a few more zip ties it is all in one assembly and nice and neat!
C**S
Fantastic Kit, looks great and more importantly functions well.
Arrived damaged some of the screws and bolts missing too along with some of the female ends of the nuts unthreaded. It was clear it was a used unit.There is plenty of airflow and the included accessories are worth the purchase. It's low profile compared to other designs as you really only have to build with single glass acrylic and bolts. Aside from dealing with the missing items, this product is well worth the purchase. Not certain about the seller though and the quality control with damaged or in my case, used products.
Trustpilot
2 months ago
1 month ago