

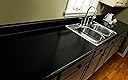



Rust-Oleum Countertop Transformations Kit
Product ID: 12549980
Details
- BrandRust-Oleum
- ColorOnyx
- Finish TypeSatin
- Item Volume70 fluid
- Paint TypeEnamel
- Size70 Fl Oz (Pack
⏳48-hour dry time
🖤Onyx black satin finish
🛠️DIY weekend project
Desertcart purchases this item on your behalf and handles shipping, customs, and support to Israel.
🖤 Elevate your countertops — because your kitchen deserves a glow-up!
Rust-Oleum Countertop Transformations Kit in Onyx offers a professional-grade, satin finish that mimics natural stone. Designed for easy DIY application, it transforms worn laminate countertops into durable, stain-resistant surfaces with antimicrobial protection. Covering up to 50 sq. ft., this US-made kit dries in 48 hours and includes all tools and instructions needed for a weekend renovation.


| ASIN | B004LB5EVY |
| Age Range Description | Adult |
| Best Sellers Rank | #1,019,366 in Tools & Home Improvement ( See Top 100 in Tools & Home Improvement ) #10,607 in Wallpaper |
| Brand | Rust-Oleum |
| Brand Name | Rust-Oleum |
| Color | Onyx |
| Color Code | Black |
| Container Type | Can |
| Coverage | Full |
| Customer Reviews | 3.9 out of 5 stars 83 Reviews |
| Dry Time In Hours | 48 |
| Finish Type | Satin |
| Global Trade Identification Number | 00020066204525 |
| Included Components | PAINT CNTRTOP RFNSH KIT ONYX |
| Indoor Outdoor Usage | Indoor |
| Is Waterproof | False |
| Item Form | Liquid |
| Item Volume | 70 fluid ounces |
| Item Weight | 7.4 kg |
| Manufacturer | Rust-Oleum |
| Model Name | 258284 |
| Model Number | 258284 |
| Paint Type | Enamel |
| Part Number | 258284 |
| Size | 70 Fl Oz (Pack of 1) |
| Special Feature | special_feature |
| Special Features | special_feature |
| Specific Uses For Product | Interior |
| Surface Recommendation | Stone |
| UPC | 020066204525 |
| Unit Count | 70 Fluid Ounces |
P**T
Fabulous product!
When I heard a colleague talk about this product, I thought I had to give it a try. The results are amazing! I was indecisive about colors but with one click I had chosen the onyx. I absolutely LOVE it! Once the chips were on, I knew this was perfect; then, I sanded, and it seemed the color changed more to white. HOWEVER, when you finish sanding and wipe with a wet towel the color changes to the beautiful onyx with some gray specs. PERFECT even with MY installation imperfections:) As far as the process, I made a few mistakes, but overall, the end result looks fabulous. I am a thinker, so having to complete the project in 20 minutes made me extremely nervous. I set a timer and finished all glue and chips in 28 minutes by myself. All set well even though I forgot to spray one small section. I actually wore the diamond sander down, and then, I realized a textured surface would be great:) I quit trying to get a perfectly smooth surface. Not a big deal at all! I used almost all of the base glue and scraped the top coat can clean; however, I managed to get right at 50 sq. feet of counter space completed. I should have purchased two smaller containers to ensure plenty of materials, but once ordered, there was no changing my mind. Clean up: I thought I could sweep the mess away, since I did not own a shop vac; however, I soon broke out my good vacuum for the dusty clean up of the sanded area. I swept up most, but vacuumed the remaining dust and pieces that kept showing back up. I was most concerned about our cats getting the top coat on their feet, but overall, I hung plastic sheets from our cabinets with chairs around the counters to ensure little paws stayed away. Only two weeks in, but the surface seems durable. I did drop a tile or two when installing the back splash, and after close inspection, no damage done at all. Just my husband and I, so we have only light use anyway. If you want a nice finish, but cringe at replacement costs, this is your product! Love the ONYX!
D**D
Great product - Helpful Hints
We just finished our counters a couple of days ago. Overall, this is a terrific item. For $200 or so, it improved our tired countertops tremendously. Many of the reviews that we read here were helpful. A few of the things that we learned: 1. Everyone is right about the "too many chips". The kit comes with six bags of chips. We piled them on, and still used just four bags. 2. They are also right about "too little basecoat". Our counters are about 40 square feet. If we had applied the basecoat "like frosting a cake", as instructed in the video, we would not have had enough. To be sure that we did, I only poured enough basecoat into the pan to cover the rough percentage of countertop that we were tackling. That is, the first section of the countertop was about 1/3 of the total, so I poured 1/3 of the basecoat into the tray. This is the only way that you can ensure that you won't run out of basecoat. In the end, the coating was plenty thick enough to cover, but it was not like frosting a cake! 3. Make sure that you watch the video before day one and again before day two. It's not complicated, but if you screw something up, there is no fixing it. 4. Take the time to hang plastic sheeting all around under your countertop. I figured that it was only important to hang the sheeting in places where I might slop basecoat onto the cabinets. That was not schmart, as... 5. ...those chips stick like glue to your cabinets and floor, even where there is no basecoat. 6. A corollary to #5 is that you should not even think about doing this project without a good Shop Vac. And forget about that silly brush attachment they use in the video. It's terrible. Use the T-shaped "utility nozzle" (the one that looks like your vacuum cleaner head). 7. You are probably going to have some imperfections. We were pretty careful, but there were a couple of places where the basecoat apparently did not adhere. Probably we didn't properly clean and sand these areas sufficiently. Also, we have straight (not rounded) edges on our counter, and you are likely going to sand the finish off in at least a few places. If you want to spend the time, you can fix it. Or you can do what we did and touch these up with a black Sharpie (we used the Onyx kit). 8. The sanding looks really easy and fun on the video. It is some real work. The two sanding tools are terrific, but it takes some elbow grease to get the counters smooth enough for the top coat. Prepare for a great upper body workout. 9. Last tip: Be prepared to not use your counters at all for at least four days. Today is day four, and we are just able to put light objects on the counter. Plan to visit your local restaurants often! Good luck. If your expectations are reasonable, you will love this product.
J**T
Messy but worth it
I bought this kit after trying the Gianni brand. I hated the way the Gianni brand turned out, it was blotchy at some areas and not enough paint. I must say this Rust-Oleaum Kit is AWESOME. Very easy to use and turned out better than I expected. Yes it's very messy but worth the mess. Do yourself a favor and buy this kit.
A**L
EYESORE smack dab in the middle of my kitchen! — Rust-Oleum really needs to address this!!!
I purchased 2 Large Kits in the Onyx color. I spent hours and hours reading the reviews and made sure to measure the surface area that would be covered before ordering. I was a bit nervous because other reviewers had noted that the product descriptions and the specifications said two different things: one said that the product would cover 25 feet yet it stated somewhere else that it would cover 30 sq ft. Because other buyers had run into problems, I wanted to play it safe; so, I purchased TWO LARGE KITS, even though I should have been able to do the job with one kit based on the product info. After the kits arrived, I read through all the instructions, watched the DVD and also watched a few videos on YouTube about this stuff. The process seemed simple enough—I am an automotive painter and I enlisted the help of our house painter who had used the product before on two occasions for his other customers. We followed the instructions exactly as directed and there were several flaws: There really NEEDS to be a BLACK primer in the kit if the base coat and chips are meant to be a dark/black color. This would make for a far better finished product. —but there wasn’t a dark primer... and no mention or suggestion to customers to use a dark primer when covering light colored counters (as we were). There is not nearly enough base coat to cover the surface area; plus when applying the base coat brush strokes would show through in some places. If there were more base-coat provided, then another layer could be applied over the problem areas but there just wasn’t enough material. (I used the base coat from both kits and there wasn’t enough for the square footage that one kit was supposed to cover) Then we applied the chips. In the kit there is a sample to show what the countertop should feel like once sanded—like a reference tool to use while sanding to see if you are done yet... PROBLEM—once we sanded the first section down to the level of smoothness on the reference card—the original surface color (white) showed through. We would have attempted to remedy this by adding more base coat—then more chips.... but there wasn’t enough base coat to apply. So, NOW THE MOST VISIBLE COUNTER SPACE IN MY KITCHEN—THE ISLAND— is a MAJOR EYESORE! For the rest of the kitchen we hardly sanded it down and figured it was better for it to be rough than to have the entire kitchen’s surfaces look like the island. The rest of the counter tops look OK— there are still brush strokes here and there and random color blotching in some places. But keep in mind that I had to use the base coat from both kits ordered, and that still wasn’t enough to complete the square footage they claim to cover with one kit. I would really appreciate it if Rust-Oleum sent me two new Large Onyx Kits so we could redo my kitchen, or find another way to make it right. I spent a lot of money on the kits, and the labor and clean up (dust everywhere) wasn’t as easy as it was made out to be. Rust-oleum/Amazon/Seller— please make this right!!
K**E
TOO MUCH WORK FOR NOT ENOUGH RESULT!
I bought the "ONYX" Rust-Oleum Countertop Transformations Kit. My husband and I agreed that the "ONYX" kit would be the best color to compliment our existing black ceramic stove-top and black dishwasher. UGH! What a mistake! After completion of the "Transformation" our counter top looked like it was slopped with road tar. There was no highlight color whatsoever. A previous reviewer stated that the kit did not supply enough of the adhesive to cover the "stated" square footage, yet more than enough of the other materials. I agree 100% with that statement! I still have "Epoxy & Activator" left over, but it apparently is useless after 4 hrs. I have leftover bags of "Chips" too. (chips are inside of all our cabinets and drawers) Unfortunately, I have a crappy looking counter top! What now? This kit might work well if you only have an "Island" countertop to work with.
J**T
Definitely Worth It!
Looks great on our counter! Follow the directions! Rustoleum is great to work with if you need just a little more chips and don't want to but an extra kit! Menards sells extra adhesive if you need extra and don't want to buy 2 kits! We did ALOT of counter with this one kit. Even screwed up and needed to redo 2 sections, hence contacting them for more chips and contacting Menards for more base coat.
O**Y
OK if you are not super picky
This product is clearly intended for a more meticulous DIYer than I am. I'm sure it has the potential to look awesome, but it's a LOT of work. I agree with what others have said about the amount of adhesive: its not enough to "spread like frosting" which is how the instructions described it. When I finished the countertops looked better than the original Formica but not quite good enough. I ended up tearing them out and putting in granite. Glad I tried, but I can't recommend unless you are remodeling a rental unit and are trying to save a few bucks.
E**I
Follow the directions except for.....
My husband and I bought this product to paint over our baby blue laminate counters. It works well. I still want new counter tops, but this will hold me off for a few years. I have two suggestions. One...make sure you have somebody very strong to help you sand otherwise it will take forever. Two...if you sand through to the original counter top on the edges I wouldn't patch it as they suggest in the directions. if the area is very small, just take the base paint and touch it up that way. You will save yourself a lot of time and once you put the top coat on you basically can't tell. Also, I am not entirely happy with the way it turned out around our sink. They suggest taping it, which we did. I would also then save a bit of the base paint. Take the tape off while the top coat is still wet. Touch up what you need to and put the top coat over it. Ultimately, this product works well, but is a lot of work. It will never look as good as new counter tops, but it is cheaper and will most likely be better than what you have if you are thinking about using it.
C**P
Love it
Transformed our counters perfectly
J**T
Five Stars
Super good product amazing job and dvd
Trustpilot
1 month ago
2 weeks ago