🚀 Elevate Your Oxygen Management Game!
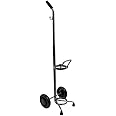
The Drive Medical 18143 Oxygen Cylinder Cart is a robust and stylish solution for transporting and storing up to 12 oxygen cylinders. Featuring dual lifting handles and 5" swivel casters for easy mobility, this cart combines functionality with a sleek chrome plated finish, ensuring both durability and aesthetic appeal.

T**S
Be prepared, poor instructions
I just purchased this unit. It is very sturdy with large heavy duty hard rubber wheels which will roll over just about anything! And two of them have locks to prevent roll-aways. It’s heavy duty and should last for years. I keep it in the garage. I use several plastic stands for full tanks, and the cart for empties so the delivery guy can roll it to his truck and exchange empty tanks for full ones.Before you build, make sure you have a rubber mallet to save you from bruised hands!! The instructions are practically useless, but the cart is easy to put together. First, install the four posts to the two handles. The posts screw in which is great. Lay on side and place both top and bottom trays on the four posts, making sure the top tray goes on first. Here’s where it gets tricky. You MUST look at the openings that the posts slide through. You’ll notice one end of the openings are slightly larger than other end. This is so the larger end will slide down over the black locking grommets you will be installing. If the trays push the grommets down instead of over them, the tray is upside down and you will have to start over and install the tray(s) right side up.While the cart is still on its side and before you install the grommets (and the trays are on right side up), go ahead and install the wheels. You will note the wheel posts have a loose ring in a track near the top end of the wheel post. This is a locking ring to hold the wheels in place so they don’t fall off. If any of these wheels are missing a ring, contact the company for a replacement, or go to your neatest hardware store for a ring. To install the wheels, you will need to insert the wheel post into the cart post and wiggle it while pushing firmly. The locking ring will eventually slip into the cart post. Push in as far as possible.Lastly, while cart is still on its side, install the plastic black grommets. Make sure the word “Top” is pointing upward on each grommet half when you snap the two halves together. On the cart posts, you will see single rings and occasional double rings. The grommets should go on the last double rings toward the bottom for the lower tray. After installing the four grommets, make sure they are all at the same place on the four posts or the tray will not be level. Slide the bottom tray down onto the black grommets and check for level and that none of the grommets or tray are upside down.Next, install the remaining grommets at the topmost double rings. Follow the same directions for the bottom grommets. Slide the top tray down over the grommets and check for any up side down components. Note: These instructions are for standard (tall) oxygen tanks. For shorter tanks, place the bottom grommets at a higher set of double rings so the bottom tray will be higher for the shorter tanks.Finally, turn the cart up on its wheels. Using the rubber mallet, gently tap all four corners of each tray to secure it snuggly over each black grommet. If you get a stubborn grommet that keeps sliding down, use a open ended wrench or crescent wrench that will fit around the cart post, and place the wrench (you might want to wrap the wrench teeth with tape to prevent scratching the finish) just below the grommet. Gently tap the wrench upward with the mallet to shove the grommet up into the post opening of the tray.Press down firmly on the handles to seat the wheels evenly. Now you’re done!One person can put this cart together in about 20 minutes barring any missing or defective parts, or not following the instructions above to avoid mistakes.
M**Y
Love this tank holder
It's a great little tank holder doesn't take up much room and it rolls like a dream
L**E
Great stand
Excellent stand and cart for my O2 tanks. Really helps transporting them to the car to swap them out and then bring them into the house. Also, a safe storage location for empty and full tanks.
B**R
No more lugging heavy oxygen tanks
Although I have my oxygen supplies delivered, they still have to be moved from the bedroom to the front porch. Lugging, one at a time, 7 size E tanks and 8 size C tanks is laborious to say the least. I have weight lifting restrictions, so no more than one at a time. With this cart I can move all my tanks at once, and its compact size allows me to store this cart, with tanks, in the bedroom hardly taking up any room at all.The unit I bought holds 12 E tanks. This is a very rugged cart, solidly built and has huge rubber casters, two that you can lock if need be. Easy to assemble, too. Took me about 15 minutes, and done!
D**.
One leg was threaded on the wrong end
One leg was threaded on the wrong end so the cart isn't level.
T**M
Just what was needed
This handy cart is perfect to keep E oxygen tanks organized and from rolling/falling on wood floors and carpet. Package arrived on time and was easy to assemble. It was hard to see from description if the cart would hold the larger tanks but the size is right. Cart is sturdy and easy to move.
L**X
Missing parts.
Item did not come with all parts needed to be functional.
M**K
Great Cart For Storage and Organization of Oxygen Tanks Stored At Home
Well made for the price. Holds a dozen oxygen tanks. I was not happy having all my husband's oxygen tanks in the garage in my garden Rubbermaid. Purchased this cart mainly for storage and organization. Will purchase a triangular one I saw that would fit in the back of our Suburban laying down, for transportation of empty and full tanks, to and from the oxygen supply distributor too.
ترست بايلوت
منذ أسبوع
منذ يوم واحد