
قم بتنزيل التطبيق


معلومات عنا
حقوق الطبع والنشر © 2024 Desertcart Holdings Limited
قم بتنزيل التطبيق

🎨 Spray Like a Pro, Save Time & Paint – Your DIY Upgrade Awaits!
The Wagner Control Spray Max HVLP Paint Sprayer delivers professional-grade finishes with a powerful 510W motor and 80 CFM airflow. Featuring adjustable air pressure and material flow controls plus three spray patterns, it offers precision and versatility for a wide range of paints and stains. Its 20 ft. hose and stationary base reduce fatigue, making it ideal for detailed trim or large surfaces. Included are dual paint cups and a viscosity cup to ensure perfect thinning and flow, helping you achieve smooth, efficient, and paint-saving results every time.

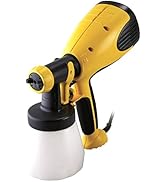
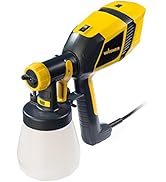


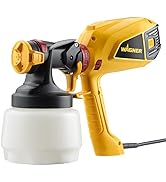
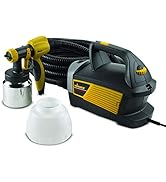


| Brand | Wagner |
| Color | Yellow/Black |
| Item Weight | 10 Pounds |
| Material | Metal, Plastic |
| Recommended Uses For Product | 20 ft. hose, Adjustable flow control with 3 spray patterns, Superior nozzle, Use with a variety of materials, Variable aire pressure control Recommended Uses For Product 20 ft. hose, Adjustable flow control with 3 spray patterns, Superior nozzle, Use with a variety of materials, Variable aire pressure control See more |
| Tank Volume | 1.5 Quarts |
M**S
Great Sprayer for the DIYer
I bought this quite awhile back (a little over a year ago), so I have used this item a lot. I now have a more expensive (10X the cost) HVLP rig, but I have found that this little Wagner gun is so MUCH more VERSATILE and EASIER to use, that I use this one more often than the expensive one. I can spray oil-based paints and primers, as well as water-based products, with hardly any effort. Cleaning up is fast and easy, too. You CAN get a 100% perfect, professional finish IF you take your time, read and re-read the manual, and you practice with it, first. Do not expect to pull it out of the box, fill it, spray with it, and have perfect results. I suggest that you gather lots of cardboard and buy a can (quart or gallon) of cheap paint (the same type as your first project requires (water- or oil-based)). Then, buy the appropriate diluent (read the paint can), the compatible additive (i.e., Penetrol for oil-based paints and Floetrol for water-based paints). While you're at the paint store (or you are on Amazon.com) pick up some medium size (pertaining to particle filtration size, not overall size) disposable paint filters. My two spray painting mantras are, "Practice does make perfect!" and "Paint additives can make ALL THE DIFFERENCE IN THE WORLD between a professional-looking paint job, and just an awful looking paint job!" That's it in a nutshell, but I've written at length about the first time I used this sprayer. If what I learned can help you get great results on your first project, it may be worth the time it takes to read: My first project was not the smartest one to choose as a first project to paint with a spray gun. It was the wainscoting and trim in my dining room. But, it came out so perfect, that even after a year, the glassy, smooth, sprayed surfaces still impresses me so much, I cannot believe I did them! But, back then, I didn't know any better, so I thought I would just start right in with the painting, buying the exact same paint and color (Sherwin Williams Alkyd) the installers had used. I lightly sanded all of the wainscoting and trim, as best I could, to scuff up the surfaces. I also used a liquid deglosser, since sanding detailed trim is thankless, tedious work. But, most of all, I spent a lot of time caulking (using PAINTABLE caulk) areas that had pulled apart from "settling," or that were not properly caulked by the installers in the first place. I let the caulk dry thoroughly. Actually, it was all the cracks and crevices in the joined edges of the woodwork caused by improper (or complete lack of) caulking, and some due to settling, that had caused the need to paint the trim and wainscotting. Next, I started in with the viscosity tests. I used paint thinner first, but then I read up on additives. So, I switched to using a combination of paint thinner and Penetrol (by Flood, purchased at Lowes). I can't recall the exact ratio of paint thinner to Penetrol I ended up using, but I think it would be safe to say about half and half. Of course, paint thinner was what my product called for as a thinning agent. Paint additives, like Floetrol and Penetrol, help produce a smooth, glassy finish. The additives can help make up for a multitude of sins! For example, if you did not properly adjust your air/paint flow, you could end up with a painted surface that has an orange peel texture (a common problem). If it's not too bad, the additives themselves can make that problem completely disappear! But, that's not too surprising, because one of their purposes is to reduce, or eliminate, brush marks! Once I had all of my paint thinner and Penetrol added in order to achieve an acceptable viscosity test, I was alarmed at how much I had diluted the paint! I had definitely diluted it beyond what the manufacturer had recommended (as stated on the can). Thankfully, I was worried enough that I decided to practice on some cardboard, rather than on the dining room walls, first, as I had planned on doing after reading all of the positive reviews here, thinking I could just spray the walls and get great results! And, although it didn't take long before I was able to get a nice, smooth coating on the cardboard, I am really thankful I did! I would have been scraping and sanding walls, for sure! I also stood the cardboard up vertically, like the surface I would be spraying (vertical surfaces are much harder to spray without getting drips and runs), so I could get a feel for how much paint I could apply before getting runs. It wasn't very much! I had to keep the gun moving relatively quickly. But, by then, I had to send my husband back to Sherwin-Williams for another can of paint, just to be sure I would have enough paint! Before getting to the viscosity tests, though, I had basically turned my dining room into a giant spray booth, but without an explosion-proof fan mounted in the window! I covered the windows, ceiling, and upper walls with plastic, masking off all of the edges. I also taped plastic over the two doorways, masking around all of the edges of EVERYTHING. I used thick plastic drop cloths on the floor, but I goofed by not taping them down as securely as I should have. So, I had to stop and do some clean-up and remedial taping when I saw that the air coming out of the nozzle was blowing up the edges of the plastic! Naturally, I used a respirator, and was covered head-to-toe in disposable painting attire. The air was thick with paint mist when I did paint. But, I expected that in the enclosed space. I put on a total of four coats, as I thought with all of the diluting, they would be thin coats. They were, but I wouldn't say that was a bad thing! I don't own a mill gauge (something I just recently learned about!), so I couldn't tell you how thick each coat was, but they were thick enough to cover bare wood without being transparent enough to see the wood grain show through, but not so thick that it would cause runs or drips. I always sprayed a small piece of cardboard, leaving it in the dining room, but near the opening, so I could easily check when the paint was dry enough to recoat, without touching the trim or walls themselves. It dried much quicker than I had anticipated, given all of the dilution. I did get a couple of runs, but I just sanded them off when the paint had dried enough to produce a powder when sanded, and not rub or rip. Of course, I sprayed these areas again. Even with the massive amount of prep work required (most of it would have still been required if I was brushing-on the paint, such as all of the caulking), the amount of time It took to spray, clean-up, dry, spray, clean-up, etc., was only a fraction of that time that would have been required for me to brush on all of the coats! The results were, as I said, spectacular. Today, the wainscoting and trim still look as fantastic as they did the day II had finished painting them. I was worried the dilution of the paint would have affected the wear or appearance of the surfaces, but it did not. So, I would never be afraid to dilute paint more than stated by the manufacturer on the can. Not being a paint professional, I do not know how they arrive at those figures, but for myself, I would always dilute the product according to what is recommended in the sprayer manual (using viscosity cup and timing the flow), and not what is stated on the can. But, I always read the can of the product I am using, because it tells me what to use in order to thin the product (the diluent). For oil-based PRIMERS, I use only the recommended diluent or solvent, and I omit the additive (Penetrol). To date, I have not used water-based PRIMERS, but I would probably only use distilled water for the diluent (unless the can stated to use another type of diluent, that isn't water). A shellac-based PRIMER would probably call for denatured alcohol as the diluent. Again, always defer to the can/manufacturer for the diluent to use, but defer to the sprayer manual for the proper dilution rate (using the viscosity cup). For water-based paints, I use a mixture of one part distilled water and one part Floetrol (50-50) to dilute the paint. I also use a medium filter for all paints and primers, and it is the last thing I do before I spray paint. Disposable filters are cheap, so I use a fresh, new filter when I fill or refill my sprayer cup. If I fill the cup three times during a project, I've used three filters. I always gather some cardboard to use to warm-up on, and, most importantly, to help me fine-tune the settings on the sprayer, so that I achieve the best finish possible. If your paint is properly diluted, and your spray is properly adjusted, I just don't think you will be ever be unhappy with the results. Thoroughly cleaning up your equipment as soon as you are finished painting is also extremely important. If you have a tiny, dried, speck of paint in the nozzle, you will not get good results. I have found those really thick pipe cleaners (oh, excuse me, I mean CHENILLE STEMS) are invaluable as an aid to cleaning out the inside of the slanted plastic tube that is inserted into the paint cup. Some other tips I've learned include spray painting early in the morning, when there is less likely to be a breeze, if I am painting something outside. Avoid spraying in direct sunlight, too. Finally, if there is a result that is not to your liking, Google it to find a solution to the problem. I have learned so much from doing this, and watching Youtube videos, too. If all else fails, call the manufacturer because there is always a small chance you could have a defective part that needs to be replaced. Dilute and practice with your cheap practice paint. If you can achieve a great finish on your cardboard (make sure the cardboard has a smooth surface to begin with, too!) using your cheap paint, you will surely be able to get an amazing finish with your higher quality paints and finishes.
M**Y
Works great, saves paint.
If you're thinking about buying this is probably because you've never owned a paint sprayer before and wonder if it will make your life easier than painting with a brush. Answer- yes. There aren't really any serious drawbacks, even in the cleanup (think of what you have to do with brushes). It works well. The experience is, the paint goes on much more thinly than what you might have imagined; you won't cover an area with one pass the way you would with a brush. So you're in effect building up thin layers of paint as you go. As far as arm the motion of applying the paint goes, you'd have to be trying to make a mistake with this thing for things to go wrong. It's really no surprises kind of deal; the air blows, it takes the paint with it, the paint is pretty evenly applied without bubble spatters or suchlike. Back and forth a few times and viola, it's done. Now it's not a flipping airbrush, meaning, it doesn't apply paint with absolutely no trace of spattering whatsoever- you can't do infinite amounts of shading with it, but it doesn't need to be to paint walls, fences, furniture and still have a completely professional outcome. Perhaps that's what people pay 1000 dollars for when they buy better models, then again perhaps even that doesn't buy you that level of fineness. My point is, it's fine for interior / exterior painting and especially painting surfaces where a brush would make it a lot of work. We had a long fence that fit this description and it literally 1/8th the time it would have taken me. I used something called flocontrol which you can get at your big box. It supposedly makes the paint flow more freely. I can't say I needed it (I have never not used it). I just needed things to turn out right the first time and didn't want to take the chance I would have problems. Just reporting the facts of how I used it. Yeah this is going to change painting for me. It's just faster and better and above all else- how could I have left this out- terrifically more sparing of paint than a brush. I would not be surprised to learn you use half the paint or even less paint than you otherwise would have using a brush. The reason is, you stop applying paint layers when it looks right, whereas with a brush the first stroke already delivers too much paint to the area you put the brush down on and then you try to spread that excess around. Somehow this works out to be much more wasteful of paint than one supposes. Yeah go ahead and get it. Fact: I saved 35 bucks my first time using this because of the paint I didn't have to apply. I have a gallon of paint I never opened. I have to imagine it will continue to save me money going forward for the same reason. I expect it to pay for itself and then save me even more money over its lifetime. Be sure to clean it as per the instructions; you can see how it would cease to function if the small passages inside it where paint flows through and gets "atomized" would cease to function with dried paint stuck to them. You have to have a ready supply of flowing water with which to clean this soon after you're done. It puts that requirement on you. Some parts also need to be swished around in a little cup of water. This is not cumbersome or mysterious, and neither is taking it apart and putting it together. All in all a jolly good buy !
T**S
Perfect for certain types of jobs
SUMMARY: Great product for the money, but only for certain jobs! I would recommend it for any outside work, but would not recommend it for painting interior walls, as the effort required to minimize overspray and obtain the perfect dilution/spray velocity outweighs any gains in speed or ease of use. DETAILS -- FIRST ATTEMPT::WALLS This Wagner has the most hits of any sprayer on the internet, and you can find many video blogs reviewing the product. However, what is lacking of sprayers in general are first-hand accounts of actual end users (especially first-time users). This Wagner is my first paint sprayer. Last year I repainted the entire inside of my house; walls, trim, doors, shelves and all in preparation to move out and get a new house. All of that work was done with traditional rollers and brushes. When we purchased our new house I was desparate to find some way to speed up the process. I researched many sprayers and read many reviews. I found many positive reviews for sprayers in the $800+ range, but was unwilling to commit to that kind of purchase having never used a sprayer. With the Wagner in the $100 range I figured even if it was a bust it was worth the effort. The first two times I used the sprayer was to paint the walls in the dining room and kitchen area, as these were the smallest wall surface areas in the house, and had flooring that was soon to be replaced, so messes were of little concern. The sprayer is very easy to use -- simply dump paint in the hopper, twist-n-lock the spayer assembly together, turn on the power, and push the trigger. Having not ever used a sprayer before, my wife and I spent a great deal of time blue-taping and laying down dropcloths. I taped all trim and I ran a layer of tape along the ceiling where it butted up against the walls, just in case. I had planned to "practice" with all those safety things in place, then decide which I could forego in all the rest of the rooms. It turned out that even the blue tape and dropcloths were not enough to keep all of the overspray out. During the process I stopped to go to the hardware store and purchase a paint shield and some painters paper. I added the painters paper to the ceiling and ended up having painters paper, blue tape, and a paint shield in place while painting the upper edge of the wall. I was disappointed to *still* have a small bit of overspray in a few area of the ceiling. I also tried diluting the paint and adjusting the velocity of the air, but never seemed to achieve the right combination. The problem with diluting is the paint can says, "See sprayer for dilution instructions", and the sprayer says, "See paint manufacturer for dilution instructions". I learned that too much dilution will cause the paint sprayer to "spit" and the paint to run. In the end I completely abandoned the sprayer for the walls and went back to the tried-and-true rollers. I am sure I could have achieve the results I wanted with the sprayer, but it would have taken such a long time as to negate any benefits from the sprayer -- the main reason I bought the thing was to hasten the painting process! DETAILS -- FIRST ATTEMPT::DOORS After rolling all the walls, I decided to give the sprayer a second chance on the doors. I removed several doors and placed them outside against a wall lined with dropcloth. Taking a tip from a painter, I nailed paint stirs to the top of the doors to keep them from butting directly against the wall. After lining them all up, I filled the sprayer and got to work. This time I skipped the dilution; I went full strength and simply turned up the velocity all the way to get the paint flowing as I did not care about overspray. This worked flawlessly! I have never painted doors this fast. In fact, these were all panel doors which are notoriously hard to paint with a brush. I kid you not that I had half a dozen doors, front and back painted in less than 30 minutes easily. I had some minor dripping on the first door, but after acclimating to the paint viscosity, all other doors look great! CONCLUSION For the money this is well worth the investment for anything other than painting interior walls. In fact, if you are used to using sprayers you probably will have success even on interior walls (if you do, please tell me how!). I can imagine painting fences, chairs and other items outside would be even easier than doors as literally no prep (dropcloths, etc.) would be needed.
D**8
Love this sprayer!
I bought this sprayer after weeks of research and confusion as to which one is right for my situation! My primary and immediate use was for two sheds one 10x10, and one 10x20. I needed to build / rebuild the sheds and paint the inside and outside of each. Again I tried to do research but there are so many options it is confusing! I knew I wanted a Wagner because of their reputation and quality of product, but I was not sure which. I finally settled on this one, and have been very happy! I used an exterior latex paint, and used the Wagner Paint Easy conditioner to slightly thin the paint, and this gun has worked flawlessly! The conditioner is only 4 oz per quart, and here locally I can get it for $9.99 with enough in the container to do 2 gallons. The instructions and use of this sprayer are spot on, and could not be easier. Overspray has been minimal, but again I am painting sheds, and really was not too concerned with getting paint on the floor. The only recommendation I have, would be instead of the small metal can in the box, if they would include a second 48oz plastic container. Doing this would allow you to mix three quarts of paint between the two containers and quickly switch them out. I I have found parts a little difficult to find, but have not researched it very well. I would like to order another of the foam seal that sits in the lid, a second container, and a set of the air filters. The length of the hose is very good, and has allowed me to put the motor far enough from the sprayer that there is no concern of overspray getting into the motor. Also, I have seen others complaining about the noise of this pump when it's running, but absolutely did not have any issues with the loudness of the motor. Cleaning all of the components has been very easy, but again I am using a latex paint so soap and water is all I have needed. Again, I love this paint sprayer, and I'm already planning many other projects inside that I have been putting off for years!
D**.
My arm and shoulder would like to thank the fine folks at Wagner
The wife and I bought a 2,000 square feet "fixer-upper" and had all new eaves and cedar siding installed. After getting the quote for staining the siding and eaves ($10k) I decided to save some money and stain the siding myself. How hard can it be, right? After scrubbing the siding with a little wood brightener (a must-do for cedar siding), and taping off the windows and trim, I started applying stain with a brush. Ten hours later, I had completed about 15% of my siding. Wow, only 85% more to go. Looks like I'm not going anywhere on vacation this summer. In addition to the time, my arms and shoulders were fatigued and I certainly didn't relish the thought of doing the same thing the next day. I immediately went inside, started researching sprayers, and settled on this unit. The unit is very easy to set up. It takes less than a minute and requires no tools. I can't speak to how the unit works with latex paint, but it works like a dream with stain. You have to spend a little more time taping and masking EVERYTHING that will be near the sprayer. The overspray is pretty well constrained by the unit but you will definitely get a little spray that misses your target area. Taping and masking is a must! Don't expect to just put a 2" piece of painters tape on the edge of the trim closest to the siding. You will have to cover the entire window AND seal the edges with tape. If you have any prize-winning azaleas in front of your house, cover those too. That being said, once your done taping/masking, the actual spraying takes about 1/5 to 1/10 of the time that a brush takes. And it is sooooo much more fun than using a brush. AND SOOOOO much less fatiguing than using a brush. There's no pushing stain into corners or going over the same spot 3 times with a brush. The sprayer just lays down the stain. You WILL have to back brush a little. This means that you will spray on the stain to saturation and smooth the stain into wood with brush. It fixes the inevitable drips, puddling, sags, etc. It sound like you're doing twice the work but trust me, you're not. SMOOTHING out stain with a brush takes about 1/10 of the effort and time as APPLYING stain with a brush. The paint/stain container used on the sprayer seems small when you look at it and it does empty out fairly quickly. The reason it empties out quickly is because you coat so much of your project so fast that OF COURSE its going to empty out quickly. The reason a gallon of paint/stain seems to last longer when you're using a brush is because you aren't moving fast enough to use much. My only (very minor) complaint is that the hose did pop out a few times. No big deal, it pops right back in and doesn't hurt anything in the process. In my opinion, clean up takes the same time as using a brush. Unless you're using disposable brushes and just throwing them away at the end of the day, you have to clean your brush just like you have to clean this sprayer. For the oil-based stain I was using, I simply saturated a paper towel in mineral spirits and wiped down the machine. After that I emptied the remaining stain from the sprayer's container back into the can and filled the container about 1/3 full with mineral spirits. After vigorously swishing the container, I turned on the sprayer until the spray ran clear. Finally, I took apart the spray head (by hand, no tools necessary, takes about 10 seconds) and put them in some more mineral spirits. After wiping down the parts, I put humpty-dumpty back together and shoved him in his box. One last thing (and remember, I can only speak to using stain with this sprayer), no thinning was required. I just poured the stain directly into the container, attached it to the unit, and away I went. I HIGHLY recommend this machine!
B**V
Easy, Simple, Beautiful.
My wife has been wanting to repaint our kitchen cabinets but is having difficulty talking me into doing them. She found the hvlp sprayers (never heard of them) and said how easy it would be with one. Curiosity got the best of me so I looked the sprayers up and was pretty convinced a $100 or less sprayer was a piece of junk. I had a small project that has needed painting so I figured I would order one and see if they would work. Could always send it back. Ain't Amazon great. I looked at a few and decided on this one, mostly because of the hose, figured it would be lighter than one with pump on sprayer, plus it had pretty good reviews. Bought some Behr Ultra semi-gloss latex enamel. Thinning suggestion on can said no more than 2oz. Per gallon. I thinned it, stirred it, strained it did a quick test on a piece of cardboard with pressure dial on medium, was satisfied so I started painting. I am really impressed with this little sprayer. Paint goes on very even with fine spray particles, no issue with runs and fairly fast. I could have thinned a little more for faster painting. Extremely easy to use and a beautiful paint job. You will never get this with brush or roller and not nearly a messy either. Very little overspray. I like the hose, it is very long, soft and very flexible. Cleaning the sprayer is very easy and simple. I dissembled the spray nozzel (4 parts to that, watch out for the little red washer) washed with water hose until no paint showing. Removed paint tube, washed it and cup with hose and used water hose and washed paint off of every part. Take about five minutes. Put it back together sprayed some water through it still works. Removed cup and stored in box until next time. Pictures are of first project. Wood is fairly rough so hard to see just how smooth the paint is, there is also a good bit of trash laying on deck from trees overnight. I did tape up the glass and other unpainted surfaces. Anyway this was the most fun I've ever had painting. Maybe I should say the least pain in the butt I've ever had painting.
C**T
I went ahead and purchased it and it's one of the BEST purchases I have made
I have had the unit for a month now and have used it for its intended purpose, to paint my kitchen cabinets. I read all the comments here and took all of them to heart, as Amazon buyers always give the most helpful remarks. I was hesitant, and a bit apprehensive, as the only spray painting I had ever done was in a can. A home DIY'r to the max, this was new to me. I went ahead and purchased it and it's one of the BEST purchases I have made! Here's some methods I used. Using Behr Ultra latex paint and primer, what worked best for me was adding just 1 cup of water to the entire gallon, and I don't really think I needed to, as straight from the can, the sprayer did very well. I just wanted to extend the paint a bit and make it a bit thinner. I set up a "paint booth" on an enclosed porch with lots of windows, started with one cabinet and took off the doors, everything out of the drawers, etc. By the time I got one section done, I was painting in the kitchen, leaving the doors on and just masking off the insides. The sprayer worked that accurately for me. Once you play with the settings, you can be very accurate as to where the paint goes, with little overspray. I used cheap, $1.00 red poster board, as the paint was white and I could get the best idea of how the paint would go on. I cut the posterboard to the size of the inside of the cabinets, (I did not need to paint the insides), taped it and voila..done in a jiffy! I also used the posterboard, held in one hand behind the doors, while painting with the other hand so no overspray would go anywhere but on the doors. I have the air set as a bit less than medium and painted about two-three inches away from the cabinets. l did used plastic to cover the counters, tv, etc., and did get a bit of overspray on a window, but nothing big and it came right off. My bad..I got much better after this! I painted three coats per "section" (we have a large kitchen), and then two coats of poly the next day..the poly required much less air, but went on perfectly. I did not thin that at all. I took my time, let the coats dry 11/2 hours in between, and they came out beautiful! One thing I had going for me is that we are having a new floor installed, so I didn't obsess about getting any overspray on the floor at the bottom of the cabinets, which isn't much. This machine will work wonderfully for you, take your time, experiment with it, posterboard is great to use in a contrasting color with painters tape. Keep a paint brush around, in case you see some drips so you can blend in. If I had any poly drips, I used the paint brush that had white paint on it and it blended perfectly! Can't wait for summer to get here...Spring, even, so I can move out to refinish the decks. BTW, very, very easy to clean, much quicker than trays, brushes, etc. I highly recommend the Wagner HVLP sprayer! Make sure you have windows open and wear a mask the 3M07192 is great for this. Have fun and Good Luck! Before and after pics
R**N
Seems well suited for spraying 15 year old cedar fence.
UPDATE: After using the Wagner for 750 square feet (of 3,000) of fencing it was determined the back-brushing process was too labor intensive. I was initially using the WAGNER primarily to get the paint to the surface and then brushing the semi transparent stain into every pore of the weathered fence. Instead of a standard paint brush I was using a dust pan brush, which worked quite well. The original Wagner setting was about 2/3 power and about 8 inches from the surface, enough to get the substrate "wet" and then back brushing. I have now backed off to about 12 to 15 inches and am using maximum blower force to "dust" the surface numerous times, never allowing the paint to accumulate as before. This requires constantly moving the gun, much like someone painting a car. The finished result (dusting method) appears the same despite the fact I am not working the product into the surface. Although I prefer the back-brush method it was simply too arduous. I intend to post a video to illustrate the two techniques. It appears I am getting a little more more coverage per gallon using the dusting method, but not substantial. The Wagner was put in use within 15 minutes of delivery, after a quick glance at the manual and assembly. I found one YouTube video using this device after ordering the Wagner. It was a guy painting a small shanty (the sugar shack) with T-111 siding. He thinned the latex with water and another chemical agent to enable the paint to flow. This product comes with a viscosity tester but it wasn't needed for stain. My project is 15 year old, weathered cedar (or spruce) panel fence. It was stained when installed and then ignored for the next 8 or 9 years. For the past 6 years I have used a clear, linseed oil based spray (every other year) but oil based fence treatments are no longer available in 13 states due to VOC restrictions. That nugget of information was not mentioned by either "expert" staffing the paint dept at Home Depot or Menards. An Ace hardware employee enlightened me. That ban may have been a blessing since this wood was showing signs of distress and would benefit from a more protective coating than linseed oil, which also provides UV block. You have to use a stain with tint to get UV protection and this BEHR product is rated at five years for a fence. I am using the Wagner to apply a semi-transparent Behr stain. $30/gallon. I found a YouTube video of a "professional" staining a fence using a 2,000 PSI gun (after power washing the fence) and he was brushing in each segment after applying the stain. It appears a brush-in may be necessary using the 2.5 PSI Wagner due to the roughness of this weathered surfaced. I suppose it is possible a new(er) fence may not require a brush-in. This latex stain will not require thinning. Each user will have to experiment with the air pressure, distance from surface and spray pattern. I ended up using the round dot pattern since it enabled me to avoid spraying the area between the boards, and allowing the application of extra stain where necessary: cracks, edges, hidden areas behind the 4 x 4 studs and the board edge near the ground. Old wood is very thirsty. The fan pattern (vertical or horizontal) seemed "center heavy" with less product applied on both sides of the spray. The quote for a replacement cost (and staining) for this fence 31 panel fence with 2 doors was over $6,000 using prefab 6 x 8 panels. Over $7,000 if stick built. I expect the job will require approximately 20 hours and $600, which includes the cost of the Wagner, and should extend the life of the fence another 10 years or more. It looks like one gallon four 6x8 surfaces, along with the support wood (vertical and horizontal), which is 200 square feet per gallon. 15 gallons @ 30$ plus 125 for the sprayer brings the cost in under $600. I suspect applying the same product to new wood could stretch the coverage to 300 sq feet per gallon. Prior to ordering the Wagner I attempted a garden sprayer with brush-in. That method was a messy nightmare. A paint stick was another failed method. The stain was too watery and you can't used a 9 or 10 inch roller on 6" wide boards since these were no longer a flat surface due to warping, and even slight warping renders a roller useless. The only preparation was a long wand power sprayer attached to a hose. It blew off the guano and blew away the dirt/clay/debris at the bottom of the fence, exposing the inch or two of the bottom edge which was in contact with the ground. There wasn't any black mildew or green mold on this fence. The Wagner cleans up fast so I was applying two gallons per session to avoid burnout. Anyone who is doing a big project (5 gallons or more) should pick up one of those $3 flexible replacement lids for gallon cans with a closeable spout. It makes refilling the Wagner quick and easy with no mess.
ترست بايلوت
منذ 4 أيام
منذ يومين