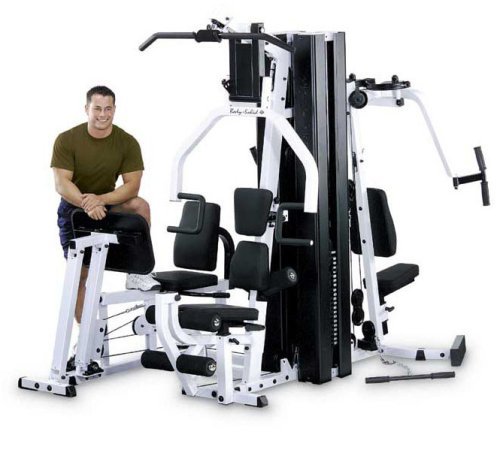
Versatile workhorse offers health club-quality strength training for up to 3 simultaneous users Durable steel construction in black and white Multi-press station is 3-in-1, with fully adjustable pads to accommodate different users and full range-of-motion exercise The leg and calf press station features unique 2-bar linkage for self-alignment, ensuring proper biomechanics for all users Pillow block and sealed ball bearings provide precision alignment and friction-free motion Adjustable back pad with a 2-position press plate for complete leg development Leg and calf press station operates on a 2:1 ratio for an incredible resistance capacity of 420 pounds Perfect pec station boasts dual overhead cams with 6 different increment settings per arm 2-function pec station allows for maximum development of pectoral and rear deltoid muscles High pulley station for lat pulldowns features easy-access hold-down rollers to fit different users Lat pulldown station is ideal for improving size, strength, and endurance in your back, shoulder, and tricep muscles Mid pulley station for ab crunches allows the highest degree of comfort while working your abdominal and oblique muscles, and while doing triceps extension movements Cam-driven leg extension and curl station helps you work your quads and hamstrings with precision Seated rowing station with low pulley swivels smoothly, providing effective resistance for cable curls, upright rows, shrugs, leg abduction/adduction, and more Features dual 210-pound alloy steel weight stacks with state-of-the-art nylon bushings for smooth, quiet operation, and full-length, solid steel shrouds for improved safety High-density, top-grade DuraFirm pads are double-stitched, sewn, and tear-resistant Comes complete with lat bar, low row bar, utility strap, workout poster, and workout DVD Weighs 940 pounds Please note that some assembly is required Manufacturer's warranty included: see complete details in the Product Guarantee area Body Solid has been maki
A**R
Great Gym - Plan how to assemble first - Send in warranty within 10 days!
This Gym is the real deal! Solid and built with no compromises! Some have complained about the instructions, but I think they were sufficient with diagrams that show how it all goes together. A picture is worth a thousand words, and if you tried to explain how to put this size of a project together by worded instructions, you would definitely confuse some people, especially if it were done by someone with ESL language skills. Second, you would need a lot of wording and that in itself would turn a lot of people off. The diagrams are simple and you need to study them carefully while assembling the gym. Here is my experience and advice if you want to put this thing together like a pro. My wife was telling me to hire someone, but I'm glad I didn't. You will have a much better understanding of this gym if you do it yourself. It's not too hard, but it is a big project. So you need to take your time and work carefully and not expect to put it together in an hour or two. Save yourself a couple hundred bucks!I needed to put this thing in a room that is 10.5 feet by 12 feet. Not a very big space for this equipment. I already had a tread mill, stair climber, and an inversion table in the same room, all of which I wanted to keep. After looking at all the pictures of the EXM3000LPS gym online of all the different stations on this gym, I decided to put my existing equipment in the corners of the room and the gym positioned in the center so that the gym and my other equipment wouldn't interfere with each other. Not being too sure of the outcome, I assembled the gym so that it would be able to re-position the gym if there was going to be any problem. If you face a similar problem of not knowing how exactly you want this gym to be positioned, then you need to follow the order outlined below so you can move the gym before it becomes too heavy.First, unpack all the boxes that come. Get the instructions (diagrams & parts list) and look them over good. Each part has an identifying letter and number on the parts list, and the corresponding part letter and number labeled on the assembly diagrams. But the parts themselves are not labeled except for colored stickers on some parts that show which section of the frame they are on. Also note that the instructions mention that you have 10 days from the purchase date to register your purchase for warranty service. If you are not ready to put this thing together right away, I suggest you open the boxes to get the registration paperwork and get that done. Not sure whether they would give you any trouble if you were late, but that's what the instructions say.So get a roll of masking tape and a fine marker, and unpack all the parts, bolts, washers, frame parts, and identify them and place them in like groups and check the numbers. Measure the diameter and length of bolts and stick the masking tape and identifying letter and number on each group of same parts. One issue I had was there were two parts that I didn't find, which hold in some round foam pads. I thought they were missing, however, during assembly I found that these two parts were replaced by a single part which goes into the end of a 1" pipes and holds the foam in place. But here is a note of caution: There are actually two parts shown on the parts diagram which have the same exact description, "01" ROUND ENDCAP" but the part numbers are not on the parts. The only way to tell the difference, which is that one has a slightly larger diameter than the other, is to stack them together so that the larger diameter part is noticeable. I made the mistake of forcing the larger part into the smaller hole and then was left with a part that wouldn't stay in because it was in the wrong location. And the first part was forced in to where I would have to destroy it to take it out. The smaller part goes on 1" pipe on the frame and there are two, the larger parts go for the knee bends and there are 4 of them. The pipe welded to the frame have a smaller hole than the knee bend pipes. The foam pads are all the same that are held in by these parts.After you have identified all the parts and have them neatly laid out around the room where you are assembling this gym, then work on getting the frame together first. DO NOT assemble the weight stacks or any cables and pulleys, leave them for last. Put together all the main frame parts and if you need to adjust the position a bit this way or that, you will be able to push and adjust the gym. But once the weight stacks are in, you cannot move this gym. On the top of the gym where the weight stack poles attach, you can put the bolts in to hold the system together, but do not tighten them until you have assembled the rest of the frame and then put the weight stacks in and tighten everything up.The last thing to do is to assemble the cabling and pulleys. Trust me, you will have to remove cables and pulleys if you try to install them too soon. Take a little time to properly identify the cables. Just like the rest of the parts, the parts themselves are not labeled. But you can determine which ones are which based on the ends, lengths and other details of each cable. And once you have everything else assembled, you can understand which cable is used where better, and they are shown on the diagrams. All the pulleys are the same, except one.Don't make the mistake of assembling everything on each diagram in the diagram page order before proceeding to the next. Instead, assemble the frame first, then the seats and all other parts, then the weight stacks, weight stack covers, and last the pulleys and cables together.I also had an issue with one of the pulleys rubbing on a weight stack cover. I could not adjust anything to give it more clearance so I adjusted the hole in the cover to move the it 1/4" away from the pulley and it is fine. Not a big deal nor any compromise in functionality at all. But I want it to be quiet and something rubbing would bug me.You could put this thing together in a day if you begin early and work hard at it. But I assembled it over several days and took my time and enjoyed seeing it come together. It is such a good quality product, I didn't mind assembling it at all. And when it's all done, you know all about your gym.As far as the end cap that I forced in the wrong place, I contacted Body Solid and they sent me 4 replacement parts. The customer support is excellent from Body Solid.One other issue was that the weights on the weight stacks were sticking on the vertical bars that hold the weights in place and guide them up and down. This was solved by applying a little silicon lubricant, like the kind you use on a treadmill, to the polls. That made everything work smoothly. Don't use grease or oil since there is plastic bushings inside the weights.I attached some photos of how my gym fits with my other equipment, and also a comparison photo of the two end caps that look alike and how to tell them apart. The room is 10.5 feet by 12 foot but my wife and I can use all my equipment without any problems. The inversion table folds up against the wall, the treadmill is near the ab station, and the stair climber is in front of the leg press. We even have room for a chair to change shoes on.
L**S
This system is fantastic for the home gym
This system is fantastic for the home gym. High quality, operates very smoothly, and covers everything top to bottom especially when you add on the Vertical Knee Raise.We installed it in our basement on (4) horse stall mats which left the perfect footprint for this to be on.......8 feet by 12 feet. We just started using it and am amazed with the amount of exercises this provides. Will never need a gym membership again. Love the convenience!Now lets talk about the directions. Ummmmmmm.....what directions! Some sketchy diagrams do not count. But 20 hours later.....we figured it out. It takes two people......sometimes just to think it through. Some suggestions:Take the time to unpack EVERYTHING and lay it out per station.....sort it.......sticky tag it with the part piece.Sort all the hardware into bags and mark on the bag the part piece.Note each station has a red, blue, or yellow dot and tend in general to be packed station by station.Note the dots tend to be on the "up" side of the piece.Print out the directions from Body Solid website on 11 x 17. Easier to see than the provided 8 1/2 x 11.Note the page numbers on the directions. Install in this order.Print out all the photos in different orientations you can find. Will be very helpful.For the cables, run everything then tighten the nuts/bolts. If you start by tightening the nuts/bolts for the pulleys, you will have to undo some of them to get the cables in.Don't forgot to check to make sure there are not plastic end caps or levelers needed under a piece. We did that, then had to find a way to life it to get them under there. Not fun.And......bring patience! We took our time and worked on it in the evenings for a few hours till it was done. 100% worth it and I find it helps me understand the machine better and the possibilities for workouts.
A**I
Very good quality gym system backed by excellent customer service from Body Solid
Pros:1. Quality of material is excellent2. Haven't found any other product that can even come closer in terms of providing so many exercise options for such reasonable price and build quality.3. Customer service is the main reason why I gave 5 stars and am leaving a review for everyone to benefit.I faced a few issues while assembling this and customer support (Rich K. & Rodney) from body solid was excellent. They sent replacement parts for free not once but twice.Despite assembling the machine immediately after purchase, I did not use it for almost 4 months after purchase. When I first used the machine, I found one more issue which required a replacement. Body solid promptly sent me replacement part for free (at least a 10lb shipping) four months after purchase. Now that is how you provide an excellent customer service. Think of their customer service at par with that of Amazon4. Not very high and so can be installed in the basement for most of the homes.Cons:Time and instructions required to assemble - I wish body solid can post a video on their website describing the assembling process.It will resolve the only negative with this gym system.
K**N
This is a fantastic quality gym backerd by great customer service personnel.
The quality of this gym is top notch. We've had a few different home gyms over several decades and this one is far and away the best quality. I was also impressed by the tech support staff at Body Solid. A real person, who speaks english answered the phone and e-mailed me a copy of the assembly manual. Just beware that assembly of this complex piece of equipment will take some time. I have approx 9 hours of labor in putting it together, and I am no novice using tools and figuring mechanical things out.
K**V
High quality.
High quality. Feels and looks like something you would use in an actual gym. When putting together must be very organized to make it easier. Some minor parts are replaced with different parts and I had some extra plastic caps and washers left over. Works great. Have been using for past 5 months. I would buy it again.
ترست بايلوت
منذ أسبوعين
منذ شهرين
