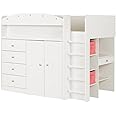
👑 Elevate her space — where study meets secret hideout royalty!
The South Shore Tiara Loft Bed with Desk is a multifunctional twin loft bed designed for kids 6+ that combines ample storage—including 4 drawers, a hanging closet, and shelves—with a retractable desk featuring built-in lighting. Crafted from non-toxic laminated particleboard in North America, it offers a safe, stylish design with rounded corners and a secret under-bed hideout accessible from two sides. Supporting up to 250 lbs, it ships in three boxes and includes a 5-year limited warranty.
Item dimensions L x W x H | 76.75 x 47 x 59.25 inches |
Product Care Instructions | Wipe with Dry Cloth |
Global Trade Identification Number | 00066311070798 |
Material | Laminated Particleboard |
Number of Drawers | 4 |
Number of Shelves | 6 |
Manufacturer | South Shore |
UPC | 066311070798 |
Item Weight | 142 pounds |
Product Dimensions | 76.75 x 47 x 59.25 inches |
Item model number | 10523 |
D**N
Go slow when building, and you’ll get good results
Finished product is quite solid for a teenager. Drawers are okay, closet area is OK, not huge, and right half door opens up into a hidey-hole area under about half the bed that any kid less than 15 or so will find a great hide away location. Ladder going up isn’t great, with round steps rather than flat, so suggest you park a chair in front of the stairs so yoir kid won’t hurt their feet. Desk around the side is cute, but the drawer opens in a strange way that is not helpful — and to close it abain you have to carefully click 2 tabs on either sode, very poorly designed.The instructions are fairly good. It is vitally impt you follow them SLOWLY and each step think carefully about which little piece goes where... many pages have diagrams that are confusing if you don’t follow VERRRY carefully which screw goes into which hole, or which orientation the board goes in, etc etc. Easy to screw up.In a couple of places — for the brackets that hold up the mattress bars — you need to kmake your own hole for the screw, or whack the melamine with a screwdriver to start a screwhole. Not too hard.Screwing the steps in proved impossible — their screws kept breaking. I used my own wood screws in the end.A few other glitches in the instructions ear the end.Mine arrived in 3 boxes, very carefully fit together. Be sure you open one box at a time... Do not discard anything, it might be important, e.g. the cheap cardvoard backing of the closet and drawers (I added a layer of my own.) Very easy to mix up right and left versions, look carefully for marks and labels, and compare what you are doing with the manual often.Very easy to confuse the little bits and pieces... screws, locks, pegs, etc.Overall it took me about 5 days working betwen 1/2 hour and 2 hours per day.Be aware that you cannot install this in a tiny area against a wall, you need to build it a foot or two away from a wall, and only then when it is done do you move it against 2 walls into the corner.Overall I am very very glad I built it. If your kid helps, give them a dozen little bowls and have them keep track of all the pegs and screws and bolts and things... there’s lots to do there.
A**R
Great Bed. Pain in the A$$ to build.
Let me preface this with the fact that I am great at building and fixing things. I originally offered to build a loft bed for my daughter and my wife said that she wanted to buy a pretty, white, girly loft with a built-in closet and desk. We ended up going with this one, which was the right call, but man was it a pain in the butt to build.First off, it arrived 6 days earlier than the estimated delivery date. The bed came in 3 separate boxes that weighed 125-150 pounds each. Getting them up the stairs sucked. There are so many darned parts that are not easily identified in the diagram. There are roughly 60 locking cams that are all the same size with 4 that are longer for a specific purpose. We couldn't tell what they were for until the very end when we figure out where they went. If you're reading this before building the bed, they go on the ladder. You're welcome!All in all, it took us 7 hours to complete. Maybe it was the 12 pack we each drank or maybe it was too many parts. it's a good bed and my daughter loves it, but I'm planning on leaving it in the room someday when we sell the house as a surprise to the future owners because I can only imagine it will be a living Hell to remove the thing!Suggestions for the company to make things easier:1) Print the instruction booklet in color. It will help to identify and differentiate the various parts and where they go.2) Have a bag of parts for each page in the booklet. Instead of having 2 bags of 30 locking cams each, a single bag with everything needed on a page by page basis would make a night and day difference in completing this build.
E**M
Dont be afraid to do this! It’s a beautiful bed! READ MY “Single Momma” HACK FOR EASIER ASSEMBLY!
Arrived in 3 MASSIVELY HEAVY BOXES. Each box had to weigh AT LEAST 200 pounds. Ok so here’s the thing- if you’re a single mom like me, don’t be afraid to buy this in fear if not being able to put it together by yourself or carry the ridiculously heavy boxes in. You can do this by yourself, and it’s actually an incredibly rewarding experience at the end when you are all done. It’s like a mini ego boost, to do something of this magnitude, without the help of anyone. Here’s the way I did this, and I hope this helps someone else!1: don’t try to lift these boxes- they are stupid heavy. Look at the labels on each box ( box 1,2,3) Open JUST Box #1 - do not touch the other boxes.2: Take all the pieces out of box one and set the pieces up in the room that the bed will be built in. Make sure you have enough free space to do 3 cartwheels and 5 somersaults. Seriously, you will need a ton of free space maneuver yourself and your project without hitting walls.3: MOST IMPORTANT STEP! Take your directions out and all of your screws, bolts, ect. Grab 10-15 bowls from the kitchen and some craft tape or self stick labels you can write on. Separate every single group of nuts and bolts and screws, and place them in each bowl along the wall. Number each bowl with your tape, by writing the actual number that correlates with that particular screw. For instance, screw #108, bolt #654, ect. The numbers of each group are in your directions. This hack will save you so much time and you will be happy you did this once you see the amount of work involved with your project. There aren’t ANY extra pieces, so don’t lose any!! If you have a big kid who can read numbers, you can ask them for help while you’re putting the monstrosity together. “Jonny, plz hand me 5 of those things in bowl #653 “ OH, and one more thing; DONT TRY TO USE JUST A SCREWDRIVER! The directions say not to use a drill, but I did and I’m pretty sure I saved myself 6 hours by doing so. Your arm will fall off if you try to use handpower for this thing. Just be careful with your cordless low power drill and don’t go too fast or hard on the screws. Slow and steady with it.4: After you’ve separated all your nuts and bolts and screws, you now have to separate your boards into the groups that go into. It will be in your directions on that first box 1 page. This is easy and will save you time as well.5. Follow each direction step by step, and once you’ve completed Box one, then move on to box 2. At this point, you need to place what you’ve constructed into the EXACT location it’s going to stay. You CANNOT MOVE THIS BED ONCE ITS PUT TOGETHER!!6: Since you’ve already separated all your nuts and bolts from box one, that’s it for those. There’s no more in the other boxes. You just need to group together the Boards in the groups they will be built into. It’s smooth sailing as long as you follow your directions (and mine lol!)7: You will get to Box 3, and want to quit. Don’t. It’s not as bad as it seems.Total project time for me; one person- 10 hours/2 days of work. Good luck!! I hope this helps someone out there!!! If you do this the right way, it will be easy peasy lemon squeeze!
ترست بايلوت
منذ 3 أسابيع
منذ 4 أيام