
Desert Online General Trading LLC
Dubai, United Arab Emirates
Desert Online General Trading LLC
Dubai, United Arab Emirates

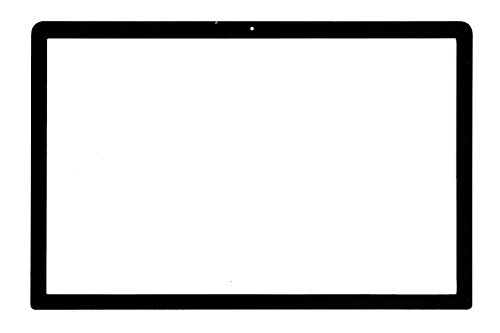
Original Mfr part - glass screen cover for 15" Macbook Pro. Fits all Unibody gloss systems. Note this is glass, but is super-thin and is flexible.
K**E
Bring your own tape, watch some youtube videos, it's not that complicated.
I cracked the screen on my Macbook Pro, big mistake. Apple wanted a crazy amount to replace just the glass and I saw this for $15 and thought how hard could it be? You're going to need some fancy double sided tape, mine was red and if you search for "3pcs 2mm 3mm 5mm Clear Double Side Strong" you'll for sure find it; you'll need a hair dryer, a guitar pick or two, and maybe even a small screwdriver. The basics are: heat up the outside rim of the screen to get the glue sticky/activated, slide the spudger or picks behind it, and work your way around the screen until it comes off. This can be tricky and you can potentially ruin your LCD screen in a number of ways: scratching it, heating it up, puncturing it, getting glue on it, etc. Watch some youtube videos first so you get the idea. It's not that complicated but it takes a great deal of care. Then go around the screen placing the double sided tape where the original glue was, clean the replacement glass with windex and a non-lint cloth, let it dry, then place it on and press along the outside edges. I had this done in maybe 30 minutes, it's not terrible and the macbook looks brand new. For $15 instead of whatever Apple charges this is a steal.
R**.
A short story of an awesome purchase :)
Perfect!This is an example of how much I love, not only Amazon, but product reviews on amazon! I was quoted $400+ to have my cracked 15"macbook pro - mid 2012 screen replaced. The cost actually would have been much more than that because it would have required dropping the computer off somewhere for a few days awaiting replacement. Since my computer is used for work as a graphic designer, that would mean a delay in getting business done. NOT good! BUT, as a graphic designer, having a crack down the middle of my screen can be quite a nuisance when attention to detail is part of my job. So, I was ready to pull the trigger and get it done professionally.In swoops amazon and it's amazing reviews. I couldn't believe what I was reading. Amature folks trying this for the first time with success. I am not a repair person by trade, however I did fix an iPhone 3Gs screen (glass and LCD) once before, so after reading these reviews, watching a few youtube videos, I was ready to make this happen!I can't say enough how nervous I was about getting started (gosh I hope I don't bust the LCD too!). So, off I went with nothing but a hair dryer (sorry I'm not certain of the wattage, but my wife tells me it's a good one), a guitar pick, a couple credit cards, a microfiber cloth, and a prayer.About one hour later, voila! Old screen removed... hello good as new screen! It took some time and sweat. I was a little nervous when I began to see the LCD get a little scuffed because I used a few old credit cards to keep the areas that I had successfuly lifted from regluing. Hindsight, I should have used playing cards instead. THANKFULLY, the scuff marks were just residual glue on the credit cards from me pushing them through. I was able to successfully wipe the marks off clean with a microfiber cloth at the end. The results were a good as new screen. Not a single mark. The hair dryer worked great, with the exception that you have to pace yourself. Mine has a safety feature that it shuts off if it gets hot too much. So, I spent a good deal of time waiting for it to cool down in order to use it again. The guitar pick (medium weight) was the perfect little wedge tool if you have on on hand.With patience and following good youtube instructions, I have no doubt that just about anyone could do this. BE PATIENT! It will work. Of course, the more shattered your screen is, the more patient you will have to be :). Best $30 I spent! PS... 2 days later and the glue is holding fine. I will update this if that changes down the road. I just cleaned the area well and heated it a little again after putting the screen back in to speed the process of the glue setting. PERFECTO
C**D
Adhesive on the glass is not good at all.
I have taken the time to take off my old glass and I have gone through all of the steps to prep the computer up for the new glass front. It does not stick very well at all from what I can see.After I removed the old glass, I completely cleaned the surface area where the new glass will be adhering to on the computer. After I cleaned the area, I cleaned it again with alcohol to make sure the surface isn't sticky from the old adhesion and I verified to make sure it was completely clean and smooth for a clean flat surface.I removed all of the strips from the new glass to reveal the adhesion and made sure my screen was completely clean before putting on the new glass front. I put on the glass front and I applied pressure around it rubbing along the front edges of the glass with a microfiber cloth to make sure it was clean on the front and stuck on the computer good.The glass fell off the first day. I immediately didn't feel right about it at all. Afterwards, I decided to try it again and this time I prepped the surface again and made sure it was completely clean and smooth. I place the glass on again performing the same steps with applying pressure and rubbing it with a microfiber cloth. Once I believed it was on as good as it can be, I then applied heat to the glass edges to get the adhesive going while the computer was laying on the back of the lid. I did that for 2 minutes to activate the adhesive on the glass and rubbed it down.I left the computer laying on the back of the lid for 24 hours to be exact. After that, I prepare to turn on my computer today and the glass front falls on the keyboard as if it was never stuck on properly.The adhesive on this glass front is not good at all.
ترست بايلوت
منذ أسبوعين
منذ 3 أسابيع
منذ أسبوعين
منذ 5 أيام