Desert Online General Trading LLC
Dubai, United Arab Emirates
Desert Online General Trading LLC
Dubai, United Arab Emirates

🔧 Lock in your heavy-duty installs with confidence!
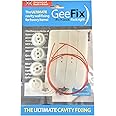
GeeFix Plasterboard Cavity Wall Fixings are engineered for professional-grade support, holding up to 270Kg. Their innovative curved backplate design fits cavities as shallow as 30mm, while extra drill points provide versatile mounting options. Ideal for heavy items like flat screen TVs, radiators, and shelving, these fixings ensure reliable, secure installations—even when re-fixing previously failed points.
| Manufacturer | GeeFix |
| Product Dimensions | 12 x 4 x 5 cm; 100 g |
| Item Package Quantity | 1 |
| Batteries included? | No |
| Batteries Required? | No |
| Item Weight | 100 g |
J**S
Best plasterboard wall fixings!!
Purchased these ones on multiple occasions, Very strong and sturdy if you need to mount something heavy and you can't drill into studs I would highly recommend these fixings.(Advice on installation)I used these a while back without any problems until recently I forgot that you have to thread the red plastic wire in the middle and one of the the side holes doesn't matter left or right hole and not the two side holes excluding the middle hole.It's very important otherwise if you thread through the two side holes and try to screw in you main large screw in the middle first you will have trouble, one - screwing it in but if you manage that, two - the red plastic wire could snap if you pull to hard you don't want that you will lose the large plastic piece down the back of the wall which is what happened this time wasting a fixing, three - the small screws for the two side holes won't line up and you will be screwing for eternity and nothing happens.(Steps)1, Drill your hole2, Cut the red plastic thread to size be generous (20cm to 25cm) more length more grip you can reuse it for multiple fixings as long as you don't snag it or damage it check after use for damage before using on second fixing and don't pull to hard it will snap.3, Thread the plastic wire through the centre hole and one of the side holes on the big plastic piece making sure the flatter side is facing you.4, Push the large plastic through the hole in the wall holding the plastic wire make sure the flatter side will be against the back of the wall or facing towards you.5, While holding both strands of the plastic wire with one hand firmly, start threading the plastic wire through the other plastic round cap remember through the same holes.6, Holding the plastic wire push the cap into the wall.7, Screw in the small screw in the vacant hole until firm not to much but not to slack.8, Now pull the plastic wire out you don't need it at this point anymore, screw in the other small screw in the other side, (tightened both sides fully)9, Now finally you can screw in your large main screw.Hope this information is useful and saves some of you some time, your welcome! 😅
A**L
Strong, reliable plasterboard fixing
I really like these fittings. The wole you need to make is quite large 25 mm, or 1 inch. And you have to be very careful with inserting the cable through and pulling tightly when inserting the Middle screw. I’ve had one or two back plates move slightly, which has needed little adjustment on my part.However once you get the knack of it, it’s very easy. I used to used them to support a heater on the wall. And also in addition to screws into studs for a very large and heavy plasma TV weighing nearly 40 kg, I used these as additional fixings to give it extra security.The fixing is so strong it gives me confidence that even something as heavy as an old 40 kg plasma screen will be held securely against the plasterboard.If you need to hang heavy items Onto plasterboard, these are a really good go-to item. The only slight thing you may need to be aware of, is that the front flange is quite large and unless it’s going to get covered by your bracket or fixing, it will show a little.However in my case security of fitting was more important than the slight aesthetic’s of this.
G**E
Quick and easy to install
Great product, quick and easy to install and solid too. Highly recommend
R**B
Great fixing for heavy items
Great product and very easy to install. The only problem I had was using them to fit a window Roman blind close to the window frame. I don’t think I left enough room and found the two smaller screws difficult to locate after the retaining plastic wire had been removed. However was able to fit the blinds securely. The fixing seems very strong.
J**N
The only choice for heavy items in plasterboard
Excellent first impressions. Secured a bike with an ebike conversion kit and battery weighing approx. 13kg total, plus tool bag. Although time and repeated hanging will tell. Beware of wall thickness / depth. Installation was complicated by thick plasterboard (50cm?), meaning the supplied screws were useless as they were too short and had to be swapped out. Once that was solved, the installation was easy - just make very sure that the holes are aligned before screwing or you risk losing the anchor when you remove the installation cord. I learned through previous harsh experience that most fixings cannot handle this sort of weight in plasterboard. However the GeeFix anchors appear to be very secure and capable.
G**Y
Great product
Hanging a 6x4 foot 35kg heavy mirror on hollow wall, seems to do the job perfect. These have a bigger surface area to work with and mirror is secure
D**N
Baffled
Sounded like a good idea, but I'm at a complete loss how to use them. I noticed some people said to watch YouTube video and ditto; seems pretty complicated.Looks like you've got to drill a dirty great hole to thread the plastic through and then something to do with what looks like a bit of cord off of a strimmer.I just couldn't understand what this bloke was mumbling on about?I'm just going to have to go back to the drawing board and bodge it. Bit of hard board, some no nails and take my chances lol!Once again, the local charity will be benefiting from my DIY failures and naive approach to sourcing a solution. Maybe someone will be able to work it out and have a use for it...If the hardboard plan fails then the wall fixture will be consigned to the bin where it can join all of the other DIY catastrophes.
ترست بايلوت
منذ شهر
منذ 3 أسابيع