🪑 Glide into outdoor comfort with style and silence!
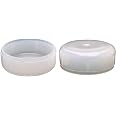
These 16-pack 1-1/2" wrought iron patio furniture feet caps are precision-engineered plastic glides that protect outdoor surfaces from damage while ensuring smooth, silent movement. Made in the USA with UV-resistant materials, they offer durable, weatherproof performance and easy installation for wrought iron tables and chairs.


A**R
Durable and stays inserted
This product meets my needs perfectly for replacement sliders on my wrought iron patio furniture. They are extremely durable and while snug inserting they stay in place until worn and ready for replacement. Great product.!!!!!
M**N
Na
Thanks
H**8
Installation was a learning experience
Let me start out by saying these end caps are virtually identical to the OEM caps that came installed on the furniture, that is what I was looking for. I would have liked them to be a little thicker in the surface that wears but, that would have made them even more difficult to install - see below.Installation was a learning experience and I am posting this review primarily to help others learn from my efforts. I read with interest all the reviews about the end caps and techniques to install - prying in with screwdrivers, squeezing in with channel lock pliers, beating in with a hammer and a block of wood. I tried each and every one with limited success. What worked for me the best was to buy a 99 cent worm screw clamp at a hardware store (auto parts store would be fine) that would open to 1-1/2 inches, place the end cap in the worm screw clamp and tighten it down until the edge of the end cap were deformed smaller and drop the worm screw clamp and end cap assembly in very hot water and leave it in there for 3-5 minutes. I then fished it out of the cup of hot water with a screw driver (be careful, it is HOT, I wore gloves), immediately remove the end cap from the clamp (be careful it’s still HOT), placed it into the recessed area of the furniture where it belongs and pressed it in/down firmly/hard, light tapping with the hammer if required. If it doesn't pop right in, flip the furniture over so the end cap is on the floor, lining up the end cap with the recess and but weigh on that leg of the piece of furniture. A few times I had to re-clamp and re-heat the end cap and try again. This method worked well for me and I installed 16 end caps fairly quickly. I would buy again, it is what originally was installed on the furniture, installation will go much quicker next time, no more rust stains on the floor.
L**N
Car coasters
I like them and they fit well
R**.
They fit, a little hard to get in.
I am happy these exist. I needed them so my outdoor furniture doesn’t scratch up my new deck. The fit needs to be tight so they stay in place. That means they’re a bit difficult to bang in with your hammer so that all edges are inside the metal. Some said that soaking them in very hot water softened them up to make it easier.I tried that, but it only helped a little. Eventually I got all 16 in place. Nonetheless, I recommend if you need them. They work great. None have come out. Make sure you order the right size.
W**E
So HARD to install
So I've been saving bottle caps to put under the feet of these wrought iron patio chairs when it occurred to me that Amazon probably has a REAL product to do that.. And they do!These gliders come in 1.5" and 1.25" and apparently I need something in between. Tried the smaller size and returned (not even close). According to the package the inside diameter of the feet needs to be 1.5" and these should work. However, they do not want to go in easy, and I tried all the advice people gave (mallet in one side then the other, align very straight and pound in correctly, boil in water to soften first), and I tried a few other methods involving cursing and breaking nails. Now, I'm NOT an un-handy person, I am telling you this is strangely difficult. The pieces are too darn big! IMO they are tapered in the wrong direction; they are flared out from the outer edge and get more narrow at the cap. It would be much better to install if that was opposite.I ended up grinding down the rim of the sliders on a stone lathe so they could get started in the feet. After a couple pounds, if they were getting mangled I then needed to push in the edges with whatever needle-nose pliers, file, or small instrument that would work. Eventually I got them all inserted, and in that time our fencers installed 8 posts. Sometimes things just can't be easy.I will say that except for the few I smashed in against their will (with a frightening litany of complaints) the more properly inserted ones are not going to be falling out of their own accord and the thickness of the plastic ensures many years of use.
L**.
Patio furniture feet protectors
As much as the reviews made these sound like they would be a struggle, we found them to fit our chairs perfectly. I really do think it deo nds on the brand of furniture as they would not work on some table feet. They worked perfectly for my needs to protect a new deck with some spares to keep on hand. Seem sturdy and effective. It's the luck of the draw as to how easily they work for you.
C**E
Exact replacements, it appears... And we needed a bunch!
Seems to be the 'exact replacement' for the leg caps on our deck furniture, and a lot less costly than what we , usually bought from "a local source". Only problem: they came only in packages of four for $4.99/ea. and after five or more years, we often needed to replace as many as twelve at at a time. This year, it was EIGHTEEN ... and of course, cannot be found at our 'usual source' UNTIL a bit later in the season (guess March is not considered to be "deck season" yet, by some stores). So, finding this package of 20 for just $15 ($14.97) made this year's 'maintenance' on our deck furniture a breeze.... it probably took me less than ten minutes to replace them all. Luckily, on that day, we had an 'unseasonably' warm sunny day (almost 75 degrees), and simply allowing them to "warm in the sun" in a small black tray made these super simple to install. They mention softening these in hot water, but our blazing high-altitude Colorado sun did the trick in minutes. I think I'm going to order more for "the next time" and already be prepared for when they're actually needed... and not even have to wait for Amazon's two-day delivery! Great deal on a 'necessary part' for our "outdoor living", IMHO
ترست بايلوت
منذ أسبوع
منذ 5 أيام