Desert Online General Trading LLC
Dubai, United Arab Emirates
Desert Online General Trading LLC
Dubai, United Arab Emirates


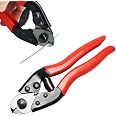
✂️ Cut clean, cut smart — your DIY game just leveled up!
The Muzata Cable Cutter CR12 is a robust, precision tool crafted from hardened Chrome Vanadium steel, designed to cleanly cut wire ropes up to 5/32" thick. Featuring ergonomic rubber grips and a safety lock, it offers safe, one-handed operation ideal for both industrial and home DIY projects like cable railing, fencing, and bike brake maintenance. Lightweight and portable, it pairs seamlessly with Muzata’s cable railing systems and accessories for professional-grade results.


| Manufacturer | Muzata |
| Part Number | MZZ0069 |
| Item Weight | 11.3 ounces |
| Product Dimensions | 3.54 x 2.36 x 0.79 inches |
| Item model number | CR12 |
| Is Discontinued By Manufacturer | No |
| Size | 5/32“ |
| Color | Red |
| Style | 1Pack |
| Material | Chrome Vanadium Steel |
| Pattern | Cable Cutter |
| Item Package Quantity | 1 |
| Number Of Pieces | 20 |
| Handle Material | Rubber, Stainless Steel |
| Usage | Amateur |
| Batteries Included? | No |
| Batteries Required? | No |
ترست بايلوت
منذ أسبوعين
منذ 3 أسابيع
منذ 3 أسابيع
منذ شهر