معلومات عنا
دعم العملاء
احصل على التطبيق

قم بتوجيه الكاميرا لتنزيل التطبيق
حقوق الطبع والنشر © 2024 Desertcart Holdings Limited


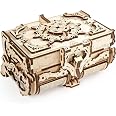
🐴 Build, Create, and Gallop into Fun!
The UGears Horse Mechanoid is a 410-piece, self-propelled wooden model kit designed for adults. This educational toy combines engineering principles with artistic creativity, allowing you to assemble a walking horse without the need for glue or tools. Perfect for enhancing STEM skills, this model is a unique blend of history and innovation, crafted from high-quality engineered wood.
| Manufacturer's Suggested Maximum Weight | 1400 Grams |
| Educational Objective(s) | Numeracy, Literacy & Spatial Awareness |
| Model Number | 70054 |
| Number of Game Players | 1 |
| Number of Puzzle Pieces | 410 |
| Assembly Required | No |
| Batteries Required | No |
| Batteries Included | No |
| Material Type(s) | Engineered Wood |
| Material Care Instructions | Attention! Not for children under 14. Contains Sharp Parts! |
| Remote Control Included? | No |
| Colour | Natural Wood |
| Product Dimensions | 37.8 x 17 x 4.2 cm; 1.36 kg |
| Item model number | 70054 |
| Manufacturer recommended age | 0 - 6 years |
| Manufacturer | Ukrainian Gears LLC, Ochakivska str./Ochakivsky Lane 5/6, 03151, Kyiv, Ukraine |
| Country of Origin | Ukraine |
| Imported By | Shrishti Mech Puzzles Pvt Ltd, Gurugram, Haryana |
| Item Weight | 1 kg 360 g |
J**M
Beautiful mechanical horse is fascinating and ingenious Rubber band breaking is an issue.
This horse is striking in appearance. It looks wild and spirited. It is quite a conversation piece on its looks alone. I would give it five stars alone for that. Movement is not as spectacular, but it does move. There’s a winding key and start/stop control levers. The horse is not able to take more than 5 steps without halting or simply falling over. It looks like the last motions of a horse before succumbing to the effects of a trank dart. The kit is a real bear to assemble. The instructions must be heeded. You may find you have to flip ahead a few pages at times to see just what this subassembly is that you are working on and where it is supposed to go. I knew at the start that I would need to sand the pieces and use the provided wax. Ther's not a whole lot of wax. It’s a 1 inch slice of a candle but the important thing is that it enough for the horse. The wax is somewhat soft, like beeswax. I had no problem with missing pieces. There are six boards with laser cut parts. If you don't see anything missing, you have all the parts. Assembly is a bit tedious and somewhat painful. As the model continues to take shape and become more horse-like there is the adrenalin surge all model builders feel when they are nearing the end. Once assembly is completed the key is wound and switch is moved. My model just sat there. C’mon little horsy, let’s go. Well, back-winding the key overcomes the initial friction and horse begins to haltingly show movement. Lots of going back and forth with the key helps to distribute the wax and the horse becomes more limber. After lots of massaging like this you can get the horse to take 4 or maybe 5 steps. Max is 9 and only rarely achieved. It will usually fall over to announce it is finished walking. Well and good. It is still a cool model and I would build one again. I’m giving it 5 stars but 4 would be reasonable too. I wish it walked a bit better and that the instructions had a bit of expository text. This is a worthwhile model that will occupy 8 hours of your life in assembly. It is ingenious.I have a few hints on this horse:Mine locked up once while fully wound up. I could not get it to operate at all. I tried moving the legs and rapping the body with my knuckles. Nothing! My horse was dead. It was not until I grasped the horses neck and moved it forward and back that the gears unlocked. This only happened once, but it was super frustrating as I was contemplating opening up the entire model to fix it.Understand at the outset that this horse can’t walk for long. If you watch the clever videos the horse appears to leave its stall and seems to be on a journey to a pasture or whatever. If you look closely the horse only takes a few steps in each scene. Clever editing makes it look like the horse can go on a pastoral journey. Not really complaining because all the ad copy and literature says the horse can’t go far. This is only a problem if your expectations are too high and unrealistic. It is what it is, a model of mechanical horse. So enjoy that as I do I.My rubber band broke. I suppose it had a nick in it that grew over time. I was able to cut out the broken piece and retie the rubber band but it is not easy working in the body of the assembled model. So do examine the length of the rubber band before assembly.Update on the rubber band issue 5 days later:The rubber band broke again. No, I haven’t over wound it. I’ll have to see if I can get a replacement from somewhere.The rubber bands for the horse’s mane and tail are genius. Looks great and the bands lie perfectly when cut. I was worried I’d need hair styling skills to make the horse look good. It was no problem.Seriously, sand everything. Knock down the edges of the large pieces as well so they lose their painful sharpness. If you have to reach into the interior of the model later you will be glad you did.Some parts are seeming impossible to press together with human hands. I finally resorted to a small furniture clamp with soft jaws to supplement my finger strength. I think pliers or small c-clamp would work, as well.A cushiony work surface was helpful in supporting a board while I was breaking a part loose from the board. I used towel I use for assembly projects.It really takes 8 uninterrupted hours to assemble this model no matter how skilled you think you are. If you leave out trying to be extra careful and the extra sanding I guess you could do it in about five.On page 13 of the instructions I was confused. The diagram seems to suggest that the rubber band should be folded upon itself in thirds. After puzzling on this I covinced myself that doubling the band was correct and it turned out to be right choice.Check for proper operation of parts during assembly. In some steps you are "told" to operate the key and check that the parts move freely. This is very important. Once the horse is fully assembled getting back inside it is a difficult task since gear timing must be maintained.There is a down side to using the wax. Your hands will get a coating of wax and when that is transferred to the horse there will be discolored spots. Try to keep the wax from where you don't want the wood to darken. I washed my hands frequently and still ended up with a horse that is more pinto than wood white.There are no troubleshooting hints in the instructions. If you can't find help on the website you are on your own. I do have a vibe from Ugears that they are helpful and I think you can correspond with them and get help if you have a bad problem.
村**則
暇つぶし、両手震えのリハビリに。
暇つぶしにはもってこい、中々難しくて組ずらいがリハビリにはもってこいに思える。
E**N
Wonderful!
The first one I bought my daughter and I, we were hooked.The instruction are fair with showing what needs to be done in what order.(I admit, I have to go back and take things apart cause I put a piece on backwards or something like that.)The panels with all the pieces are nicely labeled and some are easy to pop out; others not so much. Not sure if it's the wood or the cutting but some piece just don't want to come off the panel. And because of that, pieces break very easily when given to much force.(I might break out my hobby knife set just to cut out the pieces, we'll see.)Overall, lots of fun!
O**Y
Nice looking, but challenging model
This is a very challenging model to put together. I have done others (simpler ones) and thought I was prepared for this one. The biggest take away is make sure the gears work at every level. I thought I could fix the sticking issue with the base gears as I went along, but that was not the case. After the rubber band was wound they didn't engage at all so I tried to break the model back down and the rubber band (with no way to release the tension) snapped half the model into tooth picks. My fault and not the model's. With a lot of wood glue I got it put back together as best I could and it looks good. It just doesn't do anything because of my fundamental mess up. Also the last few pieces are very tight so if you make a mistake it's very hard to remove those bracing pieces so keep that in mind. I may try another of these with what I know now because it is a very cool, interesting model. The engineering aspects are very impressive.
M**T
Great fun. Take your time. Sand it well.
This was a great build! Looks wonderful. I use a wet/dry 600 grit sand paper on all moving parts and any parts that a moving part will touch. And all the holes as well. Complete the body first and adjust so it runs well. Jump to the legs. Put on one leg at a time, wind it and make sure it runs smooth. Do this with each leg. Using a high grit sand paper you will not need the wax. The wood will be very, very smooth. It walks okay. Not too far but it really looks like art! (Careful attention not to sand the gear teeth too much)
ترست بايلوت
منذ شهر
منذ شهرين