Desert Online General Trading LLC
Dubai, United Arab Emirates
Desert Online General Trading LLC
Dubai, United Arab Emirates

🌊 Dive into Elegance!
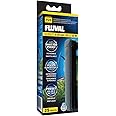
The FluvalSPEC Aquarium Kit is a 5-gallon etched glass aquarium featuring a high-output 7000K LED lighting system and a powerful 3-stage filtration system. Designed with a contemporary aesthetic, it includes all necessary components for a seamless setup, making it perfect for indoor use while ensuring superior water quality for your fish.

| Material Type | Glass |
| Color | White |
| Item Shape | Rectangular |
| Style | Contemporary |
| Item Weight | 5 Kilograms |
| Item Dimensions L x W x H | 20.5"L x 11.6"W x 7.5"H |
| Tank Volume | 5 Gallons |
| Target Species | Fish |
| Specific Uses For Product | Indoor |
| Additional Features | LED LIGHTING AND 3 STAGED FILTRATION |
K**E
Love LOVE my Fluval Spec V.
i love my Spec. absolutely adore it. i almost didn't buy this one because i had read it needed a lot of modifications to make it suitable for a betta. and that's correct, it does. but after doing a lot of research on tanks i decided to take the plunge. i'm so glad i did! it has been an absolute joy!what actually prompted my confidence in purchasing this tank for my betta was reading through the Amazon reviews. one review in particular, the one with purple and pink sand (or maybe just purple but i'm pretty sure it's bright purple and pink) laid out everything i needed to know. so thank you to that person for blazing the trail.i ordered this tank with the prefilter sponge, also by Fluval but you can find generic/other brand prefilter sponges. and that was basically it! the vast majority of people recommend the Hydro Theo heater, also available on Amazon for around $15...the heater is a bit finicky but you will soon discover that all aquarium heaters are finicky. that was actually the hardest part of this tank...figuring out where exactly to set the dial....for example, my heater is set on like 75 to keep the tank at 80...but this isn't a review on the tanks heater...you'll figure it out. also, i do have 2-3 small pin holes in the outflow tube....to circulate water around the heater...which, by the way, the hydro theo heater fits perfectly in there. i honestly don't see why fluval didn't design this....where else exactly would you install a heater in this tank? especially considering if you didn't keep a heater in the pump compartment....but in the main tank...the lid wouldn't close flush to the tank...the wire would prevent that. so it seems like fluval intended for users to put the tank in the pump compartment...but probably for legal reasons didn't suggest so because technically all heater manufacturers say not to let anything touch the heater....but everyone i have come across does in fact ignore this to put the heater in the pump compartment.with the prefilter sponge over the outflow...i kept the pump on high. a lot of people recommend keeping it on low but with the prefilter sponge i kept it on high and it worked out. i will say keeping the tank at an equal temperature was a challenge with the sponge. the bottom half of the tank stayed 4-5 degrees cooler than the top...a problem that really bothered me.now i have built a DIY spray bar like device over the outflow (see my picture) that works GREAT! the tank has a current...isn't too strong for my betta....more detritus makes it way to the inflow.....and the tank is the same temp all the way through. it cost about $14 bucks through ZooMed, 50% of which was shipping. i highly recommend doing this if for a betta...simply google 'fluval spec spray bar.' you will find the part numbers and a tutorial. the pump is now on low.also, if you are keeping this for a betta....and have a prefilter sponge....you must install an air stone. otherwise you are going to really reduce the flow and be prone to serious biofilm.....it goes away but it comes back. now that i have the DIY spray bar the flow is much better, still betta friendly....but i do still keep an air stone on low in there.i love this tank. and i have completely fallen in love with the aquarist hobby.also, the auxiliary slit towards the bottom of the false wall....it doesn't prevent all the flow to be redirected from the main filter....but some. i solved this problem by buying a silicone laptop USB plug designed for a macbook on eBay. it costs less than 99 cents...fits so perfect. like it was designed for that purpose. this may be an easier way to plug that hole up instead of silicone....my betta parks himself right on the intake grate...at first it freaked me out....he enjoys that spot better than his betta hammock. even with the flow on high it was not enough to suck his fins through the slits....every morning when i turn on the light there he is, asleep. it's super cute actually. even my snail goes across the intake grate to feed on detritus and he isn't sucked in. keep in mind, this may not be the case for your inhabitants. so be careful. i do believe every betta in this tank does the same. if you're worried, take the handle on the sponge filter....lift it up and tie a bread-tie or even better the black one that are wrapped around the pumps cord from the packaging to hoist it up over the slits. i didnt bother...this tank does require modification....which i stated earlier almost deterred me from purchasing it. however, i think you'll find that every tank is going to be far superior to some DIY modifications. there is so much information regarding this tank online you should have absolutely no problem making it work for you.this tank is a bit more expensive...but you will be glad you got this one. it is high, high quality....the Cadillac of nano tanks so to speak. fluval is also amazing for customer service...i accidentally ripped my outflow tube trying to get the elbow off of it...they shipped me out another one for free, no questions asked, for warranty...they didn't even ask for proof of purchase....i love this tank. i truly do. and i can't wait to get another Fluval, this time the Fluval Flex 15 gallon.also, ordering a tank online comes with risk of damage in the process of shipping. i was worried. this arrived very well insulated...and it's $20 cheaper than at PetCo or Petsmart. everything you need to get this tank up off the ground and running smoothly is right here on Amazon....don't waste more money than you need to at a major pet store.please get yourself this tank! don't be afraid of the modifications.....DO IT!UPDATE 8 October 2018:my aquarium sprung a very small leak....it has been leaking water out from under the base....i assume this leak is on the seals holding the bottom glass into the tank. i contacted Hagen Fluval, sent them pictures, explained my situation and they have shipped me out a new tank/glass only portion of the Spec V. They had absolutely lovely customer service.
K**A
I like the sleek look of the stock LED light
Received my Spec III this morning. First, let me say that I was more than pleasantly surprised to find that these are now shipping with a new and brighter 7000K LED light. This is huge! I bought the Spec III with the understanding that the stock light it was shipping with is not bright enough to grow two of the plants SubstrateSource Staurogyne repens "Low Grow" Potted Live Aquatic Freshwater Aquarium Plant and SubstrateSource Hemianthus callitrichoides "Dwarf Baby Tears" Live Aquatic Aquarium Plant I have on order, and have been researching aftermarket nano aquarium LED lights for a week. However, I like the sleek look of the stock LED light, and found nothing aftermarket that looked good or performed reliably. I am EXTREMELY concerned with both aesthetics and functionality.I had resigned myself to leaving the stock light on and buying a tall swing arm desk lamp and a CFL grow bulb and directing the light down into the aquarium. The aquarium is going on my desk at work, so this wouldn't have looked bad. However, I no longer have to do this as the new LED is the correct color temperature (7000K) and claims to be high-output. Not sure what the wattage is, but it's bright. So long as it's reliable, I am very happy. It mounts ridiculously easy and is very simple and sturdy in its construction - consisting of not much more than a one-piece aluminum arm and shade, and the LED light board. I was also very pleasantly surprised when I realized that the black square on top the light is a three-way touch switch (1. full-strength, 2. just the four blue lights, and 3. off).The Spec III's design is modern and clean (if Ikea designed an aquarium, it would look like this) and the filtration system is hidden well in the reservoir at the rear of the tank. I love the fact that none of the aquarium's filtration components (with the exception of the small, angle-adjustable outlet nozzle) are in the aquarium itself. In fact, there is room in the filtration reservoir for a small heater and I have a Neo-Therm Heater, 25 watt on order. The only thing I would change are the aluminum trim pieces at the corners. I would prefer rounded glass edges (at least on the front) like those on the Penn Plax Vertex Shrimp Tank, 2.7-Gallon by Penn Plax, INC..Finally, the Spec III's dimensions make the aquarium look deceptively larger than it is. At the moment, it sits next to my Penn Plax Vertex Shrimp Tank, 2.7-Gallon by Penn Plax, INC., and while the Penn-Plax is a tenth of a gallon larger, the Spec III looks to be significantly larger. I am very impressed with this aquarium, and think it's a bargain at this price.Update: 17 July 2016.So far, I think that the 7000K light that the Spec III is now shipping with will be adequate to grow any plants that I choose, and I finally pulled the trigger and installed a DIY CO2 Aquarium Plant System. This system is designed to use two 2-liter soda bottles with baking soda and citric acid. However, I like to keep things as simple and inexpensive as possible, so I went with one 2-liter bottle and a mix of: 1/2 tsp of yeast (that my wife already had in the fridge), 1 tsp of baking soda (again, my wife already had this on hand), 2 cups of sugar (again, well you know), and 1 and 3/4-liters of lukewarm water. Check out the following link for full instructions.http://www.aquatic-eden.com/2006/09/diy-co2-recipe-duration-vs-intensity.htmlThis setup should provide a steady stream of CO2 for two to three weeks and I am astounded at the amount of CO2 that a 1/2 tsp of yeast can produce!Removing the filter sponge, I ran the tubing from the yeast bottle so that the end is pressed flat toward the bottom of the power head, and reinstalled the filter media holding the tubing securely in place. You have to fiddle with it a bit to get the power head to suck the CO2 bubbles in. Again, the end of the tube must be situated flat against the lower portion of the power head, or the bubbles won't get sucked in.The power head does an excellent job of dissolving the CO2 into the water as its impeller rips the CO2 bubble into hundreds of tiny bubbles and spits them into the aquarium. The key to efficient CO2 dissolution into the water column is increasing the amount of time that the CO2 bubble is submerged. With this setup, the CO2 bubbles are submerged for a long time. First, they spend some time in the power head and the tube connecting the power head to the outlet nozzle. Then, due to their very small size, they spend a lengthy amount of time in the aquarium's water column circulating around the entire aquarium. Be sure to angle the adjustable outlet nozzle down to minimize surface water agitation and to blow the bubbles down to increase their submersion time. Another key to keeping CO2 in the water column is minimal water surface agitation.I am no expert, and this is my first CO2 system, however, this setup is working ridiculously well. I am getting a CO2 bubble approximately every two seconds, and the outlet nozzle pushes the CO2 bubbles down to the substrate. At any given moment, there are hundreds of tiny bubbles floating around in the water column and sticking to the plants, especially under the leaves. In the photos below, it looks as though the water is filled with floating debris, however, the water is crystal clear - what look like debris are all bubbles. The aquarium is literally brimming with CO2.Again, I am no expert and don't have a test kit, however, I think there may be too much CO2 in the water to keep fish. But, at the moment my concern is the plants. I've read that SubstrateSource Staurogyne repens "Low Grow" Potted Live Aquatic Freshwater Aquarium Plant and SubstrateSource Hemianthus callitrichoides "Dwarf Baby Tears" Live Aquatic Aquarium Plant do best in a very high-light and CO2 environment. This being my first serious attempt at aquatic plants, I want to do everything (within reason) to succeed! So far, so good - I think.Update: 23 July 2016.I received the rest of my plants yesterday and executed my first attempt at a planted aquarium. At this point I have, 4 SubstrateSource Staurogyne repens "Low Grow" Potted Live Aquatic Freshwater Aquarium Plant, 4 SubstrateSource Hemianthus callitrichoides "Dwarf Baby Tears" Live Aquatic Aquarium Plant, and 2 SubstrateSource Anubias barteri "Petite" Live Aquatic Aquarium Plant. Still waiting for the water to clear, but I am happy with the results thus far.UPS is due to deliver my Rhinox Glass Drop Checker - 3 Seconds to Read CO2 levels: 3 Minutes to Setup: Fastest way to ensure sufficient CO2 in Planted Aquarium today, so I should have a good idea as to the water's CO2 content shortly thereafter.More to come.
ترست بايلوت
منذ أسبوعين
منذ شهر