Desert Online General Trading LLC
Dubai, United Arab Emirates
Desert Online General Trading LLC
Dubai, United Arab Emirates


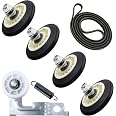
🔥 Revive your dryer’s performance and never miss a dry day! ⚡
This upgraded dryer repair kit for LG and Kenmore dryers includes 4 durable rubber drum rollers, a galvanized steel and plastic idler pulley, a 92-inch non-cracking rubber belt, and a spring. Designed to fit a wide range of models, it solves common dryer issues like failure to tumble, start, or noisy operation, delivering reliable, long-lasting performance backed by attentive customer service.


ترست بايلوت
منذ أسبوعين
منذ شهرين