

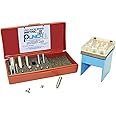
🔧 Punch Perfection Awaits!
The Precision Brand Metric 10 TruPunch Punch and Die Set with Stand is a high-quality tool designed for professionals who need to create custom washers, shims, and gaskets quickly and efficiently. With ten punch sizes and nine I.D. pilot sizes, this set offers versatility and precision. The sturdy steel die stand provides solid support, while the elevated die design minimizes burrs and protects the punches, ensuring a seamless fabrication experience.
S**R
Good punch
The punch does the job. It has more punches than many of the other sets and actually has 3mm punch, where most only have 5mm as the smallest.
S**Y
Makes perfect gaskets, everytime
This is a well designed and well engineered product, which does one job, and does it perfectly.Its job is to punch correctly sized round gaskets, with an interior hole of the proper diameter.Every gasket I have punched has been perfect, and each one only takes a few moments to do.The package comes with a slip of paper inside the die, which you cannot fail to see, since this paper must be removed to use the die. This paper warns you that you must perform the initial break-in of the punch and die set, and failure to do so will void your warranty. HOWEVER! No instructions were included telling how to do this break-in, or for that matter, how to use the set to make gaskets.I consider this a serious omission, since if you don't know what to do, you are likely to ruin one or more of the punches and/or the matching die.Searching the Precision Brand website, I did find a video that shows how to perform the initial break-in, and how to make gaskets. It is found here:[...]However, the break in process is quick and easy, so I will detail it here. I also include the gasket making process.The following one-time break-in process must be repeated for every size punch in your set:1) Always use the punch and die set on a soft surface, like wood or plastic. Do your gasket punching (and break-in) on a wooden or plastic table, NOT metal, not marble, not granite, not anything else that can damage the cutting edges of the punches when they fall through the die.2) Turn the die set upside down so the plexiglass (perspex) guide plate is DOWN and the metal die plate is UP.a) The guide plate is to keep the punches concentric to the die holes, and perpendicular to the die plate when punching gaskets.b) Place the plexiglass guide plate face down on something clean and soft, so you won't scratch that pretty plastic surface while doing the break-in process.3) Take one of the punches, and place the cutting end into the matching sized hole in the metal die.a) The sharp end of the punch is the cutting edge.b) The chamfered (bevelled) end of the punch is the striking end (the end you hit with your hammer).4) Using hand pressure only, slide the punch down inside the hole of the metal die till the cutting edge of the punch is resting on the plexiglass.a) If the punch slides into and through the plexiglass hole easily, then you got lucky. This metal die hole and the matching plexiglass guide hole are already well aligned and sized.5) If the punch will not pass into and through the plexiglass guide plate easily, then use a hammer to strike the punch squarely and firmly, but not heavily.a) The cutting edge of the punch will scrape a bit of the plexiglass away, enlarging the guide hole slightly, wherever it is slightly tight.b) You will see a little bit of plastic swarf on the end of the punch. Clear it away each time.c) Repeat steps 4 and 5 as necessary for this punch, till it passes through plexiglass guide hole easily with only hand pressure, and you see no more plastic swarf.d) Rotate the punch a bit each time you insert it for step 3, so that it will scrape the circumference of the plastic guide hole more uniformly.6) When you think each plexiglass guide hole is properly broken in, check the punch, the die, and the guide hole with this procedure:a) Turn the die assembly over, plexiglass guide plate UP, metal die plate DOWN.b) Place the punch into the guide hole and make sure that it enters the die hole easily and does NOT rest on the edge of the hole in the die.c) The punch MUST be centered by the guide hole so that the cutting edge of the punch will not chip (or be chipped by) the cutting edge of the die.d) Remember to turn the die set upside again before breaking in the next punch and guide hole pair. (Plexiglass guide plate DOWN and metal die plate UP for break-in process).7) Repeat steps 3, 4, 5, and 6 for each sized punch in your set.8) After you have performed these steps for every punch in the set, the punch and die set is ready for use.To make gaskets or shims with an interior hole, it takes the use of two punches. Follow this procedure:1) Again, always use the punch and die set over a surface that will NOT damage the metal punches when the punches fall through the die.2) For gasket punching, place the die set with the plexiglass guide plate UP, and the metal die plate DOWN.3) Pick out the proper sized punch for the interior diameter (the hole) of the gasket.a) At this time, pick out the matching pilot for the internal diameter. The pilot diameter is the same as the diameter of the interior punch. The pilot will be used in step 9, so set it aside for now.b) Always punch the interior hole first, because it is used later as a guide when punching the exterior diameter of the gasket.4) Slide your gasket material in between the plexiglass guide plate and the metal die plate.a) You can see through the plexiglass to place your material so that you can punch a complete gasket.b) Remember that the gasket you will be punching is bigger than the interior diameter you are about to punch, so make sure you have enough clearance around the gasket-to-be for the exterior diameter.5) Place the chosen punching spot in the material under the guide hole for the interior diameter die.6) Slide the interior diameter punch into the guide hole, and push it down by hand till it contacts the gasket material. Wiggle the punch by hand a bit to make sure it's centered in the guide hole.7) Strike the punch firmly and squarely with the hammer. It should punch the interior hole through the material with one strike. Push by hand or lightly tap the punch with the hammer to push it the rest of the way through the die and out.8) Pick out the punch for the exterior diameter of the gasket. Notice the small hole in the cutting end.9) Get the pilot for the interior diameter, the one you picked out in step 3a. Place the interior guide pilot into the small hole in the cutting end of the exterior diameter punch.10) Slide the gasket material sheet (with the already punched interior hole) into the die between the plexiglass guide plate and the metal die plate. Move the sheet around under the guide plate until you have roughly centered the already punched hole under the exterior diameter guide hole.11) Insert the exterior diameter punch, with the already inserted interior pilot. Lower the punch down till the interior diameter pilot is trying to go through the already punched hole in the gasket sheet.12) Wiggle the gasket sheet around till the pilot fully and completely enters the punched hole,and the exterior diameter punch rests on the gasket sheet.13) Also wiggle the punch around a bit to make sure that it is centered in the guide hole. This insures the exterior ring will be concentric with the interior punched hole.14) Strike the punch squarely and firmly. The punch should punch through the gasket material with one strike, and a perfectly formed ring gasket will drop out of the die.15) That's it, you're done!
ترست بايلوت
منذ أسبوع
منذ 3 أيام
منذ 3 أسابيع
منذ يومين